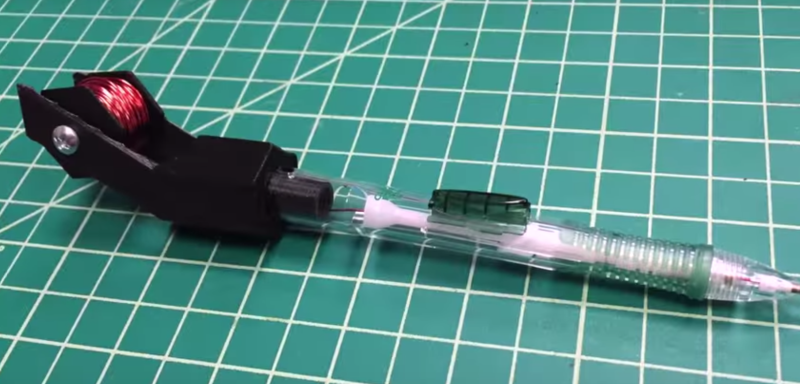
Looking for an easy way to manage wire when prototyping PCBs? Ever consider using a mechanical pencil to dispense it? Turns out, it works pretty well — and all you need is a 3D printed attachment!
[Proto G] is using a Papermate 0.5mm mechanical pencil, which means if you get 0.5mm wire (or solder) you can use it to dispense the wire without tangling your spool. In the demonstration, he uses 0.5mm magnet wire which has a thin enamel coating on it and melts away easily when you solder it.
The 3D printed wire-spool and guide snap onto the back of the mechanical pencil allowing you to load it up with a considerable amount of wire for prototyping. He has all the .STL files available on his Instructable in case you want to add this tool to your workshop.
Next up, why not make a solder paste dispenser too?


Hacker ingenuity at it’s finest!
looks like a vector[vero?] slit & wrap wire wrapping pencil
Yes, I thought the exact same thing. I remember using a Vector Electronics “Slit-N-Wrap” tool long ago. I think you can still buy them somewhere. I remember the tool was like a hundred bucks and the special Slit-N-Wrap wire was like a quarter of a dollar per foot and came in spools of something like a hundred feet. I thought it was kind of a kludge. I went back to hand-cut and stripped wire with a squeeze wrap tool. A bit slower, but better wraps. Where the Slit-N-Wrap really shines is when you need to wrap things like wide digital back-planes where you jump along from one wrap to the next. But even then there were even faster true insulation displacement wrap solutions – if you could bring yourself to trust them.
This is nice and all but maaaaaan you don´t need a frickin 3D printer for every little hack.
That technique is as old as wire-wrapping and there are numerous selfmade versions without
the need to print some fancy stuff first.
Sometimes I think that 3D printing does kill some real ingenuity aka using whats lying around…
Thank you for saying what I was thinking.
As an owner of a few 3d printers I can say that once you have them you do kind of fall into that old saying of “when all you have is a hammer…”. It’s very easy to think, “wait, I could just draw that and print it” instead of “oh, I have something like that in the junk drawer that I could modify to work”. It’s strange :)
But there is something satisfying with CADing something that is made just for that particular task.
Add something to cut and loosely hold the wire and the innards of a BBQ lighter to strip the ends as required and you have an almost perfect tool.
I think a metal ended pen might be better for that addition.
Hey… It’s not new !!
This tool existed for about 30 years.
But was not made on 3D printer. :D
And now, everyone can see another example how usefull 3D printers are, why using something was lying around and modified it, print new. Praise new god.
I reuse empty dental floss container for dispensing fine solder. I wonder if that would work well for cutting magnetic wire and may even be scraping off enough of the end insulation in the process.
That’s a neat idea.
Yeah, but how would you dispense 1lb of solder?
really big floss container
http://oralgem.com/wp-content/uploads/2014/05/Pearl-2013-300×300.jpg
Think bigger! Wall mounted dental floss dispenser.
Looks just like the one ELM uses.
https://www.youtube.com/watch?v=i5MNLTc7YhY
Wow…. Some mad skills there. My carpal from my programming time really restricts the “manipulate three items at the same time” thing.
I accidentally reported the video, sorry!
Anyone know what tape was used to keep the SMDs attached to the board?
It’s generically known as polyimide, but it also goes by the trade name Kapton.
the tape was not used to keep the SMDs attached to the board. it was used as a high-temp electrical insulator. the adhesive was facing the board. the part touching the SMDs was not sticky.
it’s kapton tape.
the SMDs were stuck to the board with some kind of white, sticky goop (2m12s).
elm-chan.org Is one of the websites that got me into electronics, his magnet wire layouts are magical!
I’ve been doing the same with fine solder (minus the spool at the end of the pencil) for a few weeks, and it works great!
Now change the design to allow for a second spool which would consist of solder wire and maybe use one those pens that allowed for multiple inks in them and u got a multispool tool lol.
Great use of a 3D printer though.
Ive been doing this for years for my solder wire…. i use a regular BIC mechanical pencil…. no “Special Adapter” needed.
Just pop our the rubber on the back and pull the wire through.
I’ve tried this before. The problem is finding the right size mech pencil and solder combination. Locally the solder available is .032. That would be close to a 0.8 mm pencil size. The pencils are available in 0.5, 0.7 and 0.9 mm sizes. My next thought was to drill out a 0.7 mm to 0.8 mm but some the collet like clamp at the end needs to be pushed down and held to be able to drill it. My attempt just ruined the tip assembly.
I used a BIC plastic pencil for 0.7mm lead, pulled the tip off, and used a needle file to enlarge the hole to the 0.032″ needed to fit the solder. That way, I didn’t drill into the collet-like assembly inside the tip, which functioned fine without modification after pressing the tip back on.
yeah, gonna have to join in on the 3D printed bashing. I mean, there’s no way this could be made with some duct tape and bits of cardboard/plastic sheet/misc junk. You NEED to have a 3D printed bracket for this to work!!!!
I’m all for 3D printed stuff, but articles that are worded like this start to make it look like a solution in search of a problem. Please quit gushing over anything that contains a 3D printed part. It’s neat, but not the only possible solution.
OK, rant over.
Nice idea. I’ll be making one(sans 3D printing) for my work bench. Might implement one of the ideas in the comments above to make it have a built in cutter.
At no point does it say that there has to be 3D printed parts, anymore so than when a project is primarily lasercut or CNC machined, they mention it and the professionalism that it lends to the finished piece.
Instead of ranting about 3D printing, you could stick this on your 3D printer and make a “pick & place” for wire system.
To use the hacked pencil, a user simply dispenses approximately one-half-inch of wire at a time and holds it to the solder joint until the enamel melts back. Once the solder has hardened, the wire can be clicked and dragged using the material dispense function on the mechanical pencil for moving onto the next solder joint.