Even though the Arduino was hardly the first 8 bit microcontroller board to support a bootloader and the C/C++ language, it quickly became the de facto standard for hobby-level microcontrollers as well as a common choice for one-off or prototype projects. I’m sure there are a lot of reasons why this occurred, but in my mind there were three major reasons: price, availability of lots of library and sample code, and the existence of a simplified GUI IDE that you could install in a few minutes. The build process is simple, too, even though if you ever have to actually figure it out, it is quite ugly. For most people, it works, and that makes it not ugly.
I like the ATMega chips. In fact, I had boards based around the ATMega8 and a bootloader way before there was an Arduino. However, they are fairly small parts. It is true that the Arduino infrastructure has grown to support more ATMega chips, many with more memory and I/O and clock speeds. However, 32-bit processors are getting inexpensive enough that for all but the simplest or highest volume projects, you should be thinking about using 32-bit.
If you’ve tried to go that route before, you’ve probably been daunted by the price, especially the price of development tools. Your alternative is to roll your own tool chain which is very doable (and there are some nice scripts out there that will help you). You also need to worry about libraries and how to integrate them. Not to mention, many of the advanced processors require a lot of setup to get, say, an A/D converter turned on. Most processors keep things they aren’t using turned off, and each pin requires setup to select the 4 or 5 things shared on that pin.
All of this has been a barrier to entry. The vendors have all figured this out, though, and many have tried to build tools aimed at breaking up the Arduino market ranging from inexpensive development boards to code-generating wizards, to full blown IDEs. I want to tell you (and show you, in the video below) how you can make the jump from 8-bit to 32-bit much easier than you might think.
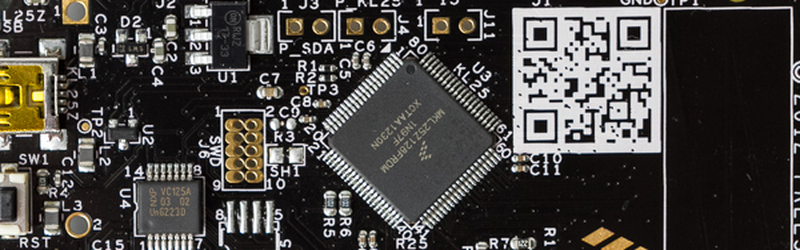
First, let’s talk price. I’m going to focus on the KL25Z Freedom board from Freescale. It isn’t much bigger than a standard Arduino board and it costs (today) about $13. What do you get for that? A 32 bit ARM processor running at 48MHz. It has 128K of flash, 16K of RAM, a USB port, and several SPI, UART, I2C, and PWM peripherals. It also has 16-bit A/D converters and a 12 bit DAC. The board itself also has an accelerometer and a touch sensor along with a tri-color LED. Not bad for $13.
Of course, you are thinking you can get an ATMega chip for less and plug it in a breadboard. You can use the same techniques I’ll talk about to program an LPC1114FN28 chip. Sure, it only has 4K of RAM and 32K of program storage, but it will easily fit in a breadboard and costs less than $5, even if you are only buying one.
The KL25Z even has an Arduino-compatible daughterboard socket (you know, a place to plug in a shield, as much as it pains me to say shield). You do have to be careful as the board is 3.3V and not 5V. Some 32-bit devices have 5V compatible I/O, but you should always make sure before directly connecting anything.
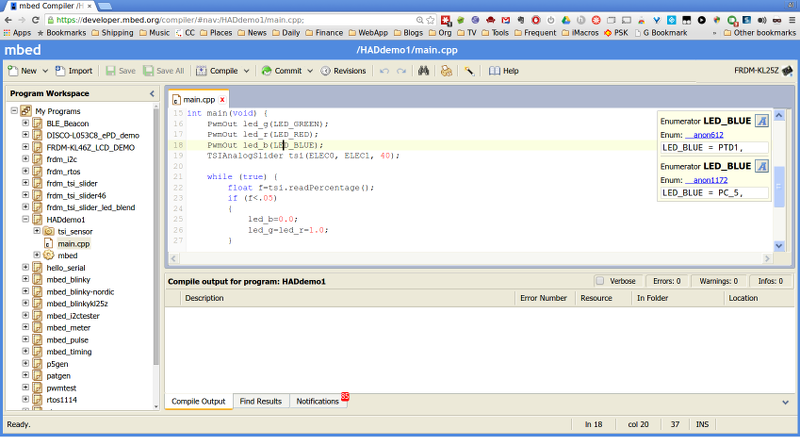 A $13 development board with a lot of memory and other goodies; sounds good, right? But surely the development tools are expensive or difficult to set up, right? Actually, no. ARM provides the mbed website that offers a full-blow C/C++ IDE in your browser (see picture to the left). No software to install at all. Version control, sharing libraries between users, documentation. Everything you might want in an IDE except debugging (but don’t forget the Arduino IDE doesn’t have debugging either). You don’t have to use the online IDE if you prefer to use a local toolchain. However, the IDE is very pleasant and has a lot of productive features.
Maybe the catch is you need an expensive device programmer? Again, no. The board looks like a USB drive. You plug it into your Windows PC (or anything that will recognize a USB drive; I use Linux) and it pops up as a disk drive. The IDE produces files that you just copy to the drive and that programs the microcontroller. The bootloader is built into the chip.
The mbed library (and also third party libraries, including those you create) let you sidestep complexity the same way you do with the Arduino. For example, if you want to create a PWM output, you simply use a PWMOut object:
PwmOut led_r(LED_RED);
This takes care of turning on the right parts of the chip, enabling the PWM outputs, and whatever other voodoo it takes to make that work on the ARM chip you are using. Just about any other I/O task you want is just as easy. The IDE lets you search for libraries ranging from math solutions to an entire real time operating system.
So if you are running into the limits of an 8 bit processor — or even if you just want to step up for the sake of stepping up–you can be up and running on a 32-bit development platform in a few minutes for about $13. Once you get used to having 128K of code space, a ton of RAM and executing code at about 48 MIPS, you’ll find it hard to go back.
Want to know more? The video below will get you started. You can also check out the documentation on the mbed website. We’ve also talked about the BBC Micro:Bit which will work with mbed and even looked at an ZX81 recreated on an mbed-compatible processor, if you want to get some more ideas.


Very nice, worth looking into. Thanks for the info!
Ok, serious question. I’d like to take a look at this just for the learning experience. However, in the past I find I buy a Dev kit, and without a project to use it for, it just collects dust.
So what kind of example projects to you do with dev kits when you just want to explore/learn? My crippled adult imagination can’t seem to think of what to do.
How about a simple pattern or waveform generator? You might even see one here eventually.Or grab some servo motors and make a robot. One project I have done with students is a servo meter you can control from the pc do you can have a real meter showing CPU use our memory or whatever. Another student project I’ve had them do is an IR receiver using one of those integrated sensors. Send the decoded signal to a pc and do something. Browse Hackaday for inspiration!
I have the same inertial compounder in my brain for otherwise useless projects. So what I do is find something I need to fix or replace. My lawn sprinkler controller died, and the direct replacement was out of production by 20 years, so the project was to replace it with relays and an ATMEGA (I needed the RAM, it turns out). Then I looked at the RC truck the neighbors gave us, with no controller. New project! Bought a little RC controller and receiver pair, an arduino, an H-bridge, and got to replacing the guts of the truck. Next I want to add a simple light switch timer to the bathroom fans, to save on HVAC costs. (OK, there’s a commercial solution, but it could be a neat little project if you want to play with IoT.) Do you have a garage and worry about having left the door open? Relay, sensors, wifi thingy.
It helps a lot to find a tangible goal first. Want to monitor the temp in your attic to decide whether insulation needs an upgrade? Want to monitor your home security system? Both are do-able. And both might conceivably save you money.
Thanks, to both replies!
Kratz, One project that I’ve been working on is to connect the ST-NucleoF072 to a $10 HLKRM04 Serial to Wifi Router and use the Nucleo as an Internet enabled server that controls the brightness of 2 10W Leds. This is a work in progress and I’m using the STM32Cube libraries instead of mbed. But I don’t see why it cant be done with mbed….I even built a breakout board for the HLKRM04 for the ST-Nucleo (mbed enabled) board: https://pbs.twimg.com/media/CI-JeMoUMAAkDlg.jpg:large
Hey Kratz … This is why I developed the RoboGuts™ S.T.E.A.M. Education Program … lots of experiments using various electronic components, structured programming examples for each experiment, phonemes to speech and singing toys/animatronics and after 24+ experiments the “X-Projects” begin where you are building toys and animatronic projects learning how to combine the earlier experiments into larger more productive programs. I’d love to see somebody developing experiments with the ARM processors using the RoboGuts™ circuit board. http://www.R2PV1.com/
For ARM-based Arduino-like boards, don’t forget Teensy 3.1. No pecuniary interest, just a rabid fan.
mbed already has support for Teensy 3.1 in the library (“offline tools”) and seems to be on its way to inclusion in the online IDE.
Thanks for the info Mr. Chango; that’s surely good news for me, since I love both Teensy and mBed.
“availability of lots of library resources and sample code, ”
This is why the MSP430 failed and everything after that. TI has a decent windows only IDE they give out for free but their libraries were written by programmers smoking crack and tripping on acid at the same time making them 100% useless.
You may want to take a look at the Energia ( http://energia.nu ) IDE platform from TI. It is a port of the Arduino language for both the TI MSP430 and ARM (their Tiva series). Using their LaunchPad boards it provides you with low cost and capable hardware with more performance/features than the ATMega chips. It runs on Linux, Windows and Mac.
MSP430 certainly hasn’t “failed.” There is a huge active community. If you don’t like TI’s IDE stuff you can use GCC just fine. You can even program it like an Arduino with a program called Energia.
Love the flowers for TI and Energia.
I am using Energia right now to program a thumb-sized I2C “networked” motor controller that has an MSP320G2553 on board (one of the 28-pin variants). Was able to add the board to the drop-down list of boards easily and create a directory with a header that reflected the fact that the chip had 24 GPIO etc.
I may need to import the project into CodeComposer, since it’s getting a little large, but so far I have managed to write a simple multi-tasking, I2C enabled, motor-controlling kernel that works nicely .. and it didn’t take long, despite the lack of debugging tools in Energia. Plus, the entire MSP430 GNU toolchain, including ms430-dbg, is part of Energia, so debugging with the gnu tools is an option.
The TI 32-bit chips seem to be far and away the best value in 32-bit MCUs right now. Most of them are M4 cores, so if you need to do fast calculations, take a look at TI.
Hmm,’ MSP320G2553′? Thumb was apparently typing one character too far to the left for a while there ..
The LPC1114FN28 has 32k of flash, not 16k.
Oops you are right. I’ll fix that, thanks.
One thing I rarely see mentioned for stuff like this is power requirements. I very rarely play around with this stuff these days, but when I do it’s usually based around a battery. So, having all that power and space is nice and all, but if it’ll run a battery down in 15 minutes it’s not all that great any more.
Good point. Have a look at this: http://mcuoneclipse.com/2013/10/20/tutorial-using-the-frdm-kl25z-as-low-power-board/
Of course, you can sleep to further minimize.
SiLabs contributed improvements to the mbed library to control peripheral power in addition to the core when in sleep(), and an API for asynchronous IO to make it more convenient to suspend the core while waiting on peripherals. The SiLabs devkits also have power profiling built into the on-board debugger (though you need the SiLabs IDE).
And in case anyone is wondering, the mbed online IDE supports .s files and inline assembly, so you can try to beat the compiler if that’s your thing.
That’s because most of these boards are for prototyping; you should have a look at the “turning your prototype into a product” section on mBed.
@sneakypoo
The Mbed libraries in my mind are more flexible and give you more control over the hardware than say the Arduino libraries. They are also intended to be used by programmers (no setup() & loop() nonsense), but it is still a high level API. Surprisingly Mbed does have low power/sleep functionality but it is by no means optimized. In order to really explore the low power capabilities of any microcontroller, you really have to go down to the register level or at least middleware (vendor library level).
I find it easier to go low power on arm than on arduino. They both use about 20 mA at full blast, but the arm quickly drops to a fifth if you slow it down to say 10 mhz, which will still outperform the arduino….
Makes sense. Modern ARM vs old AVR tech.
As someone who’s done 32-bit and embedded linux dev I’d dearly love a tutorial like this for getting into minimalist 8-bit micros for cheap – there are so many projects where throwing an 8 or 16 pin DIP in running 5v I/O and minimum extra components would be just enough to solve a simple problem or glue a project together, but it’s hard to see the wood for the trees when it comes to platforms, IDE’s, dev/demo boards, etc. etc.
It would be great to have some very minimal, quick to jump into thing to tinker with – I made a start with MSP430 a while back but the 1Gb IDE download and bajillion variants of MSP430-XYZ peed me off, and TI’s website / support sucks balls. A shame as I really wanted to like the MSP for its apparent simplicity.
Most of my current projects fit this model: bare AVR chips (or minimal dev boards at most) for prototyping. I do all my programming using avr-gcc driven by Makefiles, written in Kate (or any other text editor, no IDE), uploaded by either a cheap $15 programmer (or in the case of my current favourite chip, the ATMega32u4, the built in USB bootloader). Feel free to browse my projects (https://hackaday.io/projects/hacker/4501) and take a look at the source code (in Github, linked on all my projects). PM me if you have questions.
Cheers
In most of my current projects I am using bare XMega chips, and do my programming/debugging in the Atmel Studio 6 IDE. However Studio 6 is windows only. I have a linux laptop, and would like to move to compiling with makefiles, but how do you debug (breakpoints, stepping, watching variables) without the IDE?
Plain Jane AVRs (not the XMega line) don’t have debugging (well at least not without JTAG and such). So my debugging involves toggling a pins (depending on the frequency of the output, either hooking up an LED or a logic analyzer).
That is one reason I am interested in ARM… if you can easily get debugging then it is well worth it. Still looking for a simple to setup solution, though.
For plain AVRs with JTAG (ATMega32-128), I’ve had success in setting up Avarice as a GDB server with the AVR dragon. I believe that you can use DebugWire devices as well (ATMega328p) if you have the proper fuse settings set but I haven’t tried that.
I have a Nucleo board and had looked at MBed a bit… but I am scared to use a cloud based dev environment for anything more than trivial programs. What happens 5 years from now when their platform goes offline?
Does anyone know if there is a way to clone the MBed environment and run locally?
My preference would be gcc cross compiling, and I will be looking at that further once my current projects get a bit more wrapped up… but there is definitely an appeal to having a higher level IDE with a community of libraries and such. If only there was a way to get both…
Cheers
Yes you can export the project
to a real ide which is good for debugging anyway. Also you can clone mbed and build yourself if you want.
Sweet, I will have to look into that further. Thanks for the reply, and the great article!
Cheers
Do you have a favourite FOSS IDE which supports debugging?
Emblocks(Embitz). STM32 based mbed boards are supported out of the box as emblocks supports ST-link.
Other boards can be supported using any openOCD compatible debugger.
Online MBED ide can export out a project compatible with Emblocks IDE.
Other option is Eclipse+openOCD of which there are lot of
Thank you! I will have a play at Emblocks. It looks quite nice!
Hmm, looking into it more and it appears to be Windows only. I guess I will have to look into Eclipse + OpenOCD some more… :-(
Some development boards have a J-Link on-board, on the FRDM-KL25Z it can replace the mbed/OpenSDA firmware.
There is a J-Link plugin for Eclipse, which is much easier than openOCD.
I made my first steps with mbed and platformIO (http://platformio.org/) on a Nucleo board. PlatformIO gets the source files of mbed and generates a project folder. So you can use the editor of your choice (vi/emacs) or export it as an eclipse project. It also supports other platforms. IMO a worth look if you don’t want to use a cloud service.
Good news, mbed is still around! With a desktop IDE too!
Although now with a potential sale and/or heavy focus on profit at ARM it may not do so well in the next 5 years.
But I don’t want an Arduino, I don’t want a fancy IDE that runs in a web browser. If I can write the program in Notepad, that’s better. That’s what I want.
I want a similiar thing as the AVR tutorial here on Hackaday a couple years back. Just the bare chip with no distracting shit around. Connect power, connect programmer, connect LED, “make”, done. The LED blinks.
I don’t want to figure out how to migrate my projects away from dev-boards or specific IDEs and their functions, bootloaders, helper libraries. I want the bare bones how it is done. I don’t want to waste my time because I know it will be just as easy the “hard” way.
The problem is that the “Arduino” environment is a thing you need to learn in itself, and in doing so you become dependent on it and have to learn out of it. The dev-board is convenient on the point that you save the time soldering the chip on a board yourself, but it comes with the disadvantage of helping too much.
Well, if you don’t want anything ready-made, then you can use virtually ANY uC on the market, just got ahead and do it!.
Arduino (and its pairs) was the lever that actually skyrocketed all this DIY electronics communities around.
Indeed.
But I would like _some_ hand holding from someone who has already done it, so I don’t have to waste time re-inventing the wheel flintstones style.
The Hackaday article series for how to program plain AVR chips was exactly like that: take the plain chip, take the basic toolchain, here’s a basic reference circuit, here’s how to use them.
Or, let’s rephrase the question:
What 32 bit ARM or other processor (family?) could I use, that handles more or less like the plain AVR chips (atmega/attiny) with avrdude and avr-gcc?
I agree, would be good to see some articles on bare-bone coding for ARM chips. There are dozens of free ARM IDEs around, but you just become reliant on someone else’s buggy code.
There are NXP, STM32 and Atmel ARM chips with serial bootloader in ROM so are easy to program with simple command line tools. I know STM32 has open source toolchains for Linux, Windows, not sure about NXP. Have a look for “ghetto STM32”.
NXP also even have DIP packages, LPC812 and LPC1114. Atmel are also quite easy to get into, program with bossa tool. Freescale chips are less easy, without a built-in bootloader they need a JTAG programmer.
I program NXP LPC parts with lpc21isp command line tool in Linux, or flashmagic in windows. Works fine.
@Dax, the mbed web ide is not by any means fancy. If you don’t like it, you can very easily download the mbed source from https://github.com/mbedmicro and build mbed libraries that target your platform and toolchain. Once the libraries are built you can use the built-in python tools or a makefile to build your mbed programs locally in the editor of your choice. They even have a cool Python based debugger pyOCD that you can use.
One of the disadvantages of the KL25Z board is that its KL25Z micro does not have a built-in bootloader in rom. So you really have to use the onboard mbed interface/CMSIS-DAP interface to program the microcontroller.
The ST Micros found on the ST-Nucleo F411 & F072 both have usb-dfu & serial bootloaders in rom. So you can compile and build mbed code and then flash the bin file via these bootloaders instead of the fancy mbed programmer. Unfortunately both boards don’t bring out the USB pins via a USB connector so you’d have to build that yourself. But this makes using the mbed library much more accessible should you decide to use it with a custom board.
Some people have hacked their KL25Z FRDM development boards to be SWD programmers for other KL25Z chips. http://mcuoneclipse.com/2013/04/21/using-the-freedom-board-as-jtag-programmer/
” does not have a built-in bootloader in rom.”
So? Can’t you program it directly?
The bare KL25Z microcontroller (MKL25Z128VLK4) can’t be programmed directly no…you need a JTAG/SWD CMSIS-DAP programmer.
Luckily the KL25Z Freedom board has a CMSIS-DAP programmer & debugger. So if you want to use the KL25Z board in your projects you’ll have no problems. If however you want to use the microcontroller itself in your own custom board design, you’ll need an external programmer. As Steve mentioned you can use the KL25Z freedom board itself as a programmer for other KL25Z chips.
This is one of the reasons why I prefer the STM32 chips / Nucleo boards. But as I mentioned in another comment Mbed support for the Nucleo boards is generally not as good as the support for the Freedom boards.
That’s just it.
I don’t want to use the KL25Z board in my projects. I just want to buy the processor, or similiar chip, and drop it in whatever circuit I’m building.
-“As Steve mentioned you can use the KL25Z freedom board itself as a programmer for other KL25Z chips.”
Reading the page, it seems that I can use the board to program another identical board, but it will fail on a different board with the same processor, and extrapolating from that, will fail with just the plain processor unless I replicate some special circuit with specific chips that are particular to the freedom boards.
So that would be a no-go.
You can use the KL25Z Freedom board as a j-link programmer with a firmware upgrade. There is a zip of firmwares for it on Freescale’s website that you can use.
Or theres always the ten dollar jlinks on ebay. Ive used both for my KL26 project (Practically the same as the KL25) and both work well, even with openocd.
Most ARM devices do not have a built-in bootloader and have to be programmed via JTAG/SWD. This is why the FRDM-KL25Z has the OpenSDA on board with the mbed drag&drop bootloader and optional J-Link or P&E firmware, which allows better programming and debugging.
That’s why it would be nice to have an article that details what devices can be used as programmers, how, and what exactly you need to do to get started to upload the first program.
Otherwise you’re stuck with these dev-boards that come built with bootloaders and programmers and special IDEs, and effectively have to learn the system twice when you migrate the project off the board.
There are a lovely array of ARMs with USB that have a DFU Bootloader built into ROM
One example:
http://www.st.com/web/en/resource/technical/document/application_note/CD00264379.pdf
http://www.st.com/st-web-ui/static/active/en/resource/technical/document/application_note/CD00167594.pdf
AFAIK the KL27 family offers an USB interface and has a ROM bootloader that works directly over USB (even without using a crystal for the controller!). So you should be fine with that chip and adding a few passives and the USB connector. I’m currently developping a little board araound that chip, so i will have to dig a little deeper into that function sooner or later. I will definately still use SWD to be able to debug my code mess better, but once the basic core works, i do hope to be able to reflash without using the SWD adapter.
There is a FRDM KL27 evalboard on it’s way too, at least they write something about ramping up production right now.
I did a write up on using DFU over USB on my blog for the Nucleo.
http://www.mobilewill.us/2015/06/stm32-nucleo-and-dfu-usb-bootloading.html
The KL25Z Freedom board is awesome and has excellent Mbed support. Unfortunately the $13 version comes without connectors so you’ll still have to purchase these and solder them on.
There are many other Mbed enabled boards that offer even more bang for buck such as the similarly priced ST-NucleoF411. It has a 100MHz Cortex M4 chip with 512KB of Flash and 128 KB of RAM, 2.4Msps ADC, 3 Uarts, OTG USB and much more. The USB is not brought out by the board but can be brought out via a simple USB breakout board. The board also includes a Debugger/programmer/USB2serial interface.
Having said that, Mbed support for the ST Nucleo boards is not quite as complete as for the Freescale freedom boards…especially the KL25Z. In fact when using Mbed do some research first on the desired mbed board/platform. Not all advertised platforms have the same level of support and recent boards tend to exhibit more hidden bugs.
The KL25Z however is a great place to get started with Mbed.
I like it without connectors because I can put them in or solder wires etc. Viva choice!
If they populated the connectors it would probably be a more expensive board anyway and it’s difficult to pin down how many people will use the connector, solder in wires or barely connect anything..
Good discussion about connectors costing an arm and a leg on last weeks Amp Hour podcast
What makes a board mbed compatible? Is it the type of arm?
For example, would a beaglebone black or stm32f4 discovery board work? I’m looking to buy a board to learn not just mbed but something that has the horsepower to continue using with non-mbed applications (bare-metal programming, berkley’s snap / bonescript, grove accessories, etc)
The reason I hesitate using mbed forever, is that relying on a cloud service to compile seems a bit trusting!
A board is mbed compatible if its listed on the platforms page of the mbed site https://developer.mbed.org/platforms/
Mbed support is provided at the ‘board’ level not the microcontroller level.
You can however use the the MBED libraries that target let’s say the NUCLEO_F072 board if you are developing a board that houses the same STM32f072 chip found on the NUCLEO_F072 board.
the STM32F4Discovery board might have MBED support in the offline libraries https://github.com/mbedmicro/mbed/tree/master/libraries/mbed/targets/cmsis/TARGET_STM/TARGET_STM32F4
But the original STM32F4Discovery board does not have drag and drop programming capability.
TI and Atmel are two companies that have yet to offer mbed support too any of their ARM microcontrollers. Atmel support seems to be incoming but not TI. I think TI chooses to focus more on the Energia platform. Other companies such as NXP, Freescale, ST& SiliconLabs all offer mbed enabled boards.
Mbed seems to target mostly bare metal programming on microcontrollers as opposed to microprocessors such as the beaglebone socs.
Also just because a board shows up on the ‘platforms’ site quoted above doesn’t mean that its fully supported. Support for some devices is not complete (e.g. no USBDevice support for NucleoF072/F103/L152/F302 e.t.c) and even when it’s there, it can be buggy.
The KL25Z should have USBDevice support and its mbed implementation should be relatively bug free.
As you see from the comments here you don’t need a cloud service to compile. You can export your project into other IDEs and compile locally.
While an online compiler would [hopefully] always be up to date, writing code online is not really an option for me [security issues, firewalls, etc].
Can be mbed IDE be downloaded? Failing that, what is recommended as a local toolchain? For Windows / Mac / Linux?
You can get Mbed from source or make an empty project with any libraries you want and export it to the ide of your choice. Exactly which ide you can export to depends on the platform you select.
Great article and video. Re-piqued my interest in the mbed libraries.
Any suggestions for sourcing? Maybe I’m just cheap (no – I take that back, I am definitely cheap), but it pains me to my gizzard to pay $9 S&H for a $13 item. “Oh, maybe I can get it on Amazon Prime, free shipping!” – Yeah, it’s there, at double the price. If it was at one of the usual hobbyist electronics sites, I could justify the S&H by bundling up other crap I want, but no such luck.
I just stick them on my usual orders to DigiKey. Mouser stocks them too. You can also hunt on:
http://www.findchips.com/search/FRDM-KL25Z
(Another part of our family, I might add).
Ah, I found them on mouser myself, but findchips is new to me – nice! Doesn’t solve the problem of “buying inexpensive things means shipping dominates the cost”, but that is a tall order to solve for, I guess. I don’t do enough parts purchasing to be able to batch it up anymore; I guess that’s good and bad.
I totally feel you on the shipping struggles, it’s a pain to pay almost as much for shipping as the item itself. If you’re looking for an alternative, you might want to give Partstack a shot. They’ve got good deals on components, and their shipping fees are way more reasonable. Here’s the link for the KL25Z Freedom board by NXP Semiconductors: https://partstack.com/p/nxp-semiconductors/frdm-kl25z/145671338317.
Happy hunting, and hope this helps you save a few bucks!
@ bortels
It seems to be available at Digi-key. With $8 Next day shipping:
FRDM-KL25Z
http://www.digikey.com/product-detail/en/FRDM-KL25Z/FRDM-KL25Z-ND/3529594 $12.95 USD
If you want the headers:
2* 16(8*2) Headers
http://www.digikey.com/product-detail/en/PPTC082LFBN-RC/S7076-ND/810214 $2.46
1 * 20(10*2) Header
http://www.digikey.com/product-detail/en/PPTC102LFBN-RC/S7078-ND/810216 $1.62
1 * 12 (6*2) Header
http://www.digikey.com/product-detail/en/PPTC062LFBN-RC/S7074-ND/810212 $0.98
Total: $18.01
I call this board (along with the Nucleo Boards and even the Energia supported TI TIVA C Launchpad) the Arduino Zero Killer(s)…
Mbed Online IDE is bad, I mean really really bad -do you want your IDE lagging ?- and a lot of functions are broken, -export to another IDE anyone ?-
But Adam’s gcc4mbed work ok.
https://github.com/adamgreen/gcc4mbed#quick-start
and yes, go get a teensy.
@Zogzog,
I wholeheartedly agree the mbed IDE has many deficiencies. It is not as bad as the Arduino IDE in my opinion but still far from perfect. This is why I do not use it and opt for using the mbed libraries locally instead. I can then code in the Atom and/or Vim code editors and build with makefiles. For those coming from the Arduino world, or that just want to get something going or that don’t have a interest in learning about makefiles, cross-compilation, the build process for ARM, the MBed IDE is still a viable alternative.
I prefer the Mbed way of doing things vs the Arduino way because it’s more authentic and doesn’t try to hide things and really dumb things down a.k.a setup() & loop(). It is a brilliant C++ API that really takes advantages of all that C++ has to offer while still being surprisingly easy to use.
Most of mbed’s troubles are due to the fact that vendors don’t do a good job porting their boards to the Mbed library properly….but not due to mbed library itself.
The mbed API is pretty good.
But both those IDEs aren’t worse a text editor.
Porting that require hell a lot of time and effort. One company hired us to do that for there new platform with a 5 members team.
Strange, I added my custom board to the gcc4mbed device tree, It took me some help, lot of work, but less than a week.
Sure Arm is better than AVR (except when you want to go ultra-low-power like in the ~0.1mA).
Also having hand-solderable SMDs (TQFP) is crucial if you’re into designing, (maybe also etching/milling) and soldering your own PCBs. QFN, not even saying BGA versions raise the bar much higher for hand-soldering.
Well, they have a 64pin LQFP that’s about $5 for the 128k version… less than my current favorite ATmega1284.
The pitch is finer that the TQFP32/44 of many ATmega but i’ve already soldered a TQFP100 2560.
a quick reading of the datasheet shows many clock options, have to check how much i can bring down power by using it @1.8V on the internal slow-clock source.
So for very lean applications it should be about as good as ATmegas, for power-hungry ones it’ll obviously outperform them by a large margin (or factor i should say :)
Ordered the board plus some MKL25Z128VLH4 and this will probably be my platform of choice for new projects…
Hi, I was looking through the arm mbed’s website, I compiled and built .bin files for two different boards(By choosing different boards from online ide). Programming for all the 100 around boards is same(similar to arduino’s programming). But my question is how this ide comes to know that which board is chosen and how and where those specific changes are done that makes two exactly same codes for two different boards. For example what changes can I do or are occured in files and/or at architecture level that the code for teensy board can run on some other board, say lpc176x related some board.
This article needs the “mbed” tag.