Everybody likes 3D printing, right? But it’s slow compared to 2D laser cutting. If only there were a way to combine multiple 2D slices into a 3D model. OK, we know that you’re already doing it by hand with glue and/or joints. But where’s the fun in that?
LaserStacker automates the whole procedure for you. They’ve tweaked their laser cutter settings to allow not just cutting but also welding of acrylic. This lets them build up 3D objects out of acrylic slices with no human intervention by first making a cutting pass at one depth and then selectively re-welding together at another. And they’ve also built up some software, along with a library of functional elements, that makes designing these sort of parts easier.
There’s hardly any detail on their website about how it works, so you’ll have to watch the video below the break and make some educated guesses. It looks like they raise the cutter head upwards to make the welding passes, probably spreading the beam out a bit. Do they also run it at lower power, or slower? We demand details!
Anyway, check out the demo video at 3:30 where they run through the slice-to-depth and heal modes through their paces. It’s pretty impressive.
There are going to be all sorts of limitations to this procedure that we haven’t quite thought through yet. Overhangs, for instance, require cutting to depth and then healing the top layer. It’s going to be weaker (they demo that in the video) but how much does this matter? And how will it look? Anyway, the idea is out there to be played around with.
There are other ways to make 3D objects on a laser cutter, naturally. You can assemble parts with box joints or, if you’re up for a challenge, add a rotational axis to your existing cutter. But for simple, blocky 3D forms we think the cut-and-weld method holds a lot of promise.
Thanks [Morris] for the tip!


Acrylic cement works well for just adhering acrylic parts together, though it lacks automation.
Child slave labor? Look kids, it’s FUN!
Ah Stephanie Muller, so we will never ever see this in the wild.
and why is that? Perhaps you wish to share this special knowledge you seem to have about her?
Still waiting on the “Laser Origami” software.
The full paper is on her website: http://www.stefaniemueller.org//wp-content/themes/f8-lite/images/laserstacker/uist-2015-laserstacker.pdf
When my space got a laser cutter I took some time to explore the capabilities. I was able to cut beveled edges by defocusing the laser, for instance. (Beveled to 45 degrees or so.)
It took some time, but I was able to cut a gear with 5mm tooth spacing in an 8mm thick base, but it took a lot of fiddling and experimentation to get the cuts to come out vertical. I was also able to cut thin strips of steel and double-sided PCBs. (Yes, a laser cutter will cut copper clad PCB with the right technique. No, it’s unsuitable for making PCBs.)
My take is that you can do interesting things with the laser if you’re willing to put a lot of time and effort into fiddling with the settings. This is fine if you want to make dozens of something, but for most practical purposes it’s not an effective strategy.
Our laser tube has aged, the mirrors and lenses are clean or dirty depending on when they were last cleaned, and the nub on the focus switch is continuously getting bumped out of alignment. Subtle and complex projects that worked 6 months ago need a new round of tweaking.
Demonstration pieces like this are fine… for demonstration, but I don’t think you can predict the effects enough to do new projects and have them work first time.
I make lots of things out of layers. 3/16″ acrylic rod from eBay can be used for 1) rivets, cut a 3/16″ hole in all layers, push the rod through, and add a drop of MEC, or 2) a hinge, cut 3/16″ holes in the top and bottom layer, and 3/8″ hole in the middle layers. Insert a nylon spacer in the middle layers, and push the rod through all layers.
I’ve now read their published paper.
The paper implies that their “laser stacker” software is available, but I couldn’t find a link in the paper or on her website (maybe someone else can?). Maybe E-mail Stefanie?
The paper describes the process in detail, and outlines a calibration procedure that anyone can use to determine the settings needed for any cutter.
Essentially, cutting a deep trough will cut through a lower sheet while welding the upper sheets together. She then does another pass to widen the edges of the trough – less deep than the original cut, but cutting enough of the edge out to remove the welds generated in the deeper cut.
The paper has diagrams that make this clear.
Cuts are focused at the top layer (ie – the cutting focal point doesn’t change), but the process requires a melting pass which puts the focal point above the top layer. This means that the cutter needs to change Z-axis settings, and a lot or laser cutters can’t do that.
I still think this would only be useful for many-piece production. That’s not nothing, of course, but I think you would have to go through the calibration procedure to compensate for tube age periodically.
“I still think this would only be useful for many-piece production. ”
Of optically clear pieces – remember you’re welding through the top layers. Prototype and specialty fab maybe, production maybe not so much. The larger group effort seems to be more about padding out lists of publications rather than conceptual leaps.
@PWalsh
I’ve never worked with a laser cutter. How many of those problems are inherent to the device, and how many are from it being communal?
I consider acrylic nothing more than a waste product, it’s super sensitive to cracks and breaks and scratches and I don’t see any use for it at all.
But apparently I’m alone, because I constantly see people make stuff out of it or being very excited about it, and yet it has and continues to be a lousy material in any meeting I have with it. Weird stuff.
Apparently in your world Plexiglas was a commercial failure? Acrylic is used automobile construction, LCD displays, and everything in between. Acrylic is used to make clothing, windows, and thousands of other useful items.
A waste product? Hardly.
You use the word ‘was’, and I think that’s appropriate, at one time there were less options I’m sure, and they made crappy stuff with acrylic. But at this point most anything is better IMHO.
And yes I am aware that acrylic is very clear and is liked for that reason. And I suppose that if it’s in a non-moving non-accessible location it would do fine. Although.. isn’t it very flammable too on top of everything? And giving off toxic fumes when it is burned?
Anyway even with acrylic they made new better versions I hear, stuff that is more durable than the crappy stuff you often see people use,or where they make cheap containers or office/school supplies of.
As for your history of success, at one time bakelite was big too. But then it was retired.
I use Acrylic for a lot of things, but I definitely understand what you’re saying.
I make a lot of equipment for scientific investigation – reaction chambers, gas manifolds, project enclosures, fittings, and such. I like acrylic because I can cut out a supporting panel with mounting holes in a heartbeat. 1/4″ thick acrylic is reasonably strong for boxes or tube holders and such. Holes can be threaded.
I made an adapter to go from the ISO-25 vacuum fitting on my vacuum pump to a 1/4″ tubing connector, from 4 layers (glued) of acrylic. Those are $35 *used* on eBay. It doesn’t outgas at the level of vacuum I’m using.
I’m currently building a kiln for metal casting, and using Acrylic for the controller box panels (separate from the actual kiln, so doesn’t get hot). A 1/4″ piece of acrylic holds a 1″ strain relief and 10 gauge heavy wires go through it – it took me 10 minutes to draw up and cut, it looks great, and if I need to change it I’ve still got the original files.
I have a number of acrylic mounting brackets for ultrasonic transducers.
I wouldn’t use acrylic for a *product*, but it’s fine for small support structures and it’s very fast to prototype.
The upper scissor handle could have been flipped over the other way, like a normal pair. Whomever designed that must not have had a pair on hand to look at.
I tried it a few years ago.
there are a few problems with cutting a stack of acrylic plastic (or other materials).
first of all, the precision depends on the thickness of the material. and there is an obvious flaw, it is hard for you to make tall/thick objects
secondly the cost of the material is very expansive given that you have a ton of wasted material with the left over and very hard to reuse them.
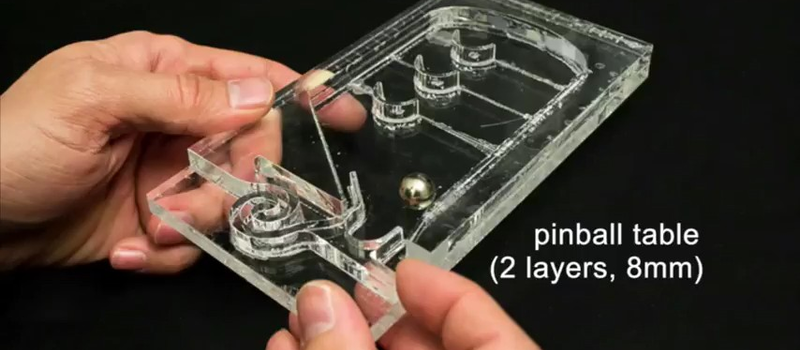
That’s not pinball, it could be more accurately described as Bagatelle or maybe Pachinko
Didn’t even use a pin to launch it. But we all know what they mean because our eyes correct the supplied words.
it’s called pin ball because historically the play field was full of wood or metal pins.