Sooner or later, we’ve all got to deal with torque measurement. Most of us will never need to go beyond the satisfying click of a micrometer-style torque wrench or the grating buzz of a cordless drill-driver as the clutch releases. But at some point you may actually need to measure torque, in which case this guide to torque sensors might be just the thing.
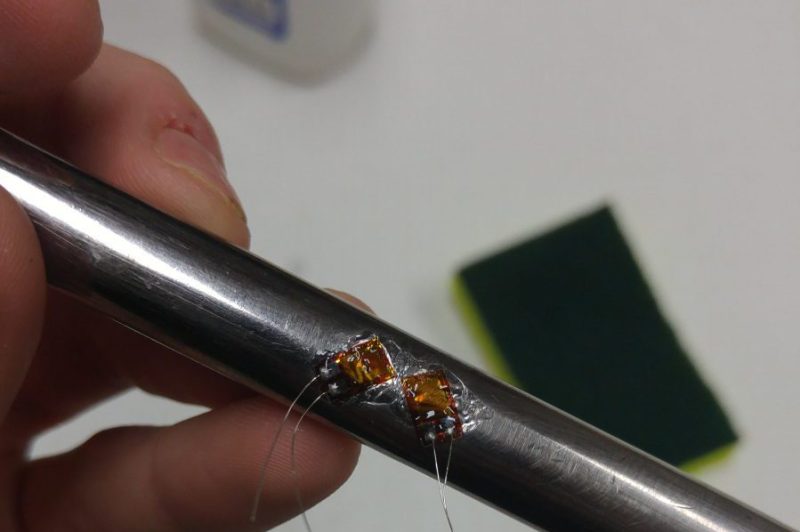
[Taylor Schweizer]’s four-part series on torque is pretty comprehensive. The link above is to the actual build of his DIY torque transducer, but the preceding three installments are well worth the read too. [Taylor] describes himself as an e-waste connoisseur and tantalizes us with the possibility that his build will be with salvaged parts, but in the end a $20 bag of strain gauges and an LM358 were the quickest way to his proof of concept. The strain gauges were super-glued to a socket extension, hot glue was liberally applied for insulation and strain relief, and the whole thing wired up to a Teensy for data capture. A quick script and dump of the data to Excel and you’ve got a way to visualize torque.
An LCD display for real-time measurements is in the works, as are improvements to the instrumentation amp – for which [Taylor] might want to refer to [Bil Herd]’s or [Brandon Dunson]’s recent posts on the subject.
[via r/arduino]


Some things that I don’t “get”.
The strain is said to be about 45 degrees but I thought it would have depended on the geometry of the shaft. Short fat shaft – wider angle. Very long skinny shaft – close to tangential to the shafts axis.
The op-amp has different input impedances on the inverting and non-inverting input. It’s all just ratios so it wont matter – but why the different input impedances.
The resistance of copper must vary so so little that this thing must need so much common mode rejection. I would have sent HF to one copper coil and measures it with the other and calculated a transfer ratio or mixed two HF signals to get a Standing Wave ratio. Is this article how this is normally done?
All the same – excellent project and well done with the documentation. I especially like to see the math is there.
Also – Varley bridge is very similar but has 3 knowns and one unknown where this one has four unknowns forming two divider ratios. The Murray loop bridge is an extension on the Varley.
The AC of frequency equivalent is a Wien bridge and is very useful for very low distortion sine-wave oscillators.
And WTH some refs –
Wheatstone bridge – https://en.wikipedia.org/wiki/Wheatstone_bridge
Varley Bridge – Murray Loop Bridge – https://en.wikipedia.org/wiki/Murray_loop_bridge
Wien Bridge – https://en.wikipedia.org/wiki/Wien_bridge
>RÖB says
>The strain is said to be about 45 degrees but I thought it would have depended on the geometry of the
>shaft. Short fat shaft – wider angle. Very long skinny shaft – close to tangential to the shafts axis.
SHort answer is torque is the result of a shear strain, and shear strains are at an angle of 45deg.
Longer, but technical, and incomplete, answer: the torque doesn’t tent to lengthen tr shorten the shaft, or change the thickness. THerefore all strains along the shaft must balance. the opposing 45 deg mountings measure this and cancel any measure along the shaft.
Simple answer: set a deck of cards on the table. Twist the top slightly. The sliding happens in the plane parallel to the table (normal to the axis of twist). This is analagous to torque. If the cards are connected by elastic material, it is exactly the same at torque on the rod. The way to measure the twisting is measure the relative displacement of adjacent layers, while not looking at length change. A single sensor can do it, but it is much simpler, and removes a calibration parameter, to use two so as to cancel out the axial component directly.
Another way to measure torque is direct measurement of hte twist over a fixed length (think an angle sensor), but, it turns out, this is a lot more difficult in practice.
I have an old style torque wrench, which is simply a thin-ish steel bar with a dial at the handle and a long needle pointing from the socket end to the dial. You turn it and it bends proportional to the torque, and the needle points it out.
It’s so old it measures torque in kilopond-meters which is not quite 10 Nm
I hope it doesn’t fracture because then it would measure in Amypond/meters which take a long time to read if you don’t blink.
oh if only there was a “Report comment -> stretching puns too far” option lol
scary as an angel.
LM358 got to be one of the worse parts you choose for this. When you are running at Vcc = 3.3V, the LM358 would only goes up to Vcc-1.5V (min) essentially throw away half of your resolution. The input common mode range is Vcc-1.5V which is very close to the input voltages. Might want to look at a rail to rail input / output opamp with low offset.
The micro has an internal voltage reference of 1.1 Volts so that’s plenty of dynamic range. You don’t want to use VCC as your analog voltage reference anyhow because it isn’t that stable. Same goes for the strain gauge voltage source as well.
In this case the author is a bit unsure what he should be doing, but he’s pretty much on the right track. One problem is that the virtual ground for the differential amp is a resistor divider, and its impedance effectively adds to the value of R8 which makes the differential amp asymmetric. The gain factor for the left side branch is smaller than for the right, which puts the result off.
To get around that, he needs to either tweak the value of R8 or put a second op-amp as a voltage follower between it and the resistor divider.
You actually want to use the SAME voltage source for both excitation and reference voltage. This is called Ratiometric conversion. This allows the reference voltage (error and drifts) to be canceled out in the math and not affect accuracy.
http://lpvo.fe.uni-lj.si/fileadmin/files/Izobrazevanje/OME/sbaa110_Understanding_Ratiometric_Conversions.pdf
The author tries to bias the output around mid rail for 3.3V, so he has no intention of using 1.1V as a reference. Anyway, this is not the way of doing things.
He could simply move the bias point to around half a volt, and use the internal reference. Looks like he’s getting around +-200 mV signals anyways, so using the full 3.3 Volt range would mean he’s only using about 12% of his resolution anyways – that is unless he adds more gain.
The gain is around 200X+ and the typ. DC offset value of the opamp is 3mV (typ) and 7mV (max), so that’s 0.6V-1.4V just for the DC offset at the output! Certainly not the right opamp to use. That kind of offset for a 1.1V range full scale, really? You can trim, but there are temperature drifts. etc. At least for 3.3V, you get some headroom for these type of things. Like I said, use Low Offset, Rail to Rail Input/Output opamp and you don’t have as much problems. Zero drifts are a couple of bucks these days, throwing in a 10 turns trim pots doesn’t makes sense.
while the absolute error of input voltage might be in the +/-1% range, You haven’t taken into account of the excitation voltage *might* not be +/- 0%. So you have to taken both the tolerances together and it is worse than +/-1%.
You want to measure the *relative ratios* of the bridge, *not* absolute voltages. That’s why there are ratiometric conversion and just because you have an internal reference doesn’t means all applications should use that. That’s pretty much a standard way for strain gauges.
I don’t know why he chose this op-amp. Perhaps it’s just what was in the old parts bin (possibly from the 80’s lol).
While certainly realize that op-amp technology has moved ahead dramatically since the era of this op-amp, I still think it is suitable for what he is doing.
To address some comments –
Vcc 1.5 Volts – no actually the min is +- 1.5 Volts or 3 volts so 3v3 is fine.
Temperature drift – this chip has very good temperature compensation.
Ground reference – this chip can do differential input including ground as an input so that is not the reason he didn’t use GND as a reference. The reason is that he is using complementary dividers as input with the Wheatstone Bridge – using GND as a ref input is not an option with this configuration.
Swing to ground output – this chip *can* do that to but this configuration is not easy to adapt for that.
(+) input impedance is aprox 150KOhm and (-) input is about 50KOhm – sure this looks ugly but he is measuring a ratio so it all works out in the wash (math) it’s just needs to included in system gain calculations.
Other points
This chip has 100dB open loop DC gain. I wouldn’t have thought you need such high gain but it does make the math easier.
This is *NOT* a GND referenced system so the analog input will swing around aprox mid Vcc (3v3/2 = 1.65v) and he is *fixing it* in software – more or less normal practice nowdays.
This chip has a second op-amp so he could have GND referenced the analog input if he wanted.
Analog References –
Using a zenner only works well (without temp comp) around 5.2volts so that’s not achievable with Vcc = 3v3 so you need temperature compensation.
You can bring the internal Vref out (from memory) but you need to do this with register settings and that is not obvious if you are using the Arduino IDE. From memory the internal 1v2 is temp compensated.
I probably would have used a LM10 as it has an internal temp compensated voltage reference but that would leave me with only one remain op-amp so I still couldn’t GND reference the analog in.
The error however seems to be quite small, below 1%.
BTW the Differential amp he is using has an input impedance of 470 ohms at each of the dividers. That kind of loading interferes with the measurements a lot. Should also considered an instrumentation amplifier.
There is another thing…. His multiplication is “about 200” on one side (100k/470) and “about -300” on the other (150k/470).
The 100k of the positive side (R8) needs to go to a reference voltage, in theory with 0 ohm output resistance. His reference however has an output resistance of 50k (R9//R10), which goes in series with the 100k (R8) he has there. The easiest way to fix it is to parallel another 100k to the R8 resistor. Or, with a much smaller error than what he has now, but not perfect, an 47k as R8.
All of these things are relevant when you are measuring a voltage.
In this case however he is simply measuring a ratio from an *already* differential device in a Weatston bridge configuration so none of this actually matters in this specific case.
I would recommend to use four biaxial gauge, mounted every 90 degrees with the solder joints pointing the same direction as the shaft (up or down), when measuring torque.
The gauge model I’m talking about is the one to the right in this image:
http://img.directindustry.com/images_di/photo-m2/56103-9282448.jpg
Nice idea but it’s actually inaccurate. An extension of any sort will reduce the applied torque to any fastener. How much the torque is reduced will depend on the diameter and length of the extension as well as the desired torque.
I think not… The strain gauges are mounted to a shaft – that’s never going to change. Add any extension(s) to that shaft and apply a torque. The shaft with the strain gauges will still see that same torque on both ends. The number, length, diameters, and materials of those extensions are not relevant to torque. Angular displacement of the system will increase (the wrench at the end of those extensions will rotate more as the extensions twist), but displacement isn’t being measured.
Otherwise, mechanics all over the world would have problems applying the correct torque with various extensions. The torque wrench reading would be meaningless.
Hi, I was calculating the change in resistance for my application and noticed a few mistakes in his calculations. The Gauge factor=DeltaR/R/strain and solving for DeltaR gives us Gauge factor*R*Strain, but in his calculation he seems to have divided by R not multiplied. is that the correct way?
The strain derivation should it be 64 instead of 4?
Please let me know.