
However you sell your kits online, you’ll have to find a means of shipping them to the customer. For an online operation this unseen part of the offering is more important than any other when it comes to customer satisfaction, yet so many large players get it so wrong.
This is the final article in a series looking on the process of creating and selling a commercial kit from a personal electronic project (read all the posts in this series). We’ve looked at the market, assembling the kit and its instructions, and how to set up an online sales channel. In this part we’ll look at what happens when you’ve made the sale, how to get it safely to the customer and how to keep the customer happy after the sale by offering support for your products. We’ll also give a nod to marketing your site, ensuring a fresh supply of customers.
Packaging and Delivery
How often have we all ordered something online only to find that the useless white-truck courier the vendor uses hires drivers who can’t be bothered to find the simplest of addresses, so we never see the product? The cheapest bidder is always the best, right? As a small supplier it is crucial that your customers come away satisfied and receive their kits, because a non-delivery costs you more proportionally than it does one of the big boys. Pick a courier not on price but on service, and make sure you allow enough margin for that in your shipping costs.
Make it a selling point that you use a tracked and signed for courier, and you will gain some customers by that alone. Often Royal Mail, USPS, Canada Post or whatever the equivalent is in your part of the world makes the best choice, because they possess the unique advantage of postal staff who really know the patch they are delivering on.
The final piece in the puzzle of getting the kits to your customers comes from the packaging. Whatever you use has to be capable of being stuffed to bursting point with your products and sent to the other side of the world without either rupturing or damaging the kits inside. The same local bulk packaging supplier you would have used earlier for your kit packaging should be able to help you with mail packaging for a much better price than you would pay from a retail source. Yet again, spend a while in their showroom trying your kits in the different options, even send yourself a test package or two, and specify upwards rather than downwards.
For a small kit in a plastic bag like our 555 LED flasher a mid-range padded envelope is fine, even when wrapped in an invoice for mailing it’s not heavy or sharp so it won’t either puncture the envelope or damage the kit. Whatever you go for, ensure that it’s adequately covered in your postage and packing charges for the weight it is likely to carry to all regions of the globe you expect to mail it to.
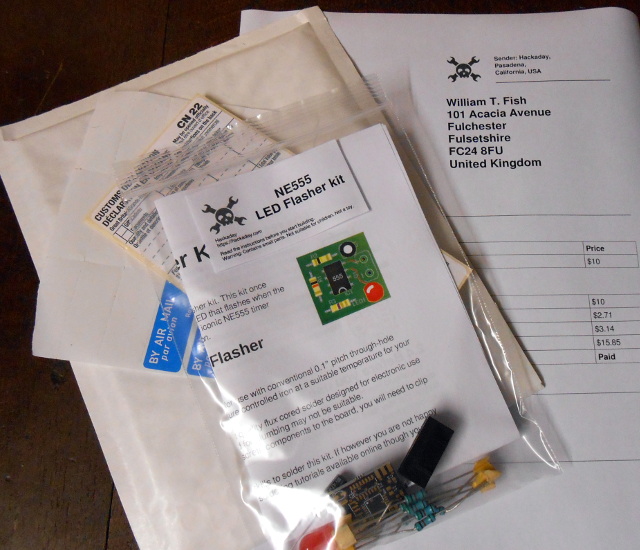
When you have an order ready to go, ensure you have all the steps in packing an order written down as a checklist. Capture the payment, print an invoice on label stationery, print another for the file, gather the kits, check and pack the kits, stick the label on the envelope, fold the invoice and pack it in the envelope, do a final check of everything and then seal the envelope. It might seem odd to have such an obvious list, but it’s amazing how easy it is to forget something, for example to find the invoice still on the table in front of you when you’ve sealed the envelope. It’s crucial that your customers receive everything they should in the envelope, so a list will help you avoid mistakes. In particular the stage of checking the kits is important, do a visual check of each kit before you pack it to ensure all its components are present.
Now to Become a Marketing Genius
Of course, thinking that merely having an online shop will guarantee you sales is likely to disappoint you. That’s such a 1998 business model! Your customers will have to find you somehow, and you are going to have to become a marketing genius to get it in front of them. Fortunately in this endeavour you have an advantage. If you are the kind of person who is a Hackaday reader then chances are you are part of the same community as your customers, so your social networks are also their social networks.
Become an active and useful person to know on the relevant forums, Twitter, and Facebook groups. Don’t spam them with your products but ensure that the fact you make them is in all your profiles. Share the interesting and relevant parts of your work — interesting manufacturing practices, neat new parts, test rigs, packaging/shipping successes and fails that show you’ve worked it out, and the awesome things you’re doing with the kit.
Keep at it and slowly word will get around that you have these kits for sale, and you’ll get a few orders. They’ll sometimes come in a rush and you’ll think you’re made, then you’ll have a month with only a couple of orders and you’ll wonder what’s happened. Eventually though you’ll have word of mouth sales and a few buyers coming back for more, and it will pick up from there.
Support Your Community
Once you have sent out your kits to customers, the tracking service tells you they have been delivered, and then… nothing. You have to assume that the customers you never hear from have happily built your kits and everything went well. Congratulations, all that work with the instructions paid off. Even the people who have problems will be more likely to come back to you with questions than to give you grief, and when that happens you should have a support strategy in the wings. If you have a reliable channel through which you can be contacted for support (maybe a Google group, Facebook group or similar) and you answer all support queries courteously and as factually as you can, then you should in time pick up a reputation for delivering a good service when things go wrong. Go the extra mile, because you will not only learn things that may allow you to improve your kits, you will also stand a good chance of enhancing your kit business on the back of it.
If you’ve made it this far through a six-article description of how to set up a small kit business from your electronic projects, then you should be well prepared to try it yourself. We look forward to seeing what you come up with!


Billy the fish. Lol
:)
Please, please, please, if you ship something to a foreign country put a CN22 Customs Declaration Sticker outside on your package. This will save your customers from going to the customs offices and spending half a day there.
Absolutely! British post offices won’t let you send it without one.
Customs forms are printed automatically if you buy shipping through the US Post Office.
This is a great series but I hope you are going to discuss cash flow management, how to research and buy parts, and inventory turns. I’ve seen too many friend’s great ideas go no-where just because they can’t figure out how to even start buying enough of the puzzle pieces to sell! Or they will buy 100 each of a few sub-parts because the buy was a “good deal” and not have enough cash left for anything else. Here’s a few tips:
1. At the end of the day, no matter what your think your project will cost to launch, the real cost will be at least 3X higher.
2. No matter how good a deal is, never buy more than 1 month’s worth of ANYTHING when you start out, no more than 2 weeks is even better. And never buy more of the most expensive items than you absolutely need even if you only buy 2 or 3 at a time. This may seem counter intuitive especially when the parts may cost 1/2 as much each buying 25 instead of 3, but locking all your money into 25 widgets when buying 3 widgets plus the other parts you need with cash that would have been spent on the other 22 widgets will fund sales NOW.
3. Don’t spend your equity. In other words, if you are lucky enough to be able to launch your project, don’t go out and buy ANYTHING (food and beer included) from your first sales until you put every penny from those sales back into the business. Continue this pattern and you may actually survive to make a little money!
Not so sure about #3. The survival rate for start up is about 10-20% to make it pass the first 5 years.
If you have the option to take the money from the first batch and leave the betting table, you should think about it. Should you take a portion of it and gamble away the remainder? At least you can walk away with some money even if you lose the chips on the table. Or stay on and work insanely for the next 5 year and may be if you are lucky to comer out with your shirt still on?
One of the things about a business is to be able to pay yourself a working salary at least at some minimum wage (and the tax man). If you can’t do that, it is not a good enough business model.
Most businesses do this by running in the red the first few years. They consider salaries, including the founder’s salary, a cost just like material and rent and insurance. And they manage salaries just like any other cost. They still aren’t spending their equity, they are consuming a pool of cash that was invested in the business.
But this entire series is about launching your own product and the cash dynamics aren’t the same as starting a traditional investor funded business. You won’t have an investor to cover your salary while you work three or more years to make a profit. If you want to be successful you have to re-invest your early sales back into your business, otherwise you are just working for beer money and I can deliver Domino’s Pizza for beer money!
#2 is great in theory, but for custom stuff like blank PCB and machined enclosures you really need to buy in larger quantities. The set up charges are the biggest cost in a small order for things like this. I might buy 20-25 pieces for the first run until I get a feel for demand. After that I try to buy 100 pieces or even 250 if it looks like I will use them in a reasonable amount of time. The price on many custom items fall very quickly in the 100-1000 piece range.
For standard stuff like ICs, caps, connectors, don’t buy 2 years of inventory to reduce your BOM cost by 10 cents. Do watch shipping charges though. If you buy $100 worth of parts and pay $8 shipping your BOM price increased by about 8%. If you have to split that order between two distributors you now have two $50 orders with $16 for shipping or ~16%.
In an earlier comment in this series someone mentioned Economic Order Quantity (EOQ) that helps you minimize total costs by optimizing your ordering. Used with some common sense, EOQ can be a useful tool.
Actually, you 100% agree with my #2 statement, you are just speaking from a different scale. And based on your statement my ‘best guess’ is you would be starting with a 10K – 50K budget. I suspect that most of this article’s readers are starting with $200 – $2,000.
The raw PCBs (boards) we buy for our controllers range from over $30.00 each for 10 to less than $1.00 each in quantities over 500. I remember when we paid those $30.00+ prices even though we pay less than $1.00 each now. But those 8 boards let us build, test and ship 8 controllers with the money we had.
Actually it is closer to 95% agreement, with custom parts being the 5%. The custom parts are frequently the most expensive item on the BOM and thus deserve extra review.
As for scale, most of my products are in the $500-$2500 budget, at least the ones I sell as kits or as complete and tested PCB assembly. The ones I sell as finished products often require cases and FCC testing so that will bring the initial costs up considerably.
My raw circuit boards run between about $2.00 and $9.00 (quantity 100). After I am satisfied with the prototypes my first production order is normally for 100 pieces. If I were introducing a product with an uncertain market and an expensive PCB, like yours for $30, buying a small quantity and cutting the profit on the first units might be a wise move until the market is proven.
My point is understand that for custom parts tooling charges can be high, and the per price can drop fast as the quantity goes up. Do some “what if” analysis with different quantities. Based on your budget, certainty of the size of your market and risk tolerance, buying a larger quantity can make sense.
PCB houses seem to have different sweet spots based on board size, quantity, delivery times and board specs. pcbshopper.com is a good place to get instant pricing from a variety of vendors. A little extra work on researching prices can yield big benefits.
I agree that PCB shops have sweets spots depending on board size. All of them start with a standard master panel size and it’s always good to tweak your board dimensions to fit as many boards in a master panel as possible. One standard panel size is 18″ X 12″ but there are other standards depending on the equipment they manufacture on. Another standard I’ve seen is 10.8″ X 7.5″
For example, if your board is 4″ X 4″ and your PCB manufacturer’s master panel size is 10.8″ X 7.5″ you would only net 2 boards per master panel. This would be expensive because you have to pay for the entire master panel regardless. But modify your layout so that it’s 3.5″ X 4.6″ and now you can get 4 boards from the same master panel and the cost per board is less! This is because 3.5″ X 2 = 7″, which fits inside the panel width and 4.6″ X 2 = 9.2″, which fits inside the panel length.
Also, I always panelize and always choose V-Score to separate the boards. Our current controller is built on a 40-up panel that’s on a 4X10 array. For those following this thread this means my boards arrive in sheets of 40 that are 4 wide by 10 long.
And the advantage of doing this? There’s not much advantage if you are shipping an unassembled kit but we load the panel on our SMT (Surface Mount) machine and place parts on all 40 boards at once. Then we reflow the solder on all 40 at once, break the boards apart along the V-scores and finish with mechanical assembly. Panelizing saves us a tremendous amount of internal labor.
Sage advice, but the focus of the article is specifically about bringing a kit to market and not about running a business.
And yes, I eat because of the other work I do, not because of my kit business. I’m still in the phase at which everything the kits earn goes back into the enterprise.
Obviously there’s some argument as to where to put the slider on the “lean” vs “bulk purchase” scale. Especially when things like tooling costs etc. come up.
There are some things you can do to optimise the situation though – like trying to use as few individual parts as possible. Got a 3k3 in the analog section? Then your I2C pullup resistors could be 3k3 too.
One big plus of running a light operation is that if you want to revise the kit (bugfix, improvement, whatever) you aren’t left holding a pile of unusable stuff. From experience (and it wasn’t my money!) it kinda hurts to throw out hundreds of units because they’re out of date.
I have a couple things to add!
I was surprised by a few things when I was putting together my first kit because at the time I had never really seriously shipped or packaged things before (just ones and twos prior to that). Without getting into customer handling or business management, here’s some stuff directly related to getting a kit into people’s hands (aka what I screwed up on by not anticipating):
1) Cardboard boxes are expensive! It’s easy to mentally slot cardboard boxes as kind of ~free~ because we all have spares we just get rid of and they seem to be everywhere. But if you want new cardboard (even off-the-shelf “new” options and not custom-made or anything) they cost real money, and more than you might think!
2) Shipping is expensive! Places like Amazon can ship their customers stuff super fast for super low prices, but that door is simply not open to you as a hacker making a few kits. Your kit will have to handle being subject to “over the counter” shipping rates.
3) It’s worth researching what your carrier’s prices are for size/weight combinations. A couple centimeters in the wrong place or an extra dozen grams that don’t *need* to be there can be dollars of difference in shipping costs (because you might be over a limit, therefore excluding you from “small package” rates, etc.) Put another way, decisions made wayyyy back during your Design phase can affect your shipping options.
#3 is right on. I almost exclusively use the USPS Priority flat rate service. It is expensive especially after their big price hike earlier this year but still less than other carriers for small quantity shippers. Offsetting part of the cost is you can get free boxes and padded shipping envelopes you would otherwise have to buy.
The down side of their packaging is that I am convinced they spend a lot of money sizing the boxes so they are just a bit too small for standard sized items forcing you to use larger and more expensive ones. Get some sample boxes (you can order them online) before you finalize your packaging. Figure out how to use the smallest box possible.
The flat rate boxes & envelopes cost the same to any US address regardless of the weight. If you sell small heavy stuff you can save a lot of money over the other shippers.
International shipping is really expensive regardless of how you do it. A padded envelope to Europe is $33! You fill out the customs stuff on line with the USPS shipments, which is nice. If anyone found a cheaper method let us know!
Try living in Australia (or New Zealand). Yikes!
If you ship several packages per week, check out Endicia and similar services.
Also look into First Class mail international packages if your items are not too heavy. Starts at less than $13 for a padded envelope below 8 oz for all overseas destinations.
Sage advice. Yes, price *Everything*.
Very well said, especially #3, it has always bothered me how the shipping companies have hard limits. Going from 100g to 101g might double or triple you cost in some cases.
I read about 15 years ago, that it cost $5 to make a VCR in China. And it cost $5 to package it.
The ratio between retail and manufacturing, or in the case of import landed cost, the ratio is about 3:1. In other words, if retail is $90 then manufacturing or landed cost should be around $30.
make sure to have it stocked within the country that it is being shipped to so it delivers fast
Yes, but sadly not an option open to a business the size of mine or most people likely to be starting on this path.
then maybe have american dealers with stock in america.
Sadly we do not all have the resources. In equal measure an American starting on this path can’t afford to maintain a stockist in Europe.
This solution only works if you are selling volume and by default, does not apply to this thread.
I read the whole bunch of articles here, because I was interested in the same topic and I wanted to see if it worths it to start a small kit production or not. Before I say anything, I have to admit your articles were quite complete and very informative.
You know what? To me it does not worth the effort as I read it. Just look at all this time and effort and cost spent just to gain a few bucks. Your day job, will make you gain way more, at much less effort. You suggest not to quit your day job, but this kit business will take you most of your day. Not to mention that if you have a family you may ruin it if you work all day… for just a few bucks of profit! Just think about all these things and the transportation from place to place to prepare and buy all these stuff, the envelopes etc. You even have to calculate the cost of the printer inks if you want to have at least some profit.
I say “gain a few bucks” because to my view, not many people are going to buy the kit if it is too expensive. And you cannot make a kit cheap enough as a starter to compete to the commercial products. If you leave in other countries with low average incomes, it is woth it, because a single $ there worths much more, but in Europe, USA, Japan and other areas you won’t benefit much out of it.
And now let’s come to the quality of the components. You cannot make a good quality kit and cheap at the same time. For example see the prices of Vishay resistors compared to the no-brand Asian ones. They are of the order of 1:50 or 1:100. Now there is a big dillema here. Which way to go, the cheap and low quality way, or the expensive but high quality way?
Unfortunatelly, my experience has shown that people want to buy the cheapest possible stuff, no matter if they are soon proved useless to them…
I am sorry to put you on your feet, but it might save other’s pain for all this mess.
I would really like the things to be like in the past where people were building stuff and the magazines were full of nice discrete circuits.
Thanks for the articles. After reading, I don’t consider making a kit any more :) It was also fun to see how the lady’s haircut changes over time :)