Greetings fellow nerds. The Internet’s favorite artificial baritone chemist has a problem. His hotplates burn up too fast. He needs your help to fix this problem.
[NurdRage] is famous around these parts for his very in-depth explorations of chemistry including the best ways to etch a PCB, building a thermometer probe with no instructions, and chemical synthesis that shouldn’t be performed by anyone without years of experience in a lab. Over the past few years, he’s had a problem: hotplates suck. The heating element is usually poorly constructed, and right now he has two broken hotplates on his bench. These things aren’t cheap, either: a bare-bones hotplate with a magnetic stirrer runs about $600.
Now, [NurdRage] is asking for help. He’s contacted a few manufacturers in China to get a hundred or so of these hotplate heating elements made. Right now, the cost for a mica and metal foil hotplate is about $30 / piece, with a minimum order quantity of 100. That’s $3,000 that could be better spent on something a bit more interesting than a heating element, and this is where you come in: how do you build the heating element for a hotplate, and do it cheaply?
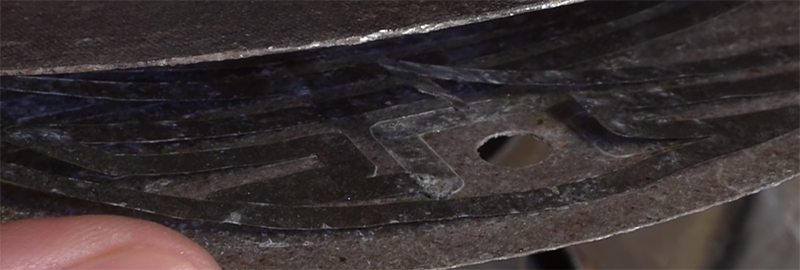
If you buy a hotplate from the usual lab equipment supplier, you’ll get a few pieces of mica and a thin trace of metal foil. Eventually, the metal foil will oxidize, and the entire hotplate will stop working. Repairs can be done with copper tape, but by the time that repair is needed, the heating element is already on its way out.
The requirements for this heating element include a maximum temperature of around 350 ºC. That’s a fair bit hotter than any PCB-based heat bed from a 3D printer gets, so consider that line of reasoning a dead end. This temperature is also above what most resins, thermoplastics, and composites can handle, which is why these hotplates use mica as an insulator.
Right now, [NurdRage] will probably end up spending $3,000 for a group buy of these heating elements. That’s really not that bad – for the price of five hotplates, he’ll have enough heating elements to last through the rest of his YouTube career. There must be a better way, though, so if you have an idea of how to make a high-temperature heating element the DIY way, leave a note in the comments.


I would find a rock, a really big rock…
Oh, say, about the height of a man and in the shape of a large cone.
Then you cut the top of the rock off, down from the tip of the cone so that your left with a flat bit about the same diameter of the original hot plate.
Then you build a giant fire around the big rock cone and heat the rock just above the temperature needed to do your chemistry.
Then you kick away all the logs and stuff you made your fire with until you have a large hot rock to do you chemistry with.
As long as your rock has enough thermal mass, you could do some heating on it for quite some time. And for cheap too!
Well at least he doesn’t sound like a chipmunk when you play it at 2x, because screw videos for tech info, typical youtube problem of 1000 frames isn’t worth a decently worded paragraph.
Holy shit it’s fuckface. Everybody, this is one of the finest commenters Hackaday has ever had. He is the Haut-Brion to the box of Franzia that’s usually found here. GOAT material. He is the troll you should all aspire to be.
Long time no see, fuckface. A lot has changed since you’ve last been around. The comments here have gotten even more racist, even more homophobic, and now we’re seeing an increase in climate change deniers. You’ve got a lot of work to catch up, but I believe in you. Good luck.
Make Hackaday Great Again!
Well, that escalated quickly.
I wish I was that well appreciated around here :)
Sorry dude, it’s a fair criticism. An alternative although imperfect solution is to turn off the sound and turn on subtitles. THey are done manually to match the audio.
or open your Realtek HD audio manager if you have it, go to ‘sound effects’ and change ‘karaoke’ to +2, +3 or +4 and guess what nurdrage’s real voice sounds like
I don’t have that. But even if i did, me changing those settings wouldn’t affect the output of the video.
Unfortunately that takes too long to set up. It also lacks magnetic stirring capabilities.
Just put the rock on the north pole.
What would that accomplish? there wouldn’t be any stirring
When the magnetic poles flip, you will get your stirring.
The elements you are using potentially have a number of problems.
The first is the track design. All metals expand when heated and a track design must take this into consideration so that the expansion is consistently even across the linear distance of the heating element. The one you displayed clearly has points where the effects of expansion are concentrated into specific points that are then the weak points at which it breaks from metal fatigue.
The second suspected problem is the metal used for the heating element. It almost looks like a ferric iron and this would explain the oxidization. Nickle Chromium is the preferred metal for this application. Nickle Chromium is more resilient and has less issues with metal fatigue but has the drawback of an even higher expansion rate with increases in temperature. Nickle Chromium (Nichrome) is used in hair dryers and you will see a coil like structure wound in loops to compensate for the expansion rate.
A third possible problem is the fact that it is made in China and Chinese factories often use a 110 Volt designed heater for 220 Volt – 240 Volt appliances and the quadruples the power dissipation of the heater vastly reducing it’s life expectancy.
If you are using this heater for constant temperatures then I would suggest a Nichrome element and the design of that would be a little more complex but it’s like expectancy would compensate for that. You can still get a relatively thin Nichrome heater but it would of course be thicker than the ones you are currently using so the magnetic strength would need to be adequate. The disadvantage of this would be that it takes slightly longer to reach a stable temperature and it would be less suitable for a changing temperature or temperature profile.
In any case, I would suggest that the current failure rate for the heaters you have been using justifies the expenditure for a higher quality heater that would most likely be more financially economical in the long run, not to mention the frustration it would certainly save.
Anyway lets see what others have to offer here.
Expense does not equal quality. I’ve had very expensive $2000 hot plates also fail, when i opened up to repair them i found they had the exact same elements as the cheap ones. So throwing money at the problem is NOT “more financially economical in the long run.” Telling me which hot plate is of quality design would be more helpful.
Currently use the mica heater, that’s have metal as conducter and heater, and mica as insulation material to protect the component. The flat construction is easy to make the heater as a fashion decorative picture
How about a wire wound resistor or some number of them? Ohmite makes a number of them that are good for that temp and higher
I would go with a standard stove top electric element, aluminum or copper plate, and a PID, ssr combo. May take a stronger magnet on the stirrer drive system. Cartridge heaters in the plate may also be an option.
I second this. A stove top can handle a lot of heat and is durable. A thick aluminium or copper plate to spread the heat evenly and a PID for good control.
Stirrer should be possible also, but maybe machining a ‘hole’ (not all the way through) in the center so the magnets can get closer. Seems like a reasonable solution in my head.
This sounds like a good idea. Then the element can be further from the center to allow the magnetic stirrer to be closer because the copper or aluminium (aluminum) plate would distribute the heat evenly. It would perhaps be a little less efficient due to the lost heat at the outer edge but that is not a critical consideration and you could insulate the outer radius if it was a concern.
It may also be necessary to cut a slot from the center of the heat distribution plate to the outer edge to prevent Eddie currents interfering with the magnetic stirrer.
Was thinking the same
Yup, i’m definitely considering it. I think the plate with cartridge heaters might be the better option since it allows more control over the shape, size and surface. Stove top heaters are good. But they’re all too large and once packaged into a chemical resistant plate somewhat too thick for magnetic stirring.
I’m looking into the cartridge heater idea.
So a stove plate heats, but the magnetic stirrer stops? Maybe its time to also look at alternatives for the stirrer. A side mount, for example…
Plate with cartridge heaters work great. I have built several. There may be some things to work around for the magnetic stirring, but possible. Let me know if you need assistance.
Remember, if using an aluminum plate , a spinning magnet will induce eddy currents, producing lots of drag on the stirring assembly, and may be enough to block the flux from reaching your stir bar.
At least the wasted energy ends up as heat, which is what you want in that plate of aluminum. :-) Based on personal experience, the eddy currents from the slow stirring process are minimal and any magnetic shielding effects of even a 1/4 inch sheet of aluminum are also minimal, basically undetectable when playing with magnets and the sheet of aluminum. The sheet may as well be a piece of wood magnetically when magnets move at such slow speeds.
its a great idea, but it has a steel backing which blocks magnetic stirring.
I have no experience with these things, so I apologize in advance if this is a silly idea. Who says the stirring action has to come from beneath the vessel you’re heating? How about something like a large home-made field winding hooked up to a brushless motor driver circuit? The magnet in the solution would then be the ‘armature’. The field assembly would have to be big enough to fit around the vessel you’re heating, and would need some heat shielding, but it might be a workable solution. Just a thought…
Yea, thats the way to go. Just make sure your design doesn’t let the magnet get too hot to the point where it crosses its “currie point” and destroys the magnetic qualities. It should be doable but it is something to watch. :-)
For reference, the curry point is after about 5 beers.
It can vary, depending on tolerances.
an important requirement omitted from the description here is that nurdrage wants a hotplate with stirrer functionality. that rules out large heated rocks, and probably a lot of things involving thick blocks of metal or rapidly changing magnetic fields.
my initial reaction is to machine a heating element out of copper sheet, and wedge it between rigid mica plates https://www.ashevillemica.com/category/mica-paper/rigid-plate then build a current source based around charging inductors and shorting them into the copper element.
I wouldn’t rule out rapidly changing magnetic fields. Using the same set of coils to make an induction heater and a solid-state stirrer would be quite a nice touch.
You mean, like, making a superposition of HF and LF magnetic fields, perhaps by using PWM on HF current driving the coils?
That would be interesting … Even more so if the stirrer could double as submerged heater as well, heating the solution from inside of the flask or dish, if application allows that.
But how would the temperature control feedback work then? If it is done from the base contacting the bottom of containing dish, sensing has to work in spite of induced interference.
Induction heating is great, but the drawback is that it would totally kill any magnetic stir bar i put on top of it.
Since oxidation seems to be the ultimate enemy, we need to stop it. I’d try a few coats of Heat resistant paint over the element. Something like this:
https://www.rustoleum.com/product-catalog/consumer-brands/auto/specialty-paints/high-heat
Could the heating element somehow be encased and filled with an inert gas or even mineral oil?
I know it would be waaaay overkill but wouldn’t an induction hotplate be awesome? I mean for 3 grand…
I thought of induction heating too. Problem is it would kill the magnetic stir bar. Its a good idea though.
You would need two sets of coils. One in the middle (with a diameter of the stir bars length) and a slow rotating field. And a second set of induction coils arranged as an annular ring which inductively heats a steel ring as a heating element.
That still sounds like it would kill the stir bar. But if you’re confining the magnetic fields to their respective regions then separate problem is that now you have uneven heating of the hot plate. Borosilicate glassware can only tolerate so much.
For our purposes at work, we use a few cartridge heaters buried in an aluminum plate. For control, we use an off-the-shelf PID controller from any of the standard suppliers, but something homegrown would certainly work as well if not better.
We used to use cheap hot plates with bimetal thermostates, but found that they weren’t nearly as temperature stable as the ones we could make. And, the surface temperatures would vary wildly across the surface. When we designed our own, we went with a thicker aluminum plate. Of course, the thicker you go, the more expensive.
thanks, i’m definitely considering the cartridge.
How thick are we talking here? Is 6mm plate thermally conductive enough to heat around the edges and keep the temperature variation small enough?
Also, I’m curious if relatively even heating could be provided by an assembly of two thin parallel plates separated by a small air gap with a plurality of thermal bridges between, arranged in such a way as to conduct the heat from the gradient created by cartridge heaters peripherally arranged on the lower plate into the upper plate in a more uniform gradient. The bridges would be sparse near the cartridge heaters and denser away from them. Just an idea I’ve wanted to run through a thermal simulator someday.
Why would anyone need that lever of thermal accuracy apart from a meth lab or making TATP? (WARNING: Never make TATP with remaining limbs)
The dissipation is normally specified in Watts per sqr cm just like heatsinks and all the same math applies. So there is always going to be some variation in temperature towards the corner of a square plate or the nodes between heating elements on a round plate.
As a general rule aluminium (aluminum) is better at storing heat than copper but copper is better at conducting heat. How they dissipate heat into air depends on the surface finish. Smooth or polished surfaces dissipate very little heat and Anodized (Al) or Oxidized (Cu) surfaces dissipate more heat.
Specifics numbers are out there and it’s easy to make calculations.
> Why would anyone need that lever of thermal accuracy
Perfectly browned pancakes?
1) Collect toasters.
2) ???
3) Profit!
But seriously, I think a $10 toaster has enough heating element in to do 2 hotplates, maybe I’m wrong and you’ll use all of it.
I’m thinking along the lines of rewrapping that radially around a donut holed slab of the heatproof insulator. Gut feeling is you want to drench it in water while you’re trying to holesaw it, and it’s still gonna be messy. It will probably end up a little thicker than stock element.
Dead (Hopefully free!) toasters probably have enough to work with also. Finding decent crimp connections might be a challenge, if in doubt, soft brass tube and mash hard with pliers.
I was thinking nichrome heating element wire; a toaster would be a pretty good source of that. Maybe make a base out of fireclay that it runs through. Something like David Gingery’s “Little Bertha”, rearranged into a hotplate geometry. The “Little Bertha” could be run hot enough to melt aluminum; it should be overkill, in a good way, for hotplate duty.
I actually tried winding a spiral coil with nichrome wire for months. I kept ruining it because the wires kept touching themselves and shorting out. i’m sure it can be done. I’m just too much a klutz when it comes to engineering.
beads!
I’m thinking a spider coil and fiberglass yarn to separate the wire turns.
Your experience with nicrome is much the norm because nichrome has a very high expansion rate with increases in temperature.
Toasters solve this problem by having a lot of thick nichrome and having it well spaced out.
Hair dryers solve this problem by using thinner nichrome but winding it into a small diameter coil and then winding the resulting coil onto a larger diameter coils. As the nichrome heats the smaller diameter increases more leaving the larger diameter more stable. Also because the voltage difference between windings of the smaller diameter is very small, the effects of a short between them is minimal.
When making a printed heater like the ones you have – the heating material expands and the magnitude of the expansion is dependent on the length of the track so it has to reverse direction very frequently or it will develop metal fatigue points just as you have experienced with the ones you have.
One weak point with using nichrome is that you cannot have a lot of electrical connections unless they are mechanical connection which themselves cause metal fatigue unless they are away from the main heated area and at a lower temperature. So your heating element must be thick or short to achieve a higher power output at a specific voltage.
Nichrome also has some memory effect. You can wind it or ‘form’ it and then take it up to several hundred degrees Cesius over it’s expected operating temperature with external heat like gas and that will help it hold it’s shape in lower temperature usage ranges.
So if you wind a spiral then you only have one length and no reversals, this is the worst case for dealing with expansion and it will try to expand it’s diameter unevenly.
If however you use a star like pattern you can have one reversal on each path at the center and several per loop at the outer edge. Then the issue becomes – how to increase the winding density at the outer edge so that the heat is not concentrated in the middle. This can be solved by extra loops on the outer edge where there is more space and a hot plate thick enough to spread any remaining irregularity. The problem is then that the total length is long so it needs to be thick or low power.
So I guess what I am saying is that the Nichrome idea can work but you will have to inspect how others are made and do some research as it is not as simple as it may first appear.
Alternatively the pre-built heating modules would be best and also as others have mentioned – PID controllers are plenty and cheap on ebay. You could just modify the existing hardware.
A word of advice, once you heat up the nichrome/kanthal to above a few hundred deg.C it forms a layer of electrical insulation oxide on the surface which prevents shorting if you coil the wire. I saw one of your replies complaining of shorting, but if you bake your coils before use you shouldn’t see any problems (and the thermal output is much unchanged). You could even pass current through the straight wire first to oxidise, then coil, but I haven’t tested to see if this works well.
Step 1: Buy Note 7
Step 2: Plug in Note 7
Step 3: ?
Step 4: Profit!
funny thing a note 7 is as cheap as a hot plate. Which means hot plates are bloody fucking expensive. It’s blatant price gouging worse than apple but i have no idea what can be done about it.
I’ve been aggressively not buying one for every single second in the last 2 weeks. By MPAA/RIAA math, I have already cost Samsung half a billion dollars.
This comment made my day.
My god! I stopped buying music when the CD was introduced, how much money have they lost?
Seems like if he bought a decent hotplate to begin with (for example, the IKA C-MAG hotplates seem to run forever) he would not have an issue. They are built with a ceramic hotplate with a completely embedded heating element that is protected from spills and whatnot. It also looks like he works with a lot of corrosives (judging by the amount of corrosion on his hotplates, not to mention the general crap they are covered with) so using a hotplate with an unsealed element seems like a poor choice to begin with.
PS The style hotplate he has is an chinese import, and is usually sold for for $100-200 (ex see https://www.amazon.com/Scilogex-86143101-MS-H280-Pro-Circular-Top-Magnetic/dp/B00AYGIFCA/ ). You can get a used IKA C-MAG in pretty good condition used for $200 (they are about $600 new). Seems a lot easier than buying $3000 worth of crap Chinese elements…
Yup i’m definitely considering other brands. In fact i made the video requesting brand types (as well as fixes) and got some very good responses. The top brand by number of votes so far is corning. second is IKA, and third i think is heidolph (sorry if i’m spelling that wrong). Do you have any experience with Corning? I had two cornings break on me in the past but then again 2 out of 2 sample set is hardly scientific. Maybe cornings really are better and i just had bad luck.
I have 7 smaller (200W and 550W) Corning plates, all from the early 1990s, all running fine. They run maybe 200 hours a year, sometimes for days at a time, but I don’t often run them above 150C, and rarely above 250C, so I can’t say how they’d handle that sort of hard running.
I can take one apart and take some pictures if seeing the construction of the heating element would be useful. I need to evaluate the internals for putting a programmable temp controller in it anyway.
Just thinking, government surplus auctions are a good place for older, top brand, built like a tank stuff.
I might have the answer. A while ago (about 2 years) I build a hotplate and it is stil functioning today and I used it alot :D. Also the heint element is very thin. I just searched my ebay history but i haven’t found it yet. I believed I paid around $10 to 15 dollar a piece for the heating elements and still have 2 spares laying around. (was planing to build more hotplates)
Here you can find a few pictures https://tklijn.wordpress.com/2016/04/06/500w-hotplate/
why thank you, that is very helpful! What’s the maximum temperature?
I experimented with etched stainless-steel heating elements. It made a vinyl mask with a plotting cutter and etched stainless-steel shim stock with Ferric Chloride. I sandwiched it between two aluminum plates that were sprayed with ceramic, high temperature paint (like something you would use on an engine or a grill), then hooked it up directly to a Variac. It wasn’t safe, but I was just testing out a hunch. It worked for a while, but the ceramic paint wasn’t insulating enough and it shorted rather spectacularly.
I never got around to it, but I suspected I could fab a pretty robust low-temp heating element by pouring silicone over the element (you see them for sale all the time). Maybe I’ll resurrect the idea and give it another shot.
Silicone and paints aren’t going to fair well at 350C, but mica sheets (such as from a toaster) would probably work well. I’m curious how the stainless steel would handle the fatigue of temperature cycling. Seems like the pattern might be important to reducing flex.
I’m skeptical that ferric chloride etched stainless steel.
There are ferric and non-ferric grades of stainless steel. You can tell them apart by putting a magnet on them.
Non-ferric stainless is often used for the bolt that goes through the middle of a torroidal transformer so that it doesn’t ‘short’ the magnetic field. Most nut’s and bolts (stainless) are ferric. The screws in hard drives and the kitchen sink are very low levels of ferric.
I don’t know which ones are which by the number.
Right, I was having a different kind of brain fart, thought it displaced copper in board etching by the metals co-opting each other, but no, when it goes into solution in water you get a HCl, hydrochloric ion out, so it’s basically acid doing the job.
I might have the answer. A while ago (about 2 years) I build a hotplate and it is stil functioning today and I used it alot :D. Also the heathing element is thin. I just searched my ebay history but i haven’t found it yet I believe ebay deletes purchase olden than 3 years. I believed I paid around $10 to 15 dollar a piece for the heating elements and still have 2 spares laying around. (was planing to build more hotplates :P)
Here you can find a few pictures https://tklijn.wordpress.com/2016/04/06/500w-hotplate/
found something that looks about the same as the one’s I have:
https://www.alibaba.com/product-detail/Hot-Sell-Mica-Heating-Element_60042331915.html?s=p
Google tells me nichrome foil is gettable by the reel in thin or quite wide widths. I hear tell sheet nickel is able to be cut on a laser cutter, so possibly nichrome is too???
Graphite?
can’t you do something with an electric welder ? large current equals high temp.
Not sure if you can keep it separate from the stirring apparatus, but maybe a cheap way
to generate heat in a metal plate ?
e.g. like in this item : http://hackaday.com/2015/06/16/mini-arc-furnace-melts-its-way-into-our-hearts/
Copper and other soft or lower melting point metals are not fit to use as heating elements. There’s all those Cadillac heated seats that just stressed copper wire, and then went dead. Ni-chrome is made to hold up to just about any app.
if you can get someone to make you a hybrid board, you could use appropriately resistive material on ceramic base material and cover it with two layers of silicon dioxide overglace. This works pretty good for heating elements in sensors. Under that ceramic plate you could place the motor for your magnetic stirrer.
interesting! i hadn’t considered that. Thanks!
1) Seal the cheap crap element in fire clay perhaps.
2) Sandwich the cheap crap element between two layers of aluminium.
3) Adapt a ceramic hob element. These are the most practical, since you should be able to replace the heater wire. A large reel of nichrome wire is not very expensive, so to replace it all you should need to do is identify the length requires, wind it on a suitable former and crimp or baize it in place of the failed wire.
By the way, could attempt repair in meantime with “defogger repair” paint or 2 part gloop. It’s meant to stand up to “some” heat and stick to nichromeywomey type stuff. Find it in auto repair suppliers. Though I’ll get TPB’s Ricky to quote you a best case ontario of sixty sixty it works.
Stainless steel foil.
Borrow the ideas behind 3D Printer PCB heat beds for a pattern, but laser cut the metal from stainless steel foil (shimstock) (McMaster Carr does cut shimstock as a service if you don’t have a better option, 12″x12″ max $60-$100 depending on material) Braze or silver solder the connections. Sandwich the element between fiberglass fabric (no resin) for electrical protection. Sandwich that with a heat spreader plate on top, and insulation on the bottom.
How about a stand-alone magnetic stirrer and 1 or 2 cheap heat guns from the sides for heat.? Temperature control is left as an exercise for the reader…
Hello,
what about nichrome wire with some kind of pattern then pouring concrete onto it?
And for the stirrer, i guess that strong magnets with motors could go below.
I’ll chime in a vote for the cheap stainless cartridge heaters, as we tried them in a titanium-tub wave solder unit retrofit.
e-Bay materials:
$15 PID module with type-k thermocouple, and 5v logic signal out (relay outputs are a joke)
$5 25A solid state relay
$20 four 120V 300W stainless steel tube style heaters (we usually design in multiples of two, so 240v users can easily make things work by selection switch.)
Notes:
1.
Use conduit clips to mount heaters in oversized holes with high temperature automotive head gasket sealant.
Otherwise, most ceramic heaters crack apart with physical size changes during temperature increase.
2.
Although this apparatus will certainly draw over 1kw… going to red-heat is not a good idea for a few reasons.
3.
A 304 Stainless steel plate should work fine, and retain even heating… though Aluminium would normally work better…
If you want a precision custom stirrer, than an arduino with stepper driver (RAMPS kits are $20) could be a cheap solution… with a bit of development it could also do the PID part too…. ;-)
Or maybe a simple iron-skillet may be hot enough for your needs (usually <300'C).
Like your videos by the way ;-)
Catalytic converter FTW!
If you’d pardon my ignorance– why does the stirrer have to be on the bottom? It seems like you’d have a lot more options I’d you set up something, like, 4 magnets around the side of the bottom and drove the stirrer like a stepper? The accel would be tangential to the magnets if the stirrer already had angular momentum, but perhaps you use glass stong enough to take it? Seems like a more interesting option, if the whole industry of stirrers uses only one mechanism…
Because moving components need lubrication to overcome friction and heat travels upwards and will burn off any lubrication.
If I’m understanding [Errana’s] description, the only moving part would be the magnetic stir bar, which resides in the chemical being stirred. Interesting idea, though it would need some careful control to avoid firing the stir bar through the side of the flask and across the room.
tl;dr: It’s on the bottom because it’s cheap, safe, and cheap.
It’s generally on the bottom because that keeps the coupling distance between the driving magnet and the stir bar small, and keeps the stir bar passively centered. Small coupling distance is good because if it is large the rotating field is also large and interacts with other nearby stuff, which is inconvenient (maybe a good motor stator-like field coil could fix that, but it would be heavy and take some control electronics to handle the high current, which would cost more). Centering would still be a problem I’d think. Stirring hot, toxic stuff at high rates with a stir bar that wants to fly off to the side and fling the beaker off the plate sounds.. exciting.
Can’t you heat a fluid in a unit off to the side or below the bench and run it up to the reaction container with titanium tubing so that your heater is never exposed to the corrosive compounds that you use? This also allows the heater to be bigger and more robust. Make it a reverse cycle heat pump (can they work over a large enough range?) and it suddenly gets way more useful, because heat pumps have a hot and a cold side, like the different parts of a lot of your set ups often need.
Even the stirring part can be reinvented as two sealed electromagnets that are controlled by an MCU so that they pulse like the parts of a simple stepper motor, with the stir bar as the rotor. You position them off to the side of your reaction vessel and they are independent of each other so you can move them around.
As DKE said – laser cut steel shim stock. I’ve actually done this as a prototype (for a 3D printer heated bed, actually…) – a 40W Epilog laser can cut 0.001″ (“one thou”) steel in a single, very slow pass. I made a chart calculating trace distance vs. width based on resistivity (the basic property of a material, not the resistance of a given sample), chose one that was reasonable, and made the pattern in SolidWorks, trying to keep the cross section identical across the trace. It was a bit difficult to cut (the steel liked to peel up after cutting, getting caught on the air assist nozzle or autofocus plunger), but it worked well enough, and once soldered up, performed well. This was only to test a given power heater, so I didn’t run it for too long, but for the price, it could definitely be worth trying – McMaster has a 12″x120″ roll for $36, which guessing at a 6″ target diameter (even though the video looks like it’s closer to 4″) yields around 40 heaters, or a 8″x12″ sheet for $6 if you just want to test one or two. Most FabLabs have Epilog laser cutters in a usable power – ours is a 40W Epilog Mini/Helix.
I’ll tell you a tale of how such problems were avoided by arcane techniques by the masters in the labs of long ago, listen carefully…. bunsen burners and glass stirring rods. :-P
Dude what is your problem? I’m sorry if i offended you in the past. God knows i’m an asshole.
Depends on the planed reactions. Some organic solvents are quite flammable. You do not want to use an open flame in this case. And by the way: Railways are not steam powered any more.
Though it’s a moot point if your electric heaters are going to randomly blow out with some regularity. They would be an ignition risk at time of failure.
Domestic electric frypan, alloy, non-stick coated, with temperature control, and room for a makeshift magnetic stirrer beneath (never tried). Can also be filled partially for a hot water or hot oil bath (careful!). I use mine to make gallons of Ethyl-Esther Bio Diesel (yes Ethyl).
Yay NurdRage!
Filing it with oil is about the only way to overcome the huge thermal hysteresis of those bi-metallic strip regulators that are about 10 seconds away from the heating elements.
Problem then is that ferric metals will cancel the stirrer by mono-poling the stirring magnet and non-ferric metals will cancel the effect of the stirrer by reflecting a reveres magnetic polarity due to Eddie Currents.
Then you have an even worse problem. Hot oil is extremely dangerous, it has a low flash point and is extreemely efficient at burning flesh.
Polydimethylsiloxane is safer, but contained in a pipe coil is even better, particularly if there are no joins or seals where a leak would result in an unconstrained spray.
Yep, all good points, RÖB. My needs won’t be as critical as others, but the frypan was a real cheap way-out for me.
I use a similar technique for etching with Ammonium Persulfate which need to be at 70 degrees Celsius.
I place an oven tray on a stove top element and half fill it with water and I place some spacers in the tray and a Pyrex glass dish on the thermal isolating spacers so that the poorly regulated higher temperatures from the heater are limited to 100 degrees Celsius by the water.
I then bring the water to boil (only once and I turn off the element) and wait till it drops back to about 75 degrees Celsuis and add the etchent. When it drops further to 70 degrees I add the copper laminate. The thermal mass from the water will keep the temperature stable long enough for the etch to complete. At times I also add cold water to bring the temp down from 100 a bit quicker. All of this is done with careful temperature monitoring with at least one digital thermometer.
The same could be done with an electric frying pan. But you need the water and thermal isolation from the metal or the thermal hysteresis from the poor temperature regulation would break the glass or cause unwanted and dangerous side effects.
Stove top elements have poor regulation and electric frying pans are far far worse.
I’m resisting the urge to suggest a deep fat fryer and synthetic motor oil, in case anyone takes me seriously.
There’s not much in life that is more scary to me than high temperature oil.
I did work with larger hot oil cooking vats when I was younger. Then later in life I use a domestic bench top deep fryer but I shortened the cord and placed it always at the back of the bench.
I would not consider, even for one moment, increasing the risk of horrific if not fatal burns that could result from using a deep fryer for an unintended purpose.
It’s much safer if you just mix in some gasoline and light it up. Then you don’t need the dangerous mains voltage at all.
My first thought was electric stove hotplate BUT that has been well covered.
So, what about the heating element from an electric jug / kettle?
Would that get hot enough, and would it interfere with the magnetic stirrer?
From a jewelers view I can only recommend you a thin platinum foil, which is completetely inert to oxygen, hydrogen and most common acids (Besides Carbon), but costs are of definitely higher than FeNi!
… and it would also be at risk of runaway overheating with some organic vapors like ethanol which it is highly catalytic to the oxidation of.
For my project I did have to warm a stainless steel machined part up to 400 Celsius degrees.
I used 4 cartridge heaters of 150 W each custom made from this company http://www.kvmheating.com from Thailand
When I installed the heaters one failed but the other three lasted many years, still working.
Right now I do not recall how much I paid for it but it was not expensive considering that I ordered 4 pieces custom made for me.
They can made small volume heaters of various kind but I do not know if they can export
If no one has suggested, use a crock pot with a removable pot. They usually have a hole in the bottom for spills to drain.
Mount a motor on the bottom or coil in the center for the stirrer.
Yea, the coil idea sounds great since it can’t demagnetize with heat like a magent does. :-)
“a bare-bones hotplate with a magnetic stirrer runs about $600”?
http://www.ebay.com/itm/171962756826
Note that that hotplate is 180W, which is really more of a warm plate. For bringing larger items up to high temperatures you really want at least 800W, with 1200W being more practical.
I wish I could contribute something useful, but have racked my brain on all the options I can think of..
However, I’m curious as to how many of you are also reading NurdRage’s comments in his Youtube voice…
:)
By not contributing any ideas for a hotplate, you may in fact be helping to save the world from global warming. What a guy/gal! [don’t want to assume your gender, bro]
@Scaramouche
In response to your comment:
> When the magnetic poles flip, you will get your stirring.
That wouldn’t be viable due to the time scales involved.
(apologies for hijacking this comment, for some reason there was no reply button to your other comment)
RPM … revolutions per millennium
You can make a ~1000W heat element for less than 10$. Simply salvage the nichrome from an hair dryer and wrap it into a fiberglass wire sleeve (I used 7mm x 2m, 5$ on ebay). To help yourself, first attach a long plant twist tie to the end of the nichrome wire, and then pull the twist tie across the sleeve. It gets very hot, so of course you will need some sort of temperature controller. I tried to used it full power in an homemade heating mantle. It got so hot that it burnt the glasswool I used as insulation. The fiberglass was fine though. I think next time I’ll try with two small stainless bowl and perlite inbetween.
What about a glass plate with lots of small slits on the left side and on the right side, then use kanthal wire and “weave” it from left to right and back until the underside is covered with wire. That should be able to handle temperatures even higher than 350C.
Eagerly awaiting your youtube video of the simple, quick and cheap way to make lots of small slits in glass. Partcularly a heatproof glass.
As it happens I have a broken hair drier here.
Also an idea, the elements used in soldering irons are very similar so something based on an array of these could work.
I am facing a similar issue at the moment. I want to build a custom stir hot plate as the decent units are far too expensive for my budget/usage. The really cheap units are either under powered or do not include any important safety features.
I purchased a cheap kitchen stove plate unit and found that the center of the plate has enough clearance from the element coil to drill a hole to run a small magnetic drive. The plate also had three undrilled lugs for convenient mounting as I removed the center lug when I bored a 32mm hole. The cast iron plate was easy to drill and tap; a cheap sheet metal hole saw worked well in a drill press for the center bore. Long 6mm bolts or threaded rod can be used to support the hot plate away from the hot plate housing.
The stove plates also feature a spacer/trim that may work well as a heat shield for the magnetic drive motor when spaced with a few nuts.
I’m going to mount the modified stove plate on an ATX PSU case and run the drive motor (24VDC fan) and PID controller inside the case. I think an aluminum drive shaft with a heat sink attached to the fan should keep cool enough to prevent the fan from melting. The fan will be drawing in cool air past the PSU casing wall (acting as a secondary heat shield). Perhaps a sheet or too of mica will help with radiated heat.