We see a lot of old radio restoration projects around here, and we have to admit to having mixed emotions about some of them. It seems a shame to go through the effort to lovingly restore a vintage Art Deco case only to stuff it with a Raspberry Pi and Bluetooth. Seems like if you’re going to restore a radio, go all the way and bring the original electronics back to life. But this radio “restoration” avoids that issue altogether by cleverly concealing a full PC build in a vintage radio case.
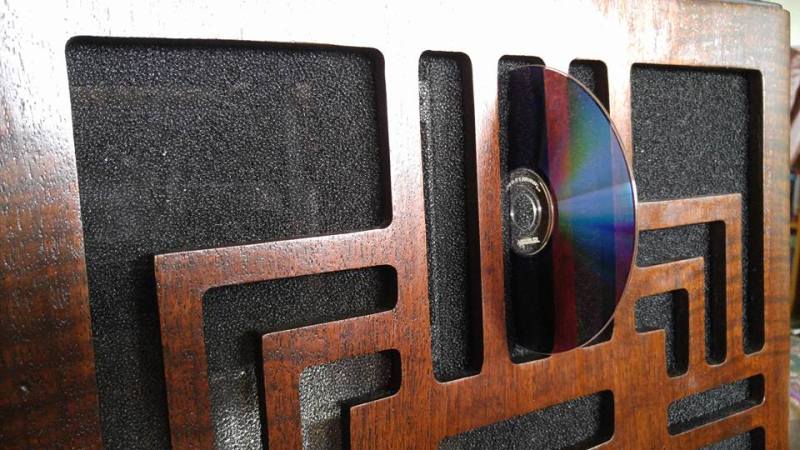
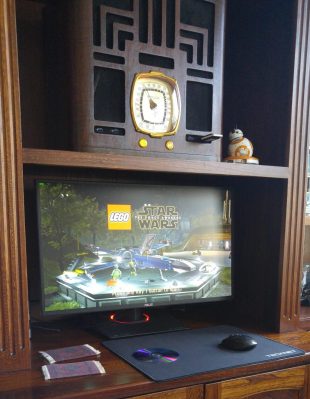 Clearly a labor of love, [SolomonZaraa]’s two-year effort guts the radio but still manages to pay homage to the original beauty of the 1939 vintage Philco 39-80 “tombstone” portable AM radio. The first design decision was to retask the original tuning dial as an analog thermometer using an Arduino and a servo. Then a new back was added with an extension for the motherboard and PSU, a drive cage was added, and a surprise slot for the DVD drive was built into the speaker grille. Nice brass trim and a good refinishing of the case resulted in an impressive and unexpected presentation.
You don’t have to go far in the Hackaday Wayback machine to find an antique radio with updated audio, but we’re pretty sure this is the first antique radio PC case mod we’ve seen. Nicely done, [Solomon]!
[via r/DIY]


I was just thinking about this two days ago, in the context also of desk-case builds… I saw a radiogram on the curb and thought it would be an awesome retromod desk-case…
… I was on a mission though at the time, and don’t have room for it at present, but because it was one that got away, I can assure you that it would have been perfect in every last single minuscule detail.
The radio restorer in me is weeping…
But if the choice is the dump or become a computer case, become a computer case.
Or Batman.
From what I’ve seen though, the difference between a complete “survivor” radio and a pile of it’s chassis and guts seems to be about $10. By survivor I mean it’s all together, but in need of restore. I’ve also seen a reasonable amount of empty shells going rather cheap at hamfests. So I tend to conclude that really the case isn’t the collectible part…. or that far more exist than working guts to go in them.
Yea, those words “Let’s gut it!”, ugh! But lets assume the electronics were beyond hope then it’s a pretty sweet case.
obligatory “what is that giant mirror sticking out of your case?”
i haven’t used optical drives for over 10 years and i dont miss em.
Giant? You clearly haven’t seen a LaserDisc if you think Blu-Ray is “giant”.
i have in fact seen one of these shiny records before. but it was a traumatic childhood and id prefer to forget.
Sorry, I got a DVD player, relatives with DVD players and a CD player in the OLD car so I still need the rusty edge technology.
not having one gets me out of so many family favors, and i dont need one. most of the time its “pirate this for me” anyway.
Have you got a 3D printer? …. what if someone sent them all a circular pointing out all the amazing things they could do if they knew some nugget with a 3D printer? >:-)
I recently brethed life into the empty shell of an old Marconi CR100 comms receiver – see https://www.rs-online.com/designspark/sdr-radio-breathes-life-into-a-75-year-old-marconi-cr100
Very nice work! Watched the video you made of it! Nice to see it live again, in an all new way!
What is hacking?… Who is a hacker?.
Sorry,
by asking “Who is a hacker?” on this forum, you have just precluded yourself from ever being recruited by a hacker organization. They recruit only those that have shown themselves to be approached by such a secretive group. It doesn’t work to ask, they’ll contact you if they feel you’re worthy. But, keep asking, and they’ll find ways to make you shut up!
I just wanted to know what is meant by hacker. It is somewhat ambiguous for me.
What is hack!? Radio hurt me, don’t hurt me, no more~
Radio?…
I did this a couple years ago. Oddly enough… I also used a 1939 Philco radio cabinet. Popular vintage, I guess!
When I found the radio, it had been completely gutted. Not even the original front panel remained. I used a pair of brass mailbox doors as the front face to replace the missing front panel. I put a nixie tube clock behind the glass, and run a quad i7 with 32 GB RAM and 23 TB of HDD space, and 1.24 TB of SSD space.
http://richfiles.solarbotics.net/eb/PhilcoNixie.jpg
http://richfiles.solarbotics.net/eb/PhilcoMacRearFinished.jpg
Since then, I’ve upgraded the Nixie tube clock to display seconds. I have NOT yet done the upgrade, but I want a dekatron spinner that’s tied to HDD activity (I’ve not bought the parts needed). The mailbox doors open up, and inside are a few USB sockets for things like thumb drives, etc.
On the rear panel, you see a pair of slots on either side. Those slots are for a pair of pleated air filters. Each slot contains a 10×10 inch (25.4×25.4 cm) filter, and I get the filter by cutting a 10×20 inch mobile home furnace filter in half and taping the edges at the cut. It’s a standard size, so readily available. There are 8 intake fans that pull air in through those filters. There are three exhaust fans in the rear chassis (2x 120mm, and 1x 140mm), plus the PSU exhaust fan (140mm). I might ad a few small fans to exhaust above the GPU area, if i can find one that fits.
Future upgrades may include air pressure sensors before and after the filters, to try to measure differential pressure (and warn when filters need changing), and If I can get CPU die temp as a voltage or PWM somehow, I want to drive a russian IN-9 or IN-13 to display the temp. Might go ahead and do the same for air pressure too, if I ever get around to building those functions.
I over engineered the fan controller. There are actually 15 fans inside the case. One is driven by the PSU, the other 14 are driven with a voltage follower with LM675 power op-amp drivers. It supports separate PWM and Voltage controlled channels, and can convert PWM to voltage control, if needed. Jumpers configure if the channels are separate, merged, or if they convert PWM to voltage or pass it through. It’s WAY overkill, but I wanted room to add MOAR fans if I needed them!
http://richfiles.solarbotics.net/eb/PhilcoMacFanController.jpg
Yes… It’s SO overkill, but it lets me more or less drive as many fans as I very well feel like, and let the motherboard have complete control over their speed.
One more future upgrade (and it’s partially implemented here) is every tachometer signal will be eventually fed into a single monitor, which will serve as a fan failure warning alarm. To indicate fan failure, I have a red domed panel indicator that lights up with a “nuclear” symbol (if you’ve ever seen the remake of Death Race, then there is one in the instrument panel of one of the cars). I will create a small “model” of the enclosure from polycarbonate, and inside will be neon lamps suspended in space to represent each individual fan location. When you open one of the “mailbox doors” I want for the neon indicator lamps to all light up, but if there’s a failed fan, that lamp will flash, indicating the fan that’s not making speed. I’m planning this, but have not yet actually implemented it though.
http://richfiles.solarbotics.net/eb/RadLight.jpg
Oops! Forgot the closeup shot of the mailbox doors and the nixie clock (I REALLY need to take new pictures… The right side now displays seconds) Also, the “hump” on the left lower corner is to allow long graphics cards to be installed. It’s got clearance for 12.75 inch / 32.5 cm cards, and the fan quad on that side feed air directly into the PCI-e area. The fan quad on the other intake filter directs air up toward the hard drives and the CPU. I think I want to add an additional 2 more exhaust fans in the very top of the back panel. Smaller fans, to fit the space, but just something to clear any air that rises. For now there are… Hmm… 8 intakes, 3 exhaust, 2 CPU, 1 built into the PSU, and 2 circulation fans that move air into and out of the case’s upper area, which is where the hard drives are housed.
http://richfiles.solarbotics.net/eb/NixieDetail.jpg
I like your idea, I hope you’ll someday get the cabinet refinished.
And cover up all that character! :P
The only finishing work I did to it involved a brown sharpie… ◔‿◔