Untold miles of film were shot by amateur filmmakers in the days before YouTube, iPhones, and even the lowly VHS camcorder. A lot of that footage remains to be discovered in attics and on the top shelves of closets, and when you find that trove of precious family memories, you’ll be glad to have this Raspberry Pi enabled frame-by-frame film digitizer at your disposal.
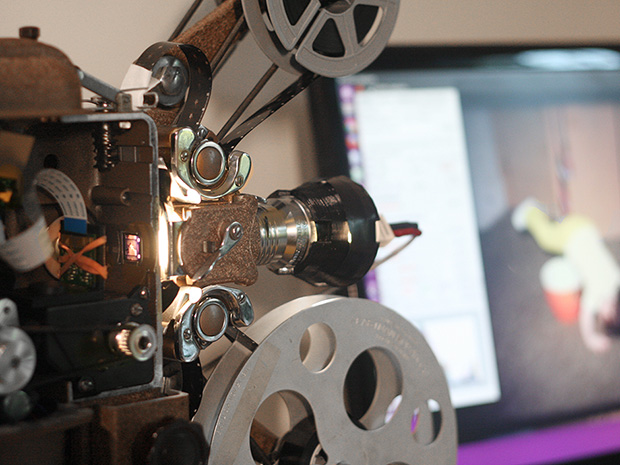
With a spare Super 8mm projector and a Raspberry Pi sitting around, [Joe Herman] figured he had the makings of a good way to preserve his grandfather’s old films. The secret of high-quality film transfers is a frame-by-frame capture, so [Joe] set about a thorough gutting of the projector. The original motor was scrapped in favor of one with better speed control, a magnet and reed switch were added to the driveshaft to synchronize exposures with each frame, and the optics were reversed with the Pi’s camera mounted internally and the LED light source on the outside. To deal with the high dynamic range of the source material, [Joe] wrote Python scripts to capture each frame at multiple exposures and combine the images with OpenCV. Everything is stitched together later with FFmpeg, and the results are pretty stunning if the video below is any indication.
We saw a similar frame-by-frame grabber build a few years ago, but [Joe]’s setup is nicely integrated into the old projector, and really seems to be doing the job — half a million frames of family history and counting.
[via Geek.com]


Wow, I bet that looks better digitized than projected.
Tip: f you use an LED, it should be a high-CRI option, and the appropriate color temperature for film projection. If you’re on a budget, Cree’s TR series edison bulbs have a fairly high CRI, but it’s fairly simple to get the right emitter from digikey or mouser. Standard LEDs have a very peak-y spectrum; CFLs are even worse.
If you can’t get a high-CRI LED, then just use a tungsten bulb – lower wattage, of course (don’t use a dimmer – the color temperature and spectrum will shift dramatically.) The color spectrum is far, far smoother. Add a small PC fan to keep the film cool if you’re not moving the film very fast.
Also: the first generation Pi camera was pretty rubbish. The newer Sony Eximor-R based 8mp sensor is far better, but the optics are, again, pretty rubbish.
Film typically contains 3 pigment layers anyway, and you’re digitizing it with a 3-color sensor, so it’s a lot less critical to have a good LED spectrum, and CCT barely matters. As long as you have enough light in each layer’s absorption band, there exists some 3×3 correction matrix will give you basically the same results. (And since you’re already stacking multiple exposures, you don’t need to worry about too much light in one band before you have enough in another — worst-case, a low-quality light source means you need to add one more exposure per frame at the top/bottom.)
Low-CRI LEDs have a big gap between the blue spike and the yellow phosphor, but the yellow phosphor’s curve is still broad enough to cover both your red and green requirements tolerably well, and any of the decent-CRI options (e.g. 80+ CRI) is as good as the best.
I was pleasantly surprised to see that the author of the piece used avisynth to aid in image restoration. While the idea of avisynth is great, it is a bitch to get set up properly, and often crashes when working with complicated scripts. However, once it is dialed in, it can do wonders.
https://www.youtube.com/watch?v=sNQy36hcTNU
wow! that looks like a huge improvement!
The scripts referenced in the article were put together by Fred van de Putte. Here is a web page describing the telecine machine he put together. Rather than doing multiple exposures ala HDR, he has a higher quality camera.
http://www.super-8.be/s8_Eindex.htm
Explore the links there — his telecine machine is first rate, and his example restored films are astoundingly good for 8mm. He has a couple youtube tutorial videos too.
I can attest to this; his scripts do color correction, scratch removal and interpolation if you want. I’m working on the latest version of my system which uses a DSLR for image capture. It’s super slow but I wanted to capture each image at the highest resolution possible so I could pick off each frame as a picture if I wanted.
Here’s a short A/B comparison
https://www.youtube.com/watch?v=kI_-re59mkM
Nice! As you are already dealing with individual images of low resolution frames, may I suggest adding Smilla Enlarger to your workflow, to bump up the detail? https://deadlydad.wordpress.com/2012/11/15/image-rescaling-utilities/
That’s a striking video, and makes a great example of the Soap Opera Effect.
I am consciously aware that the right side is objectively better in every possible way, but something about the left just feels more real. Then I realized that the right side looks like it was shot with a VHS camcorder.
Impressive project, the problem of dynamic range is very nicely solved, wow! I will follow you project as I finally have found a purpose for the pi in my closet.
OT: All I can think about is how we used to have a 35 HP outboard, and I have no idea how we managed to waterski slalom behind that. I guess the boat was pretty light.
Ektachrome?
If I only had a Raspberry with a better cam when I build this (http://pohlcity.de/images/8mm/proj.jpg) in 2003/4(?)
Perhaps I should do a new scan of these old 8mm movies with new hardware.
On the software side, Blender is pretty good for handling both basic image manipulation jobs, like cropping and color correction, as for some fancier stuff. I’ve used it for tackling some very bad chromatic aberration on 8mm film. I guess it could do some motion tracking and stabilization too, if needed, but that would require quite a bit more manual work.
https://www.dropbox.com/s/gs91qguliyn03e3/chromAberr_nodes.PNG?dl=0
This is a very basic node setup for removing chromatic aberration, luckily it was easily done by separating the image into RGB components and moving them back into their proper places. Not quite the exact job, but close enough.
+1 for Blender, though it’s really too complicated for casual users.
Blender’s really gotten more user friendly than it was 10+ years ago when I started with it. For video filtering, setting up some nodes is a lot simpler than After Effects or even Vegas Pro, let alone trying to to finagle Avisynth into doing anything.
A cheap upgrade might be to remove the camera lens entirely and project directly onto the image sensor. You can do this with the aid of a photo enlarger lens. I use it on my system and it avoids a lot of problems.
I actually tried replacing the lens with a few different versions, and – long story short – the pi camera doesn’t seem to play very nicely with other lenses when the stock lens is removed, an issue which has been discussed on the pi forum. (Can’t find link right now.) It’s something I’d sure like to do, though; I expect a new interchangeable-lens-friendly version of the camera will be released the day after I scan my last reel.
Ha, no doubt. I’ve been working on variations of this for about 12 years. I modified a Samsung NX300 DSLR to run without an attached lens and mounted an enlarger lens about 6″ away from the sensor, and the image is about another 6″ from that. I can fill about 2/3 of the image sensor that way and am capturing at about 5472 x 3648. Here’s a pic:
https://photos.google.com/photo/AF1QipPaeklSvq8-UqGuxGqfP2Crwpkj8FgjcLbDLa4w