How To Levitate 100lbs

Most of our readers are already going to be familiar with how electromagnets work — a current is induced (usually with a coil) in a ferrous core, and that current aligns the magnetic domains present in the core. Normally those domains are aligned randomly in such a way that no cumulative force is generated. But, when the electric field created by the coil aligns them a net force is created, and the core becomes a magnet.

As you’d expect, this is an extremely useful concept, and electromagnets are used in everything from electric motors, to particle accelerators, to Beats by Dre headphones. Another use that you’re probably familiar with from your high school physics class is levitation. When two magnets are oriented with the same pole towards each other, they repel instead of attract. The same principle applies to electromagnets, so that an object can be levitated using good ol’ electricity.

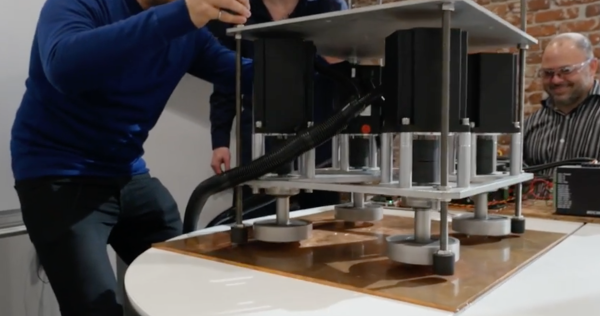
That, however, isn’t the only way to levitate something using magnets. As shown in the video below, permanent magnets can be used to induce a current in conductive material, which in turn exerts a magnetic field. The permanent magnets induce that current simply by moving — in this case on rotors spun by electric motors. If the conductive material is placed below the magnets (like in the video), it will push back and you’ve got levitation.

Continue reading “How To Levitate 100lbs”

Everyone Should Build At Least One Regenerative Radio Receiver

When we build an electronic project in 2016, the chances are that the active components will be integrated circuits containing an extremely large amount of functionality in a small space. Where once we might have used an op-amp or two, a 555 timer, or a logic gate, it’s ever more common to use a microcontroller or even an IC that though it presents an analog face to the world does all its internal work in the digital domain.

Making A Transistor Radio, 2nd edition cover. Fair use, via Internet Archive.

There was a time when active components such as tubes or transistors were likely to be significantly expensive, and integrated circuits, if they even existed, were out of the reach of most constructors. In those days people still used electronics to do a lot of the same jobs we do today, but they relied on extremely clever circuitry rather than the brute force of a do-anything super-component. It was not uncommon to see circuits with only a few transistors or tubes that exploited all the capabilities of the devices to deliver something well beyond that which you might expect.

One of the first electronic projects I worked on was just such a circuit. It came courtesy of a children’s book, one of the Ladybird series that will be familiar to British people of a Certain Age: [George Dobbs, G3RJV]’s Making A Transistor Radio. This book built the reader up through a series of steps to a fully-functional 3-transistor Medium Wave (AM) radio with a small loudspeaker.

Two of the transistors formed the project’s audio amplifier, leaving the radio part to just one device. How on earth could a single transistor form the heart of a radio receiver with enough sensitivity and selectivity to be useful, you ask? The answer lies in an extremely clever circuit: the regenerative detector. A small amount of positive feedback is applied to an amplifier that has a tuned circuit in its path, and the effect is to both increase its gain and narrow its bandwidth. It’s still not the highest performance receiver in the world, but it’s astoundingly simple and in the early years of the 20th century it offered a huge improvement over the much simpler tuned radio frequency (TRF) receivers that were the order of the day.

Continue reading “Everyone Should Build At Least One Regenerative Radio Receiver”

Darth Vader, In A Nixie Tube

This may be a controversial statement, but Nixie tubes have become a little passé in our community. Along comes another clock project, and oh look! It’s got Nixie tubes instead of 7-segment displays or an LCD. There was a time when this rediscovered archaic component was cool, but face it folks, it’s been done to death. Or has it?

vadar-nixie-tube-unlit
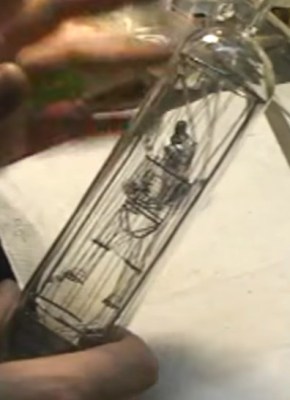
So given a disaffection with the ubiquity of Nixies you might think that no Nixie project could rekindle that excitement. That might have been true, until the videos below the break came our way. [Tobias Bartusch] has made his own Nixie tube, and instead of numerals it contains a 3D model of [Darth Vader], complete with moving light saber. Suddenly the world of Nixies is interesting again.

The first video below the break shows us the tube in action. We see [Vader] from all angles, and his light saber. Below that is the second video which is a detailed story of the build. Be warned though, this is one that’s rather long.

The model is made by carefully shaping and spot welding Kanthal wire into the sculpture, a process during which (as [Tobias] says) you need to think like neon plasma. It is then encased in a cage-like structure which forms its other electrode. He takes us through the process of creating the glass envelope, in which the wire assembly is placed. The result is a slightly wireframe but very recognisable [Vader], and a unique tube.

Continue reading “Darth Vader, In A Nixie Tube”

Acoustic Accordion Becomes MIDI; Oh The Complexity!

Everyone knows accordions are cool — they look fly, make neat noises, and get your romantic interests all hot and bothered. What isn’t cool is being relegated to acoustics only. How are you going to play a packed stadium or lay down a crystal clear track like that? You could go out and buy an electric accordion, but even low-end models carry a hefty price tag. But, this is Hackaday, and you know we’re going to be telling you about someone who found a better way.

That better way, shown in a build by [Brendan Vavra], was to take an acoustic accordion and convert it to MIDI. The base for his build was a decent full-size acoustic accordion purchased on eBay for just $150. Overall, it was in good mechanical condition, but some of the reeds were out of tune or not working at all. Luckily, that didn’t matter, since he wouldn’t be using them anyway. Don’t be fooled in the demo video below; it sounds like he’s playing the acoustic according but notice he’s not pumping those bellows! However, the bellows isn’t useless either since it can feed data back as a MIDI input.

[Brendan’s] build plan called for an Arduino Mega to be tied to a series of photo-interrupters that would detect button pushes and fire MIDI signals. But, first he had to take the thing apart — no small task, given the complexity of the instrument. The accordion has 120 buttons, and they’re not interchangeable, which means he had to carefully keep track of them as they were disassembled.

Continue reading “Acoustic Accordion Becomes MIDI; Oh The Complexity!”