If you’ve ever thought about having a light-up dance floor at an event, the chances are you will have been shocked at the rental cost. Doing your best impression of a young John Travolta in Saturday Night Fever doesn’t come cheap, it seems. When faced with this problem before the Furnal Equinox 2017 convention, [Av] and friends decided instead to build their own LED-lit floor.
Their design and build is shown in the video we’ve placed below the break, and though each individual light unit is straightforward it is the scale of the project and its epic build that makes it a very impressive achievement. There are 64 panels of 4 light cells, giving a total of 256 cells and 7680 RGB LEDs arranged as 2560 pixels. Each panel has a shift register PCB interfacing LEDs to the Teensy that controls the floor, and there are also microswitches talking to an Arduino Mega which provides the floor with interactivity. It’s hard to imaging this build would be possible without the people numerous who pitched in at the Toronto Hacklab for the assembly process.
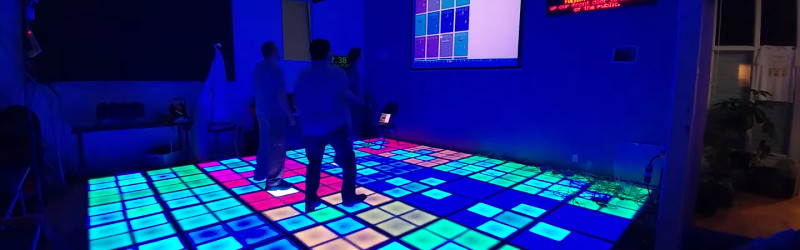
The resulting 17 foot square dancefloor is a work of art, with custom programmed graphics responding to dancers moves, and even a few games along the lines of Dance Dance Revolution built in. After watching the video below, how many of you will secretly want one?
We’ve brought you quite a few dance floor projects over the years. Memorable was this one using a glass floor suspended over a swimming pool, but there has also been more than one student project floor.


I like the micro switch thing!
IR is a wast of money..
FSR sensors or load cell sensors will be a great option too.
It’s no secret
I want one :-)
+1
Fantastic. But looking at the move and install at the convention it appears that with all that hard work they didn’t incorporate easy install technique. I found that strange given how much effort they put into the standardization of the parts. They could revisit that I suppose and even consider how to make this a marketable product.
Labor of love from what I see. Good stuff all around.
Universal modularity with connectors that can simply be set down onto one another. They’d need to allow some vertical misalignment while still maintaining contact. If needed, have just a few edge only panels with the control computer connection. Put male connectors on two edges and female connectors on the other two so the panels can’t be rotated incorrectly.
The goal would be fast setup, being able to ‘drop anywhere’ by assembling the panels in any configuration then have the system sort itself out for each panel’s coordinates and. Make the control software with a configurable layout so its squares can be dragged around to match the physical setup.
It would simplify setup and storage and repairs. Just have a few spare panels so if one doesn’t light up properly during a setup, just grab any of the spares. You’d definitely want to test while assembling because having a dead one pop up in the middle or near the starting edge would mean picking up a lot of panels to get to it – unless an ’emergency’ method of removing and reinstalling connectors from the top of a panel that’s in place is developed.
Any system that doesn’t involve solid mechanical locking will not hold up. Modular dance floors, even just plain thin panels used to protect carpet, migrate position under use. This LED floor moved 4 feet from it’s starting position over the two nights of dancing on it. If the panel weren’t bolted, we’d have quickly ended up with unsafe gaps between the panels.
I think it’s fair to say that speed of setup and teardown is secondary to robustness and safety of the floor for it’s users.
On the subject of repairs. Just grab you handy tile lifter, pull up the acrylic panel and you can access all the electronic. I watched [Av] fix a solder join that way during the con.
I’ve maintained a couple of different types of (Chinese) floors, and their biggest issues are – quality of assembly, power supplies, cabling and mounting – just about everything. Including installation stability.
The two dominant units are a diamond ‘star’ layout in square tiles with MIDI interconnect, and the pother uses a proprietary high-speed serial link, and an external dedicated controller using MIDI or SD card to store the patterns.
The control and assembly was so bad, I ended up developing my own standalone (hind-held) controllers – such that I could jump in to the control lines anywhere – to test single cells, or blocks of cells.
I also worked on a 6mm RGB video wall – which was quite well made, but really hard to disassemble & fix – but had the worst control software known to man. Luckily the cost meant it didn’t go out very often – so it didn’t get damaged either!
Test run and check all these factors before you invest in a floor.
Great project! I’m part of a Belgian based community of carpenters, welders and hackers. We are looking into making something very similar for the yearly party we throw. The electronics are nicely documented, but do you have any plans / sketches of the mechanical designs?
We’re not looking for a build plan to copy, just doing the research and taking a look what we can learn out there.
for power supply look into Server units, surplus 1 KW Proliant power supplies are $20.
Thats totally cool (thanks for DDR)
Good work guys.. could you share tech specifications to re build this project or some kind of a version of this project ??.. i really appreciated..
Thanks a lot
I would like to know what the surface is, glass, polycarbonate and what thickness? We are looking to build something similar using DMX control, just worried about the correct, safe surface