I have a bit of a love/hate relationship with the Arduino. But if I had two serious gripes about the original offering it was the 8-bit CPU and the lack of proper debugging support. Now there’s plenty of 32-bit support in the Arduino IDE, so that takes care of the first big issue. Taking care of having a real debugger, though, is a bit trickier. I recently set out to use one of the cheap “blue pill” STM32 ARM boards. These are available for just a few bucks from the usual Chinese sources. I picked mine up for about $6 because I wanted it in a week instead of a month. That’s still pretty inexpensive. The chip has a lot of great debugging features. Can we unlock them? You can, if you have the right approach.
The Part
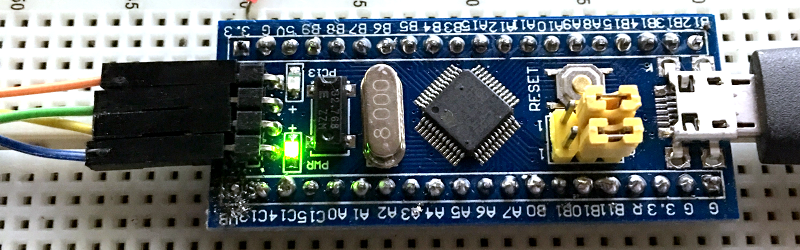
For a few bucks, you can’t complain about the hardware. The STM32F103C8T6 onboard is a Cortex-M3 processor that runs at 72 MHz. There’s 64K of flash and 20K of RAM. There’s a minimicro-USB that can act as a programming port (but not at first). There’s also many 5 V-tolerant pins, even though this a 3.3 V part.
You can find a lot more information on this wiki. The board is a clone–more or less–of a Maple Mini. In fact, that’s one way you can use these. You can use the serial or ST-Link port to program the Maple bootloader (all open source) and use it like a Maple. That is, you can program it via the USB cable.
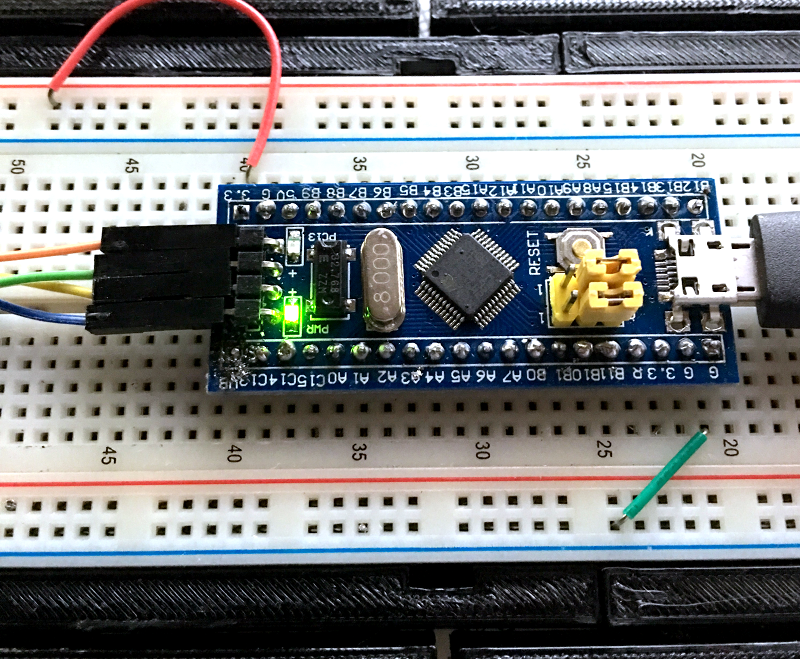
From my point of view, though, I don’t want to try to debugging over the serial port and if I have the ST-Link port already set up, I don’t care about a bootloader. You can get hardware that acts as a USB to ST-Link device inexpensively, but I happen to have an STM32VLDISCOVER board hanging around. Most of the STM32 demo boards have an ST-Link programmer onboard that is made to use without the original target hardware. On some of the older boards, you had to cut traces, but most of the new ones just have two jumpers you remove when you want to use the programmer to drive another device.
The “blue pill” designation is just a common nickname referring to the Matrix, not the pharmaceuticals you see on TV ads. The board has four pins at one edge to accommodate the ST-Link interface. The pin ordering didn’t match up with the four pins on the STM32VLDISCOVER, so you can’t just use a straight four-pin cable. You also need to bring power over to the board since it will have to power the programmer, too. I took the power from the STM32VLDISCOVER board (which is getting its power from USB) and jumpered it to my breadboard since that was handy.
The Plan
Programming the board is easy — I knew the community had done a lot of work to create a support package for it. You do need a recent version of the Arduino IDE (not the one that shows up in the default Ubuntu repositories). I downloaded version 1.8.1 from the Arduino website, just to be sure. That was the first step of my general plan of attack:
- Load the latest Arduino IDE
- Set the compile messages to verbose
- Use the Board Manager to install the STM32 F1 packages
- Get more tools
- Capture the build directory
- Run the right version of GDB
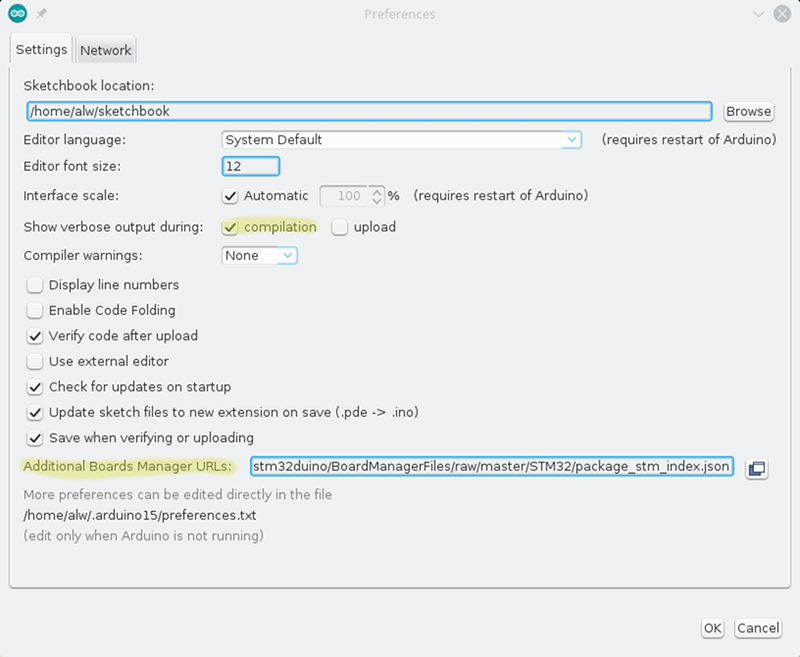
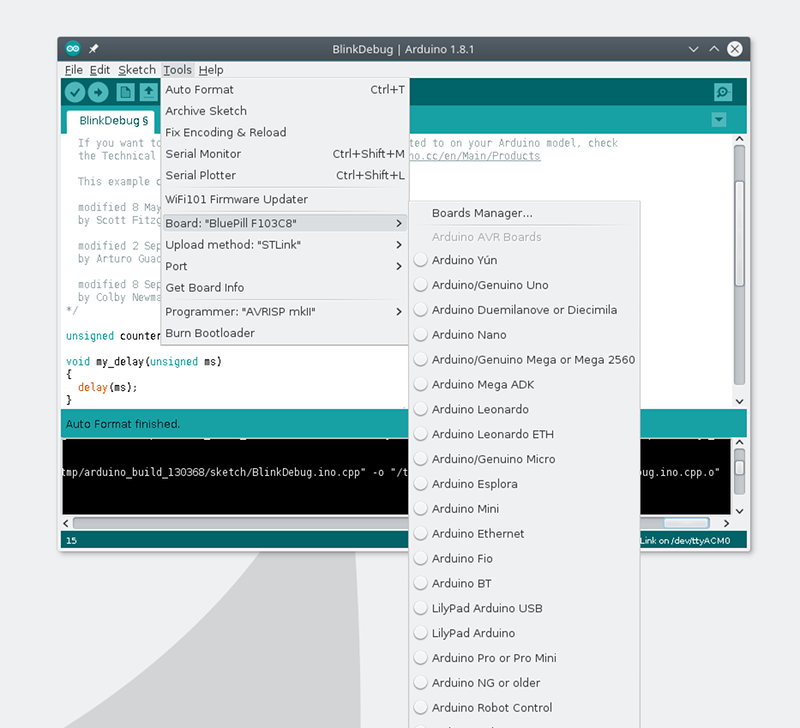
The recent versions of the Arduino IDE let you select platforms by using the Board Manager (available from the Tools | Board menu). However, if you look, you won’t see this board on the list. You’ll need to tell the IDE where to get the third-party support package. To do that, you can go to the Preferences menu item (on the File menu for Windows and Linux; I understand it is on the Arduino menu on the Mac). You need this same preferences dialog for step two, also.
 Step 2 isn’t strictly necessary, but it will make step 5 easier. Just check “Show verbose output during compilation.” What you really need to know is the temporary directory the IDE uses for your build and this is the easiest way to do that, as you’ll see.
Further down the preferences screen is an entry for “Additional Boards Manager URLs.” If there’s already something there you should click the little button to edit the list. If it is empty, you can add this URL:
https://github.com/stm32duino/BoardManagerFiles/raw/master/STM32/package_stm_index.json
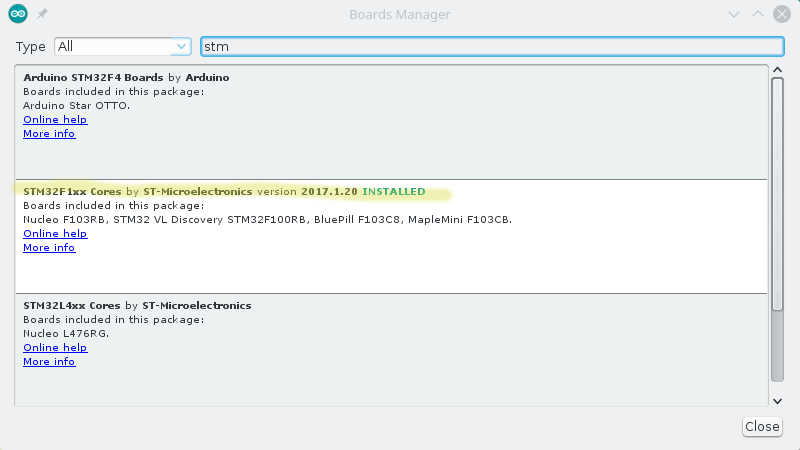 Now you can go back to the Tools | Board menu, pick Board Manager, and search for STM. You’ll probably see a few packages (I had three) but the one for the F1 will specifically mention the blue pill. Click the button to install and wait for it to do its thing.
Once installed, you’ll have some new entries on your board menu. When you have the blue pill selected, you’ll be able to pick a few options for uploading including the one we want: ST-Link.
Coding
 The package has all the stuff you need to build and download programs using a variety of methods, including ST-Link. However, it doesn’t have the particular tool you need to do debugging.
It is simple enough to build the tools. The GitHub repo has the code and some simple build instructions. You do need libusb and CMake, but the page explains all that and once you have all the pieces, the build goes fast. For many OS choices, there are pre-built binaries you can use, too.
You’ll also need to know the USB ID of your ST-Link board and add it to the udev rules for Linux. If you don’t do this, you’ll need to be root to program the device and that’s not a good idea. However, depending on which ST-Link interface you use, it may already be there from other software or from the Arduino install. I’d try a test first and if it only works as root, you’ll need to update udev.
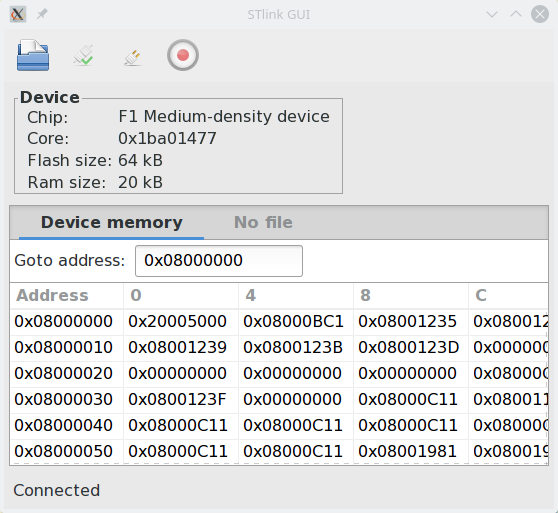
If you did your own build, I suggest running the tool stlink-gui to perform the test. You can also run st-info --descr
If you run stlink-gui, press the connect button with the ST-Link and blue pill powered up and connected. You should get the information about the device. If not, try as root. If that works, you need to update udev. I created a file, /etc/udev/rules.d/45-stlink.rules.
ACTION=="add" SUBSYSTEM=="usb", ATTR(idVendor)=="0483",
     ATTR(idproduct)=="3744", MODE="0666", GROUP="usbusers"
You’ll need to modify that for the USB ID of your particular interface (mine was 0483:3744; the lsusb command can help). The mode allows all users to read and write the device. I made the group owner usbusers, but since everyone can access the device that probably isn’t strictly necessary.
Once you can do all that, try running the blink sketch from the IDE examples. Be sure to pick “Upload Method: STLink” from the Tools menu of the Arduino IDE. If it doesn’t work, you may need to use the tools you just built instead of the ones that come with the Arduino IDE. Mine worked but the debugging required the custom build (because the Arduino package didn’t ship with that particular tool built).
Finding the Tools and Build Directory
The Arduino IDE is pretty friendly, so it doesn’t try to install things like boards for all users, since that would require root. The board package you loaded winds up in your home directory under ~/.arduino15/packages/STM32/tools. There’s an STM32Tools directory and a few more levels down you’ll find copies of the ST-Link tools. If they don’t work, you can manually run the tools you built in the previous step to do your uploads. When we debug, we are going to do that anyway.
What’s really important though is back under the STM32/tools directory is another directory with the compiler that the IDE uses to compile your code. There’s also a matching version of GDB — the GNU Debugger — there that you will have to use.
If you loaded an example, make sure you save it to your own directory (I hate saying sketchbook). If you don’t, the IDE will make a private copy of any changes you make and things will get confusing.
Do a build (the checkmark icon) and — assuming you checked the box in step 2 — you’ll get a lot of output from the build tools. You might verify that the compiler in use is the one we mentioned above. You’ll also see that your program gets added to other things and put in a directory named something like /tmp/arduino_build_XXXXXX where the XXXXXX is a number. Your source code will be in this directory named something like sketch/Blink.ino. In the top-level directory will be the executable Blink.ino.elf. This is what you need to debug.

If you are comfortable editing your Arduino settings file (just be sure the IDE isn’t running first) you can also force a build directory using the build.path key. The IDE does have an “export binary” command (on the Sketch menu) that compiles to your sketch folder. However, this .bin file doesn’t have enough information for the debugger.
Debugging at Last
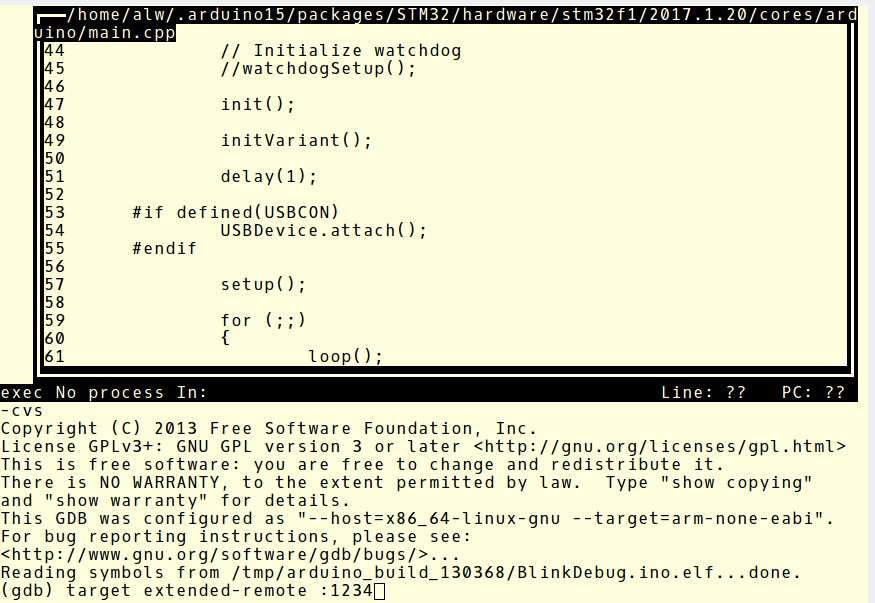
Finally, you can debug. Use the arm-none-eabi-gdb executable from the same directory as the GCC used to compile your program. This is important. If the versions don’t match you’ll get strange errors even though many things will seem to work. Provide the name of the elf file as an argument to GDB.
If you like, you can use the -tui flag to GDB to get a sort of text-based GUI. Either way, you have one more step to go. The st-util tool you built earlier can listen to the ST-Link interface and provides a socket that GDB can use to do debugging.
Start it like this:
st-util -p 1234
That will make it listen on port 1234. If you already use that port for something else, pick another one. Just remember that on Linux only root can listen on ports below 1024, so pick a bigger number.
Once that is running, you fire up GDB with your elf file name and issue the command:
target extended-remote :1234
Or, I’ve recently started using:
target remote :1234
You can run the two parts on different computers, so use a hostname if necessary (that is, devbox21:1234). Most times, the programs are on the same box and you can use localhost or omit it like I did. The difference between remote and extended-remote is that the server does not shut itself down at the end of an extended-remote session. It often works, but I have seen cases where I had to restart the server anyway, so lately I’ve been using plain-old remote to force me to restart it with each session.
A “load” command to GDB will now flash your program to the board. A typical session after a load might be:
break main
continue
list
n
n
n
The “n” command steps to the next instruction.You can find a lot more about using GDB in an earlier post. You also might find it easier to watch the walkthrough in this video:
A few caveats. First, optimization can cause your lines to execute out of order, or even go backwards. It can also cause variables to not be visible where they have been optimized out. The other thing to watch out for is that, in some cases, the debugger internally single steps. This can cause very slow execution of delay routines, for instance. You might reduce or remove delays while debugging or be careful where you try to single step instead of placing breakpoints.
Final Thoughts
It would be neat if the Arduino IDE let you debug inside of it. However, there are ways to do that using Eclipse (and GDB) or Visual Studio (if you use Windows). If you are like me and OK with the command line, you might think about using one of the Makefiles for Arduino instead of the IDE. If you aren’t OK with the command line, there are GUI shells for GDB that you could try. If you’d rather hack the ST-Link firmware, we’ve seen that done, too. If you miss doing printf’s, you might want to try a Black Magic probe, which ought to work about the same as the ST-Link interface, but also provides a serial port for printf and other mischief.
By the way, Arduino isn’t the only choice for this board. It is possible to use mBed and other development tools with them. But that’s a topic for a future post.


STM32F103C8T6 USB MSC Bootloader:
http://www.elektroda.pl/rtvforum/viewtopic.php?p=15729392
http://obrazki.elektroda.pl/1531676400_1465306758.png
Too bad it needs a forum registration to be able to download the attachment to the linked forum posting. Bugmenot passes don’t seem to work.
http://cloud.pcdeb.pl/s/VIXAVPQGMaU1e2m
updated version
http://cloud.pcdeb.pl/s/Fsz9x6hgeKcxO5T
To enter bootloader quick press reset twice.
Not for commercial use!
Thx, but: no license, no sources, no use.
Maybe silly question, but what is the purpose of MSC bootloader?
Thank you :)
Put new firmware without programming software.
Crash the microcontroller by trying to copy a 20 GB game (or a large dump of /dev/zero).
not a crash, it’s auto reset after programming
I doubt it will auto-reset after running out of memory (unless the watchdog is on).
Writing beyond 60KB is ignored
Thx, but: no license, no sources, no use.
Instead of fiddling with the Arduino environment I suggest using the STM32CubeMX graphic configurator. This will generate C code for your project and take care for you of the numerous
STM32 registers and bits. You can then write you code inside “USER CODE” comments and your
code will be preserved if you modify and generate code for your project again.
For compiling and debugging I suggest CrossWorks for ARM which is very inexpensive (150$)
and gives you a fast graphic debugging environment. As a bonus it runs on Linux and Macs too.
Or you can learn how to configure the chip (it’s not hard at all) and don’t bother with that ST provided crapware.
What’s wrong with STM32CubeMX?
Well, the latest version has at least one weird bug. If you set up the PLL clock with HSE it tries to set up the HSI and the HSE. Then the HSI is not set up so it faults and hangs. Every time you regen you have to go and fix that by removing the HSI enable in the RCC. Nice when it works though.
Or try “libopencm3” (http://libopencm3.org/), actually a generic “cortex M3” library.
Or… use TrueStudio from Atollic. CubeMX can generate projects that work out the box for it, you press build and debug – hey presto, full debugging, no code size limit and Eclipse for the IDE with all the compiler properly set up. Just plug in an STM-Discovery as a debugger and you’re away, commercial grade development for free on super cheap targets! Love the crazy cheap eBay boards!
Howdy, I think you mean it has a Micro USB connector, I just checked mine and from your picture it looks like a Micro too. Just an FYI.
Yep. Fixed. Don’t know why I said mini.
I just reported your comment to draw attention to the problem.
Ignore the stupid Arduino IDE and just use gcc and a Makefile. For crying out loud.
The “blue pills” are the bomb for sure. Just jump on AliExpress and order 10 of them for less than the price of an Arduino.
Heck, order 20 while you are at it.
And you can get cheap ST-Link gadgets dirt cheap on Ebay. Cheap enough I bought 3 of them to have “spares”.
What you can do with these is phenomenal.
I can’t say enough good things about the STM32F103C8T6 — why anyone would waste time with an 8 bit AVR is beyond me. Maybe the AT-tiny in an itty bitty package makes sense, but an AVR on a full sized Arduino board????
CrossWorks is gcc based too but gives you a nice IDE programming environment which is handy when dealing with tens of C and header files. Windows users are not used to CLI so they seldom use bare gcc.
The ST-Link2 programmers you can buy cheap online have one minor drawback: they don’t connect the Reset pin and bring instead another 5V on that 10pin connector. Remember these can program STM8 devices too so there’s a SWIM interface there. Without a reset you can’t always interrupt the CPU to program or pause. I have modified mines with a tiny wire and a SMD resistor to bring that reset signal out in place of the 5V pin.
I made meself a blackmagic probe pcb and use that one instead to program the stm32 (and other arm) chips. You can even flash those el cheapo dongles with blackmagic firmware. Dunno about the reset pin after reflashing though.
Building the BMP was about 3 bucks including PCB.
You could could buy or build a Black Magic probe. Another option is to convert a Blue Pill into a BMP:
https://medium.com/@paramaggarwal/converting-an-stm32f103-board-to-a-black-magic-probe-c013cf2cc38c
Use a Blue Pill to debug another Blue Pill.
Can you give some examples of what i might use this for over an arduino? I’m completely new to arm chips and would love a few reasons to take the time to mess with these.
Thanks
Anything more then blinking a LED ;)
Seriously ARM chips tend to be faster (16MHz vs 72MHz), generally have more memory and IO pins then Arduino. Personally I think as hobbyist Arduino is nice to explore embedded electronics but if you need more power ARM is better. Also the code is more or less compatible between different chip manufacturers.
“more or less”, means every variation needs to be taken into account to support all of the chips that use the ARM core.
IF an AVR is too slow AND an RPi is too fast, and an ESP8266 has too much wifi, THEN use one of these.
You made me chuckle.
https://twitter.com/SuprNova/status/849258708534210561
The big difference (to me) is that these have DMA, which means you can quickly setup massive data transfers at wire-speed that don’t touch the CPU. Lack of EEPROM is annoying, but you get a basic 32kHz RTC with small quantity of battery-backed RAM for free. A few more pins than a basic arduino too.
For example with DMA, you can attach a string of APA102 LEDs, which are basically SPI, and do 100Hz animations on 1000+ LEDs using just two pins and approximately no CPU time.
If you want low-power, look instead at the F0 and L0 series chips; the same toolchains work on them and they are mostly code-compatible, and they’re also available cheaply online, e.g. F030. Or if you want more grunt, those are compatible and readily available too (e.g. F103VET6 for more IO and flash, or F4xx for floating point and massive performance, etc).
The only drawback is that there is a significant learning curve; you will be sitting there with 3-4 data sheets open (device-specific brief-spec, chip-family/peripherals spec and cortex programming manual, as a minimum), totalling a couple thousand pages, and referring to them constantly as you write your code.
I’ve been doing some STM32 development and can give you one reason why AVR and PIC are still relevant. The STM32 chip I’m using has some 4000 pages of documentation scattered across several documents, and the information required to configure and use a peripheral is never located completely within just one document. They’re insanely complicated, as a necessary evil of being insanely powerful. But if you don’t actually need all of that power, the 8-bit programmer will always beat the pants off the ARM developer in a dead start race to a working, completed application starting from scratch. AVR and PIC chips are just way, way easier to understand. It’s sort of like buying a passenger ticket to get from point A to point B, versus joining the Air Force and getting trained to fly a fighter jet and then flying from point A to point B. I’m just saying that they can do very different things, but if you’re using an STM32 to do the same thing an 8-bit MCU can do easily, then you’re wasting a ton of time and complexity on the problem.
I agree the documentation is horrible, but I don’t think it has to be, I think it just is. Back in the days when you could make good money writing computer books, someone would probably written a “ARM for Everyone” book but now days you have to make do with scattered blog posts, project logs, and the giant mass of vendor documentation.
But one value to the STM32Arduino and mbed libraries is that they hide a lot of that complexity from you. Don’t need to know how to init things or turn on the APB or etc. etc. Just ask for PWM or an A/D value and you get it. Is it the most efficient? No. Is it the most power-friendly? No. But it is expedient. That being said, I don’t disagree that the docs are terrible.
I bought something similar about a year ago (maybe longer) and I was excited about it coming unfortunately I wanted to find documentation for it and the chip I bought wasn’t very popular to say the least. I think I’ll give it another after reading your article. I’ll go in prepared this time and buy a board that seems a lot more popular.
I think “terrible” is a strong word for it (and one I didn’t use). Are the docs fragmented? Lengthy? Unable to fully explain every aspect of the processor clearly? True in all respects…however, I chalk that up to the nature of the device. It’s a complicated device, so you need an STM32 accountant to navigate the murky depths of tax regulations for you. I think that with 8-bit code, you can casually come up with a decent solution even if embedded firmware is not your forte. To be excellent with ARM Cortex firmware design, I think you need to eat-sleep-breathe ARM until it’s part of you, and you can never stop or you’ll lose it all quickly. Definitely explains why you have people coming in to almost violently scoff at anyone ever considering another platform…they have no room in their mind left for anything besides ARM :)
One of the things that you get when you migrate from an 8-bit micro with simple peripherals, to a 32-bit micro with advanced peripherals is that the complexity increases. Instead of needing 3 lines of code to configure a GPIO pin you now need 8. This comes with the territory and is a small price to pay for the gains made in performance, memory density and elsewhere. It is also the reason why ARM Micro vendors create peripheral libraries and code wizard tools to make coding for their micros a little easier despite the complexity.
I find the TI MSP432 to suffer the least from this problem. Peripherals are sophisticated enough and can be configured with fewer lines on code than other ARM micros on average. Unfortunately they don’t come in lower pin count packages…only 100-qfp and 64-qfn. They also tend to be expensive compared to similarly spec’d stm32s. The MSP432 Launchpad ddev board ($12.99) is very affordable though and has Arduino support via Energia. Also the MSP432’s standard peripheral libs are in my mind much better designed than the STM32HAL/CUBE
8 bits MCU are a dead end, they won’t increase in capability, only decrease in size and price, look at the last atmel/microchip 8bits, it’s a tiny. If you can do your stuff with 2Kbytes and clock below 20Mhz go for it.
Also, i am programming my PC in .net or Python, i never did open Intel corei7 100.000 pages user manual !
All those 32bits chips are able to run a decent OS,a concept that has been invented last century to avoid the RTFM problem.
No one wants the 8-bit MCU to increase in capability. We’re OK with it dropping in size and price. Consider it to now be a cheap basic element of electronic design…would you ever say that resistors or decoupling capacitors are dead end because they are old and rarely improved? It is a simple tool for simple jobs, and with all due respect to the vast power available to an ARM running an RTOS, not knowing EXACTLY what is happening cycle-to-cycle is a liability for some applications. I have applications that need to average a few microamps in order to last on batteries in a confined space. I have applications that could cause safety problems if they ever got stuck in a rare race condition because someone forgot to make some peripheral code threadsafe. I don’t think an RTOS is a good thing to put inside a 500KHz feedback loop in a DC-DC converter fed into a custom lithium charge controller.
“No one wants the 8-bit MCU to increase in capability.” Tell that to the developers of the Motorola 6809. Oh, wait. Turns out, hardly anybody wanted it. They really wanted 16-bit processors.
rubbish
You are obviously not an embedded programmer. The reason you don’t need to read the CPU data sheets is that you are so far abstracted away from them- you are not programming anything that is deterministic or time critical, or that needs to be utterly reliable such as an engine controller. Not at all the same thing.
As a newbee I can answer this question: I think the success of the arduino is due to the all-in-one package that immediately work and all the tutorials.
For this STM, it does not work out of the box and it’s completely unclear to me what is finally needed to program it (demo board, usb, dongle, blackmagic etc) and what env to use (arduino ide, gcc, cubething, etc).
If someone put all the informations together without talking about the 1000 confusing alternatives, then I may be very interrested. But for now, I think I would need to spend hour on google just to make a led blink.
It reminds me of when I started getting into the hardware stuff back in 07. I started with PIC’s and found out I had to use a crappy IDE and learn assembler, and getting help on some retarded forum, like those old ones with the….
+responses
+ response
+response (when I run across those types of forums any more I just leave, I never find a proper answer)
Then I found out about avr-gcc and learned how to write in C, there was a lot more code examples and helpful people. But I remember when I ran across the Arduino and I was like, Oh my! So I don’t have to go searching the internet to find some random dudes C files and figure out how to import them so that I can write to an SD card? Someone else did all the work and stuck it into a ready to go IDE? Genius!
This. If anyhing, this article kind of got me interested in this particular board, but I don’t think I will be able to easily work with it, like I do with ESP8266 for example. This guide is a bit confusing and scary if you’re not familiar with all the steps and tools involved already.
Yes, anyone who claims using ARM based processors is a great place to start learning microcontrollers is deluded. ARM may be “standard,” at heart, but every MCU has variations that make it in no way compatible out of the box with other arm devices. No advantage there. Yes they are powerful, and cheap, but simple- no.
Sometimes you still need a 5V system. Either for interfacing to WS2812 type LEDs (OK, this can be done with level shifters) or for better noise margin for ADC measurements.
But this is definitely a nice board.
Seconded – it’s a fantastic CPU. Tons of peripherals, plenty of ram+flash, fast, and USB full speed. I love ’em. No idea why anyone would use 8-bits any more
There are plenty of reasons to use 8 bit machines, or they would not still be around- with new versions introduced constantly. Kind of like asking why people are driving around in minivans, when they could be just as easily driving around in race cars. Dumb to use much more complicated hardware where you do not need it (not smart engineering really), and dumb to criticize a platform made for something completely other than your application/interests. .
I am with you on the full size Arduino (UNO, Mega2560, Leonardo etc) but the Arduino Pro Micro and Mini are excellent controllers. These $2 low power consumption devices are perfect for small, low power projects, but still delivering 12 digital & 8 analog I/O pins and very suitable for running modern 3v devices.
Personally, my main controllers are the Pro Mini 3.3v MCU and run an 8ch IIC Multiplexer when using multiple IIC devices.
As I have no previous experience in C coding, Arduino was a perfect step into the world of Microcontroller devices and coding. I am spreading into Processing and STM32, but I still come back to the Arduino Pro Mini for most of my projects. After all, why overdo the Heart of the project when the smaller device is al you need.
> Why Drive a Ferrari when a Ford will get you there in the same time ? Flash over Substance <
People need to stop rubbishing other peoples choices on the Microcontrollers and IDE's they prefer, just accept that we are all different and have different requirements for our projects. No one Microcontroller, language or IDE is perfect for all occasions.
Enjoy your choices and respect the right of others to choose theirs.
“Debugging at last” For the record, you can use avr-gdb with a standard AVR debugWire interface, like the AVR Dragon or JTAGICE mk II or a clone, plugged into the ISP port. On an Arduino you do need to remove the capacitor on the reset line to allow debugWire as the reset line doubles as the debugWire port. On an Uno, you simply remove C5 from the board and you have access to realtime debugging through your ISP port. You can set breakpoints in hardware and all the usual things.
Yes I’ve used the Dragon like this before. But debugging with the Arduino shouldn’t be this hard and while this is nice, it is still too hard if you subscribe to the idea of the Arduino being newbie-friendly. You might argue that debugging overall isn’t newbie-friendly, but I’d argue that the new guy is the most likely to be lost without it.
So thrown ARM in there to make it simpler?? hahaha
> There’s a mini-USB that can act as a programming port (but not at first).
STM32s (including the F1s) have a serial bootloader though. It’s in internal mask ROM and can be activated by resetting the chip with BOOT0 pulled high. More powerful STM32F4s have an improved version of this bootloader with USB DFU support.
Also, do you know what’s inside these $2 ST-link clones? An STM32F103C8T6 pre-programmed with ST’s encrypted ST-link bootloader. If I recall correctly, someone reverse engineered the encryption and made an exploit that uses the firmware update feature to run any code without having to open the ST-link and solder any wires.
Yes! Was wondering why the ROM boot loader was not mentioned. Even the ultimately cheap STM32F030 has it, multiple interfaces. The still quite cheap ‘070 even has a USB bootloader IIRC (DFU).
But for debugging you’ll need one of those ST-link clones anyway. (Or a real one, or a dev. board that has one)
Please add a “continue reading” break.
Please don’t. I only want the page to load once.
Absolutely. I prefer scrolling down over having to wait for the second page to load.
To be fair, I do prefer to read an article completely or not at all. (aside from articles that are bad and I only notice half way through, in which I primarily sense regret).
So, if possible, have a *really* short abstract (3 lines – 5 lines tops) as subtitle and link to that from the article listing.
Then, obviously, break free full article. That would be my wish.
Like it is now and what Noah wishes for is the bad of both worlds: I don’t get to read the article in whole at once, and I still have to scroll a lot of things I’ve already read or don’t want to read to get to that interesting article further down, *AND* then have to click it.
Please don’t
There are many reports saying these actually have 128KB of flash, and it doesn’t require any fancy hacking to use the extra 64KB.
Yep, near as I can tell those reports are correct. You always wonder if that extra 64K is fully qualified though. Use it at your own risk. Hasn’t bitten me yet.
Would be fine for nothing but hobbyist purposes
I too heard those rumours. It is not true, as far as the chips I bought are concerned – they definitely only have 64kB.
i got one of these in my desk and haven’t gotten around to using it for anything yet.
I’ve used Arduino libs on AVR chips but it looks like there are some nice alternatives for ARM. How does something like LibOpenCM3 compare?
Funny. I got one of this boards a view days ago and started with the Arduino IDE. It took me only a few minutes until it ran.
Then I made a little synthesizer with some of my own routines to play some music and I ported “talkie” a LPC vocoder to create speech.
https://github.com/ChrisMicro/BluePillSound
So, if you want to make your BluePill saying something just flash the
_073_SigmaDeltaTalkie
project.
I’ve used the Arduino libs on AVR chips before but it looks like there are some nice alternatives for ARM. How does something like LibOpenCM3 compare?
One of my main pet peaves with projects like LibOpenCM3 is that they don’t properly document what peripherals are supported by their libraries for which devices. So you go in assuming that lets say USB device support is available for part x, only to find out that it’s partially supported or not at all…after you’ve invested the time and energy to learn how to set the Library up and use it. This same problem exists with other libraries like mbed, LabView Linx among others.
The problem with the current Arduino port of the stm32F103 is that it is mostly based on register-based C and not the stm32cube. This makes it harder to integrate STM32Cube code with the Arduino code in the Arduino IDE. It also means that porting other devices STM32F4s/F3s e.t.c is much harder.
The blue pill boards also have a problem with their USB circuit. Very much prefer the Nucleo board version. It only costs $10!
IMMV, it may work, even with the wrong resistor. But fixing it only requires soldering a through-hole resistor across GND and a header pin. I got mines for $1.73. Or you can get a Maple Mini clone for $3.32:
https://www.aliexpress.com/item/sku/32647125364.html
Replace the 10K resistor between PA12 and 3.3V with 1K5.
Or simply add 1K8.
Much better solution. Why should I want a dangling THT resistor when I can use a nice SMD on it’s intended place? SMD is even way cheaper.
I would consider not having anything to do with CubeMX a feature.
Cube code generation is garbage, but the HAL is all right. I had some very expensive people who have been developing professionally with STM32 for years tell me that HAL is quite stable now, not awful for power management and only a couple small bugs with RTOS.
The Cube’s older brother, the Standard Peripheral Library is battle-tested and rock-solid, as far as code goes. It’s not as abstracty as the Cube, and because of this not as portable across the different chip families, but you can work with it. There’s a lot of code examples out there, too.
I’m still not convinced that it’s a good idea to write code libraries that encourage engineers to not read the datasheets. (“Seamless portability across chip families…”) I do know that it allows code to be produced faster and cheaper. Pick any two!
I don’t see too much difference between the HAL and StdPeriph stuff; often the HAL functions are named the same and do the same thing as the StdPeriph counterpart :)
The HAL certainly does not keep you from reading a datasheet; I sleep with those things under my pillow (and that’s a recipe for a sore neck, as thick as they are). Bringing up an ARM using the available data and the minimum of example code is more difficult using HAL than when I wrote a USB stack in assembler for an HC08 chip in 2002.
Biggest obstacle to using StdPeriph: they don’t make it anymore, and so it’s not available for the chip I’m using (STM32L4). It’s on the way out.
$10 nucleo board from ST and a system workbench for STM32
It really beats, even the cheapest arduino clones, The STM32 Arm USD $1.70 plus http://s.click.aliexpress.com/e/V3JaIEa and the ST-LINK USD $1.90 http://s.click.aliexpress.com/e/EmQZ7qF. So for less than $5 US dollars ( and around a month waiting for it ) is possible to have a very powerfull ARM development hardware.
Now, I know here are a lot of gurus so please help:
I wrote this guide https://emil.fi/avr and have been trying to get into arms for the last year (because they are simply better), even have two stm32k4lc nucleos lying on mt shelve doing nothing.
Does anyone have a similar one or would be willing to write one for arm? I and a lot of other people really appreciate it!
Good job, Al. This is a good article and video. I’m going to have to pull out mt STM32VLDISCOVERY board and order one of these Blue Pills.
+1 Al always has good videos. One of the few where when its over I wish it had been longer. I always feel like I am at his desk doing stuff with him. More like this please.
Even a “real” st-link is cheaper than a genuine arduino. But as some said, it takes much more work to get started. I’ve actually found a Nice free IDE for ARM (and other) development in emBitz. It features all you need for debugging STM32 without any trouble. About documentation i ve found a good start with Yiu’s “definitive guide to cortex m3/4 processors”.
emBitz looks nice as does Coocox CoIDE but both are MS programs so that inhibits me. I do keep a Windows VM and Wine works for some things but it is finicky so I try to only use those things when there are no options.
http://www.openstm32.org/System+Workbench+for+STM32
Is the Coocox stuff still being supported/developed? Their website appears to be a ghost town- no updates in a loooong time, and if you try to make an account nothing appears to happen.
Coocox is no longer viable or supported and in fact their newest version doesn’t work well with the stm32f103c8t6, It crashes often. Their previous version works well but I would recommend Atollic Studio Lite, it’s free (AC6 stm32 workbench seems ok but wont debug with the st-link unless you make a custom configuration script, it seems determined to use OpenOCD). Keil lite also works fine but it’s Keil.
This board also has xpcc support, in case anyone feels more comfortable programming microcontrollers in modern C++: https://github.com/roboterclubaachen/xpcc/tree/develop/examples/stm32f103c8t6_blue_pill
Ouch. Policy-based C++ templates, protothreads, Clearly not for the faint-hearted.
I’ll give a try as soon as I get my blue pill.
I guess that’s what “modern C++” means.
I wonder how long before Chinese manufacturers catch on and start producing add-on boards for this pin layout? I wonder if it will ever reach the level of the Arduino or RasPi ecosystem? Would anyone more knowledgeable than me hazard a guess?
There are LOTS of Chinese STM32 boards, all with different pinouts. That’s not going to happen.
The Chinese will not design any platform. They will copy one though ….
Well, one of my objectives is to design add-on boards, open-source of course, I just have to port my STM8 boards that you can see here https://hackaday.io/project/20388-home-smart-mesh it is just a matter of time. I’m also thinking on making the STM32 BluePill not simply as a dev kit but a complete sensors node (Humidity, pressure, temperature, light, gesture,…).
Let us one second imagine that the STM32 BluePill add on boards got very popular, which sensors would you think could get most demanded ? Or in another way, which add-on boards would you think are most interesting to have ?
That will never happen, peripheral boards, hats, capes, and shields are made for new developers to simplify bread-boarding your own RC networks. You are already dealing with bare metal and C with this board unless you are using the Arduino IDE.
For more (much more) stn32 related info start here -> http://stm32duino.com/index.php?sid=4d562964ddb517eef9f0bee30dac41a6
These boards are great (and cheap). I do not do Arduino much, but use these boards with STM32CubeMX -> Keil uvision 5 -> STlink V2 toolchain. The results are great and I have completely switched from 8/16 bit PIC&AVR platform to STM32 platform.
I’m surprised to see that nobody speaks about Atom.io plus the platform.io environment !
That’s a really good alternative to arduino IDE.
It supports tons of boards (including most arduino ones, and ST also…), and can be extended via many plugins…
I’m going to buy a blue pill, I’ve already seen them on ebay but never tried, now I’m conviced !
You will see something on platform.io soon.
It is a neat platform- the whole philosophy of for standardizing libraries for everything sounds great. Not completely plug and play, though, and not necessarily for beginners. I am trying to use it, and hoping support and interest grows.
This whole detailed (and really good) article, but not a single mention of the guy who wrote the stm32duino core: Roger Clark. I think he deserves at least a mention of his name, he’s done a ton of work putting the core together, and he’s even got people that work at ST on the forum working to make it better and better.
A little credit goes a long way. Thank you Roger and all the people from stm32duino.com for all the work.
I agree, Roger Clark et al deserve a lot of credit.
To give full credit, Maple labs created the original core code for Maple Mini, which I ported to the latest Arduino IDE, and then Roger Clark used that port as the base for stm32duino and all the development since.
^^ LeafLabs is the company, Maple was the product, but same people ;)
Great article, I got finally my STM32 BluePill talk arduino. But for debugging it, I’d rather look towards real IDEs, I already evaluated several ones, so I decided to summarize my experience in this article
“6+ IDEs to debug the $2 STM32 BluePill”
https://hackaday.io/pages/205962
Good job! I have used System Workbench sometimes and it is good. STCubeMx can be installed just as an Eclipse plug in and so that works well switching back and forth (other than every time you regenerate you have to fix that one bug in MX which is going to be true of everyone’s). Also, I dislike openocd for ST-Link because it is painful to configure. In fact, I think I had to change its reset code to work with BluePill correctly, if I recall. It also does not easily support J-Link or anything else with the default setup. Sure, you can code it all in OpenOCD but it isn’t point/click/shoot. And (voice of experience) if you ever get an incorrect debugger string in a configuration it is well-hidden how to fix it (hint: there is a .config file in your project directory).
However, it would be nice if you marked which of these are Windows-only. That also stops me on some of these as I really dislike running an IDE in Wine or VirtualBox.
Thanks, I’ll definitely keep updating that page with inputs as relevant as windows/Linux as you mentioned. Also good hint for the STCubeMX eclipse integration, that could make it an ideal combination for the gnu arm eclipse. Well, OpenOCD is not intuitive, one option is to turn the STLink-v2-1 into a J-Link On Board by flashing a Segger firmware, and then it would have better integration into the gnu arm eclipse (that’s what they recommend).
I have done the J-Link conversion. Honestly, just st-util is fine so I didn’t get much benefit from using the J-link although the monitor commands are better and programming was way faster (but, like 1 second vs 5 seconds–not that big of a deal).
Sorry, it is .custom.cfg not .config. Have to fix it for every new project (want to guess what reminded me of this?).
If you want to try SystemWorkbench, I have some notes on making it work over on Hackaday.io: https://hackaday.io/project/20879-notes-on-using-systemworkbench-with-stm32-bluepill/log/56408-notes
Cool, I’ll check that Note. For st-util, that’s right, now that I tested it and have a clearer picture it’ way enough for me. With the gdb interface I realized that I don’t need to look for any other IDE to support specific Debug Adapter SW. So basically the J-Link is good if you need multiple targets where the ST-Link is enough for ST, and same OpenOCD has the advantage of supporting multiple Debug Adapters while st-util is just enough for ST-Link.
i am taking an embedded programming course at edx.org course. What is the difference between this and the TM4C123
Better tips:
– Use a second bluepill as a blackmagic probe instead of using a generic stlinkv2 – https://medium.com/@paramaggarwal/converting-an-stm32f103-board-to-a-black-magic-probe-c013cf2cc38c
– Dump Arduino entirely: use libopencm3 – https://github.com/libopencm3/libopencm3
Harder but more future proof tip:
– Dump GCC and start switching over to LLVM/Clang 4.0 or 5.0. Compilation and linking works just fine for M3 and higher.
Just integrated Arduino Blue Pill into the uTasker project – with USB-MSD boot loader: http://www.utasker.com/stm32/BluePill.html
Anyone know what happened to the website, stmdunio.com? Did it move?
Are you looking for stm32duino.com? Try https://github.com/stm32duino.
STM32F103C8T6 USB MSC Bootloader:
https://ebd-cda.pl/seriale/
https://ebd-cda.pl/blog/
We’re going to need a bigger monitor..
Stupid WordPress. Misposted.
Like saying “Ford is better than Chevrolet”. There are bad Fords and good Chevys.
“Debugging at last” For the record, you can use avr-gdb with a standard AVR debugWire interface, like the AVR Dragon or JTAGICE mk II or a clone, plugged into the ISP port. On an Arduino you do need to remove the capacitor on the reset line to allow debugWire as the reset line doubles as the debugWire port. On an Uno, you simply remove C5 from the board and you have access to realtime debugging through your ISP port. You can set breakpoints in hardware and all the usual things.