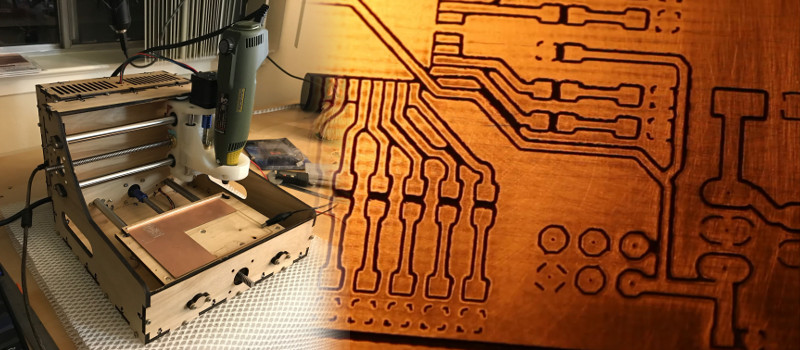
It’s 2017, and getting a PCB professionally made is cheaper and easier than ever. However, unless you’re lucky enough to be in Shenzhen, you might find it difficult to get them quickly, due to the vagaries of international shipping. Whether you want to iterate quickly on designs, or just have the convenience of speed, it can be useful to be able to make your own PCBs at home. [Timo Birnschein] had just such a desire and set about building a PCB mill that doesn’t suck.
It might sound obvious, but it bears thinking about — if you know you’re incapable of building a good PCB mill in a reasonable period of time, you might save yourself a lot of pain and lost weekends by just ordering PCBs elsewhere. [Timo] was fairly confident however that the build would be able to churn out some usable boards, however, and got to work.
The build is meant to be accessible to the average hacker who wants one. The laser cut & 3D printed parts are readily available these days thanks to online services that can manufacture for those who don’t have the machines at home. [Timo] uses a rotary multitool for a spindle, a common choice for a budget CNC build.
With the hardware complete, [Timo] has spent time working on optimising the software side of things. Through careful optimisation of the G-Code, [Timo] has been able to improve performance and reduce stress on the tooling. It’s not enough to just build a good mill — you’ve got to have your G-Code squared away as well.
Overall, the results speak for themselves. The boards don’t suck; the mill can do traces down to 8 mil, and even drill the holes. We’d love to have one on the workbench when busting out some quick prototypes. For another take on the home-built PCB mill, why not check out this snap-together version?


You had me at “even drills holes”
;-)
It also does double sided properly, now!
My apologies, stupid ‘report’ button location.
You don’t have to apologize.
It take several different IPs before anything goes into moderation. :)
Are you still having issues with the microstepping?
http://hackaday.com/2016/08/29/how-accurate-is-microstepping-really/
Good work, I see it costs less than $200.
How does this compare to the Mantis 9 CNC?
The build could be faster, because it uses a laser cutter and 3D printer, but at the end of the day it is the precision that is most important. For a low tech, from scratch, option the Mantis looks great.
Nice to see that the Mantis 9 isn’t as obscure as I thought. I built one at 133% scale after seeing David’s superb build videos. I have used it for laser etching and as an inspection microscope platform too.
less than $200? If that is including the cost of the drill then that is quite low. I think Proxxon drills are quite good, I would say, compared to Dremels. They feel kind of heavier and better built.
A Proxxon Micromot is like $30 and, while just 25 watts, easily sufficient for PCB work. For drills and mills in the sub-mm range one doesn’t need power, but RPM. The more, the better.
Wow! Been looking for a good, cheap, at-home, non-mail-in and non-chemical solution to PCB etching. This could be it. Now how do I acquire one from overseas? I lack laser cutter and 3D printer (future projects). Anybody sell the parts or kit?
Here’s a version which gets away without lasercut parts. Just a handsaw and some practice with it:
http://www.reprap.org/wiki/Mantis_Electron_0.9
Nicely done. I have a homebuilt CNC using a watercooled 24k rpm mill and a v-cut 60 degree bit and barely get 10-mil traces. Glad to see you are at 8-mil. I need to do some more tuning.
Get 15 deg bits.
With 30 deg or more, even small variations in PCB thickness result in noticeable milled width differences.
“lucky enough to be in Shenzhen” — The city has miserable weather. I can wait for my PCBs.
Hahaha, I don’t thinks that’s what he meant. I live in the Bay Area, San Fransisco :)