They say that if something is worth doing, it’s worth doing right. Those are good words to live by, but here at Hackaday we occasionally like to adhere to a slight variation of that saying: “If it’s worth doing, it’s worth overdoing”. So when we saw the incredible amount of work and careful research [Rob Linnaeus] was doing just to roast coffee beans, we knew he was onto something.
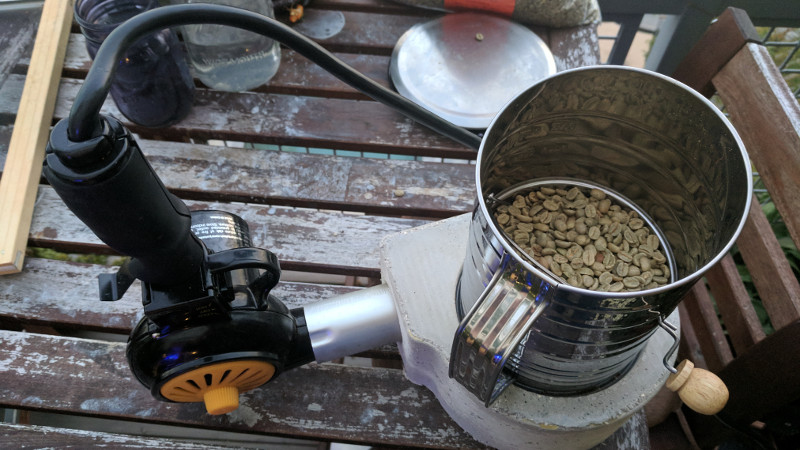
The heart of his coffee roaster is a vortex chamber with an opening on the side for a standard heat gun, and an aperture in the top where an eight cup flour sifter is to be placed. [Rob] modeled the chamber in Fusion 360 and verified its characteristics using RealFlow’s fluid simulation. He then created a negative of the chamber and printed it out on his Monoprice Maker Select 3D printer.
He filled the mold with a 1:1 mix of refractory cement and perlite, and used the back of a reciprocating saw to vibrate the mold as it set so any air bubbles would rise up to the surface. After curing for a day, [Rob] then removed the mold by heating it and peeling it away. Over the next several hours, the cast piece was fired in the oven at increasingly higher temperatures, from 200 °F all the way up to 500 °F. This part is critical, as trapped water could otherwise turn to steam and cause an explosion if the part was immediately subjected to high temperatures. If this sounds a lot like the process for making a small forge, that’s because it basically is.
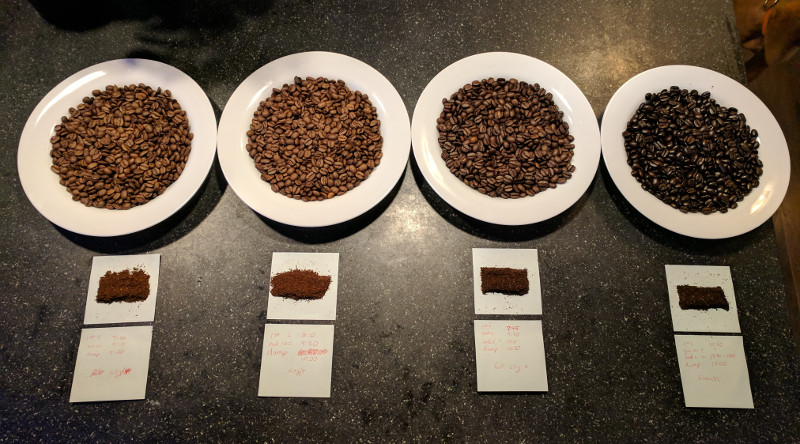
With the physical aspect of this project largely complete, [Rob] next moved onto an experimentation phase so he could determine exactly how long the heat gun needed to be run. With a presentation that looks like it could be his thesis for the Juan Valdez Technical Institute, he was able to fine tune his process until he got his ideal roast time calculated down to the second.
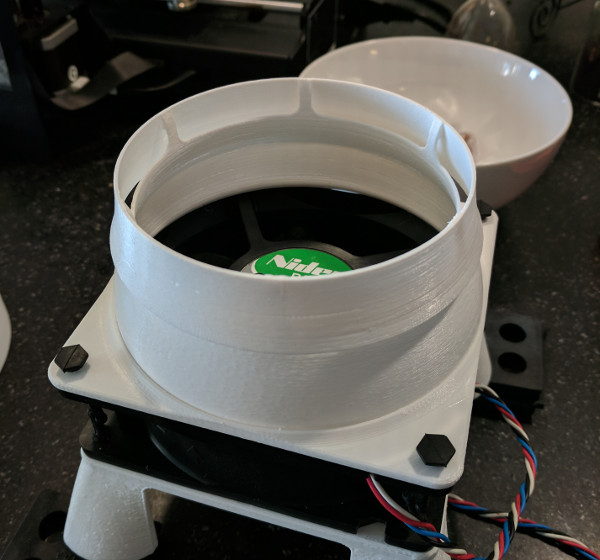
Finally, because an elaborate way of roasting coffee beans needs an equally elaborate method of cooling them back down, [Rob] created a 3D printed adapter that could be bolted onto a 120 mm fan. At first glance his cooler looks simple enough, but on closer inspection you can see a row of openings around the side which are there to help vent back pressure in the event that the amount of beans being cooled restricts the airflow. This prevents the fan from reaching a stall condition, which is a failure mode in axial compressors where the airflow can actually reverse.
[Rob] says he’s happy with the results of the experiments so far, and believes he can improve the finish quality of his cast by modifying his cement mixture. He’s also looking into replacing the 3D printed mold with a silicone one, which would be reusable and allow him to scale up production. As he hasn’t yet decided on if this is going to become a commercial product or not, [Rob] has decided to keep the STL files for his parts private for the time being, but the details he has shared so far should be enough to get you started if you want to try and duplicate his work.
This isn’t the first time someone’s used a heat gun to roast coffee beans, but it’s certainly one of the most polished attempts. We’d suggest he completes his collection with a 3D printed coffee grinder, but somebody’s already beaten him to the punch.


All that effort and you just pile the beans in? Far too haphazard, need a way to roast each bean individually and examine with 15 megapixel image sensor to check for perfect colour.
Why stop there?
Go for full buzzword compliance by streaming images to the cloud, where an Amazon EC2 instance running TensorFlow uses AI to determine the perfect roastiness. A 5W laser etches a unique hash, adding each bean to a blockchain for traceability.
Also probably IoT somehow because embedded.
… and to think some people probably just use fire like a caveman!
Then you need the IoT Arduino/Pi controlled hydroponics, to grow the beans.
v1.1 should add a MAZER so you can heat the whole bean effectively instantaneously, or use a plurality of them to ensure instantaneous isotropic heating. If you used a phased array you could still add the blockchain information.
A phased maser as a laser eraser you say? Hmmm
Hey! How did you get ahold of my heat gun!
r34l lyfe RPG dot com has them, Gonne of Heat 1d3, (+1 Fire Damage) must carry staff of lightning to wield. 50 Gold Pieces.
I’ve heard some use a hot air popcorn popper.
I did give it a try: it works, but you can only load about a cup at a time. It’s funny to try it once at least.
What about if you just drop them in a pan with oil? Can you do puffed/popped coffee for a breakfast cereal?
I tried that. Makes your coffee taste like fries.
Might want to duct those roasting fumes away somewhere safe too:
https://www.cdc.gov/niosh/topics/flavorings/processing.html
This is mainly for food additives for flavorings, i.e., “hazelnut” or whatever crappy fake “natural” flavors they add. If you are just doing beans, there is not much harm.
I keep my beans the right temperature the way nature intended: In the pouch they came in.
200 degrees then 500.. to avoid steam.. so I’m guessing that are those quaint US degrees then.
Perhaps the author could mention what flavour of degrees next time?
This is an American writer, talking about a project done in America, on a website hosted in America.
So yes, they are using American units.
But only a third of Hackaday’s readers are located in America?
Bus them in. :-)
Well, the other two thirds have no way to read the article, then.
The issue is not about the units used but the refusal to identify them.
Also several HaD writers are not American, so you can’t even assume that.
I did not see an indication about the nationality or the address of the writer. Of course I thought of 200°C and that this somehow gives a sufficiently slow heating to avoid a steam explosion. I did not even think of °F, because for me “degree” without any additional indication is °C.
200 F (93.33 C) is just below boiling, so I expect it’s F since 200 C would create steam bubbles.
Very nice! Since you already have a fan in the heat gun, you could also cool the beans by decoupling the fan from the heating element and controlling both parts with an IC and a thermocouple (or just throw in a switch on the heating element). I did something similar, and most hot-air popper-based roasters do the same. The main issue is hot-air poppers (and maybe heat guns too?) are designed so that part of the heating element is used as resistance to knock down the voltage for the DC motor, so the addition of a separate DC power source is required.
My design, called tinyroaster, is here (pics, schematic, parts list, Arduino sketch): https://github.com/donnm/tinyroaster
It’s an ATtiny85 at the heart, with an LCD to display roast info, a thermocouple in the chamber to measure temp, a relay for the heater and the fan running off of a laptop supply, PWM controlled. The ATtiny85 only has 6 I/O pins so a little bit of pin magic was required to shoehorn it all together. The tinyroaster has 3 roast modes (full manual, temperature, and profile) and 5 preprogrammed roast profiles: Light, City, City plus, Vienna and French. It can do about 100g of beans per roast and depending on temperature the roast time can be anywhere from 3-15+ minutes (my preprogrammed profiles are 6-10 mins).
Here’s a pic of the finished build. Yes, I know it’s in a wooden box, but even after 30 mins of constant roasting it barely gets warm. Sufficient air intake through the side vents.
https://raw.githubusercontent.com/donnm/tinyroaster/master/docs/images/IMG_20170926_204727.jpg
That’s great!
Somewhat overkill! I use a modified popcorn popper (outdoors). The maximum temperatures are less than 200c so refractories aren’t necessary. It only takes a few minutes to roast beans so roasting on demand is easy. Some say you should degass the beans after roasting but I don’t notice much difference. Roasting your own beans saves money as good green beans are cheaper than most roast beans and they keep much longer. Freshly roast, ground and brewed coffee anytime!
Yeh, the larger hot-air popcorn poppers are ideal for a few cups at a time. A little noisy but worth the effort.