Some may be surprised to hear that CB radio is alive and well in the 21st century. From disaster response to operating in areas without reliable communication infrastructure, there are plenty of reasons people are still reaching for their radio and not their smartphone. Unfortunately, modern automotive interior design doesn’t have such an enlightened view. It’s hard enough to get decent cup holders in some cars, let alone a spot to hang your microphone.
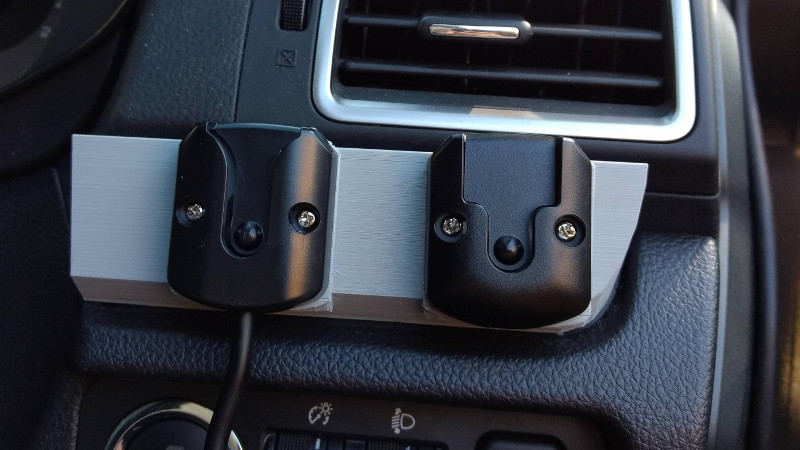
When presented with this problem in his Subaru Forester, [Alex Loizou] did what any modern hacker would, he 3D printed a mount that snaps into the stock dash. No drilling was required to attach his radio mount, it simply replaces a decorative trim piece that wasn’t doing anything anyway. Obviously this particular mount would only really work on the same year and make of vehicle as [Alex] has, but this is a good demonstration of how 3D printing can be used to adapt to existing hardware.
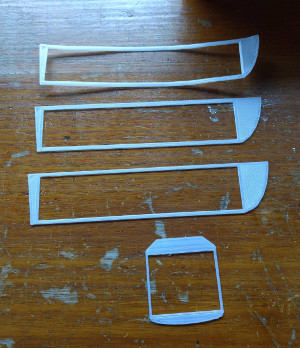 As is often the case when trying to print something to match perfectly with an existing object, there was a fair amount of trial and error required. It took a few attempts before [Alex] got the proper shape, and things weren’t made any easier by the fact he was doing his designing in TinkerCAD. While we appreciate the fact that TinkerCAD provides a web-based CAD tool that is easy enough for anyone to use, using a parametric design tool like OpenSCAD is generally preferred when you need to make slight adjustments to your model.
Software limitations aside, [Alex] managed to come up with a mount that not only holds his CB microphone, but also his handheld transmitter. All while looking about as close to stock hardware as something like this could. We especially like that he switched to a darker filament color for his final version to blend it into the dashes color scheme a bit better.
If your radio interest is a little full-fat for CB, take a look at what keeps ham radio alive and well in 2017, and if you’re a radio amateur with a hankering for the CB days we’ve got you covered.


Nice! sharp corners fully compatible with retina in case of accident. ……ohh shut up grumpy old me!
To be fair, it’d take some interesting physical charecteristics to be able to hit that part of the dash with your eyeball and OEM stuff isnt always better either.
I was in a heavy frontal in a truck last year, and the passenger had to be cut out, and her knee was fractured by the factory fitted fire extinguisher mount that buckled inwards…
dashes => dash
Nice hack. Never would have thought of ripping out a panel like that.
On the other hand, I don’t know if I like the 3D-print part of the story.
“[…]but this is a good demonstration of how 3D printing can be used to adapt to existing hardware.”
A piece of wood / aluminum, a handsaw and a few files could do the same.
Not to dishonor the job that he did or anything. I’m a huge fan of technology and I LOVE the idea of 3D-Printing. Sadly, I can’t find any use for this. Except for stuff like gears to be replaced and whatnot …
Never found something for the price-range of 100-200 bucks in germany and maybe that’s why I don’t see the “point” in 3D printing ….
Cheers,
I remember suggestions decades ago about buying replacement panels or such, so you could drill to your heart’s content but when it came time to sell, the spare goes in and all is well.
Someone was even looking for a way to mount an antenna without drilling, and ended up buying a lamp piece of some sort, it being in the right place, above the hood or trunk.
I thought that was some of the potential of 3D printers, but you either have to measure carefully, or hope the manufacturer releases info to make the spare part.
Michael
Michael
Why 3D print a gear when “A piece of wood / aluminum, a handsaw and a few files could do the same.”
https://www.youtube.com/watch?v=BIUAdINXZmQ
Have you ever cut a gear out by hand like that? Its *incredibly* tedius painstaking work.
Even setting up the blank on a indexer on a shaper with a tooth shaped bit is hours of work starting and stopping the machine to shift the indexer unless you have some sort of mechanically coupled indexer linked to the motion of the machine itself. Its only when you get to the mill with a cutter that the time to make slips under the hours mark.
If a 3d printed gear is strong enough, I’ll run it as its so much easier and sometimes inserting a nylon or similar gear into a steel train has other benefits (less ringing noises, sacraficial point in the geartrain to break if overloaded etc). And I have semi automated ways to cut spur gears out.
I also often 3d print more heavily loaded gears out just to test that what I’m doing makes sense finally before committing to the expenditure of cutting them out of something more solid. Do the same with cnc milled parts too from time to time.
I’m not here to tell you that 3D printing is the tool for you — I don’t know what you’re into. But €130 will get you an Anet A8 kit shipped in a couple days anywhere in Europe. It’ll take you a couple days to put together, and it has flaws, but you’ll have a 3D printer within budget. I bought one a couple months ago, and have yet to write up a good review, but I really want to.
If your time/money tradeoff works otherwise, the Prusa machines are awesome, and ship from just over the border in Prague.
Ebay. Anet or CTC prusa clones are available under $200. Last I checked one could get a CTC delivered within EU for ~€150 with Anet A8 costing just a little bit more. This from (IIRC) German sellers so no extra taxes/import fees.
What is it made of? I’ve had PLA warp in a hot car.
I don’t mean to be critical, I only hope to be helpful to the next person.
I don’t think this was the best way to do this.
I assumed at first read that he chose to 3d print it because he was designing the mounts directly into his replacement piece. That might have made the project worth some effort.
He’s not. He basically just made himself a replacement part that he could drill holes into without ruining the original. There is a much easier way to achieve that. Go to a junkyard, find a similar car and remove the trim piece from it. Whichever piece looks nicer, your original or the junkyard part… that’s the one you store away for the day you sell the car. The other one is going to be covered by whatever you mount to it so looking perfect is unimportant anyway.
Maybe this varies in different areas but little trim pieces like that go for peanuts at my local junkyards. Also, this way you get a piece that fits perfectly. All those fancy curves that manufacturers like to design into dashboards these days… they suck to try to duplicate. I learned to hate modern design the hard way, laser-cutting a front panel to make a car radio for a car that didn’t use the standard DIN rectangle. Friends don’t let friends attempt that unless it’s the only way to achieve whatever the maker is trying to build.
Upon further inspection I think I may have reacted a little too quickly. His replacement trim piece seems to be thicker than the original and angled in order to hold the radio and mic out from the dash to clear the vents and angle them for easier use. Maybe it was worth 3d printing.
My advice for others still stands though… consider if there is a good place to mount your stuff by “just drilling” and use the local junk yards to get a replacement for whatever piece you drill into. Modern curvy dashboards just don’t make this kind of thing easy.