[Admar] is a software developer who was introduced to e-textiles in 2011. The bug firmly took hold, and these days he gives e-textile workshops at Eindhoven University of Technology. Here, students learn to build a single e-textile sensor that detects both presence and pressure. The workshop presentations are available on his site, which is itself a window into his e-textile journey.
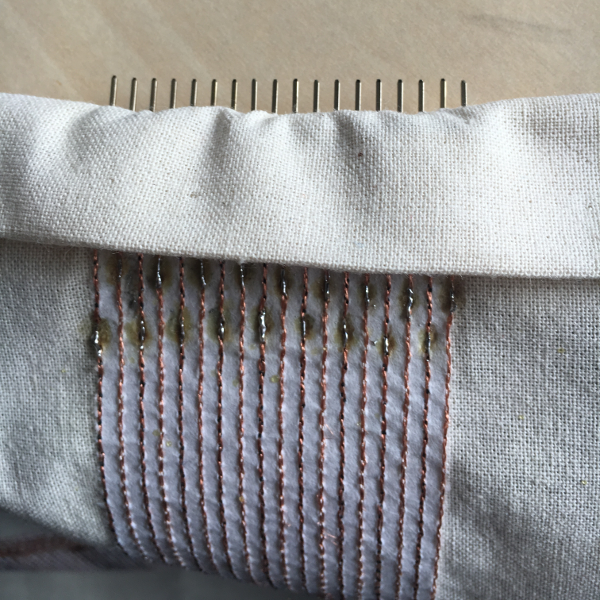 Over the years, [Admar] has discovered that any e-textile project requiring more than a few connections is ripe for some kind of textile-friendly multi-point connector. Through trial and error, he designed a robust solution for use with an embroidery machine. The wires are made from conductive thread and soldered to a row of male header pins to make the transition out of fiber space. This transition requires solder, which quickly gets interesting when coupled with a fabric substrate and no solder mask. We wonder if spraying on mask beforehand would help, or if it would just soak in and stain and get in the way.
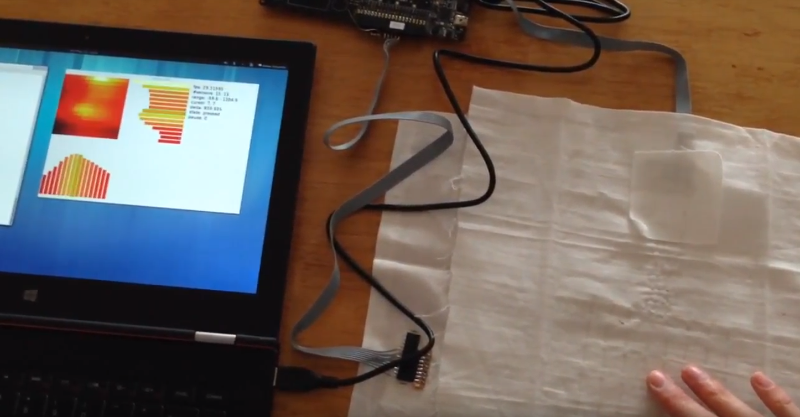
You can see the connector in practice in [Admar]’s capacitive multi-touch demo video after the break. He has stacked two pieces of fabric, each with a wire bus made of conductive threads, with the traces at right angles. Both sensors are wired to a Cypress PSoC5 to create a sensor matrix, and then to a laptop for visualization purposes. As his fingers approaches the fabric, the bar graphs roar upward to show increased capacitance. Once he makes contact, each finger appears as a yellow dot illustrating pressure.
E-textile projects aren’t limited to traces sewn by hand or embroidery machine. Circuit boards can be knitted, too.
Thanks for the tip, [Melissa]!


So, I guess its sensitivity to human skin would not make it good for clothing.
More for furniture or something else…
Just add insulation layer of some sort in between and voila!
Just imagine the benefits! Jeans that tell you whether they are already occupied or not!
I know that I’ve seen some “occupied” jeans, that I wanted to get into!
Like robot skin
Cool hack, but terrible title here!
“Get You an E-Textiles Sensor That Can Do Both”
Maybe “E-Textile Matrix Wiring” or something?
Sorry my man but the title is good
Not for traditional English speaking people…
It’s a F%&king half sentence that assumes a previous context exposition.
If someone can point me to the pressure sensors where objects don’t need to be physically present to cause pressure on them, I just want a few to see if it’s as fast as quantum entanglement…
I’m wondering how well actually weaving the thread into the material would work. i.e. find someone with a loom, then while making the fabric, replace some of the threads with conductive thread. You could achieve fairly fine spacing, and it could be almost imperceptible to the eye, if you choose conductive thread of a similar gauge to the regular thread. To my understanding, having read the post, you could even do the cross direction in the same piece of “fabric”, because the conductive thread itself is insulated. This solves the problem of the garment becoming too thick and bulky. Although it might introduce more problems, with the “interactive area” being larger than desired. I guess you can work around this by ignoring touches that are outside of the “connected matrix”.
Then, to the problem of connecting, and the reason the pitch is so coarse. I’d look for a solvent that can dissolve the insulation around the conductive thread without damaging the rest of the fabric. Paint a stripe of solvent where you want your connector’s pins to meet the thread, then rinse and dry the fabric. You may want to do two stripes an appropriate distance apart from each other, so that the female surface mount header can connect in two places. Lay down a stripe of non-conductive (fabric?) glue in between the two stripes of solvent to hold the header in place, and carefully apply conductive glue to each thread/pin you want electrically connected, such that you do not bridge any pins. You could potentially then cover the header’s pins with more non-conductive fabric glue to reinforce the bond with the fabric. Finally, placing the header under a seam or fold would help to reinforce the mechanical connection to the rest of the electronics.
An optimisation to this process might be to find a conductive glue that incorporates the solvent required to remove the insulation from the thread. Also, you can solve the problem of having two physically distant connections on adjacent edges of the matrix by connecting a diagonal pattern in the fabric, and linking the orthogonal lines back to parallel lines that would end up adjacent to the first connector.