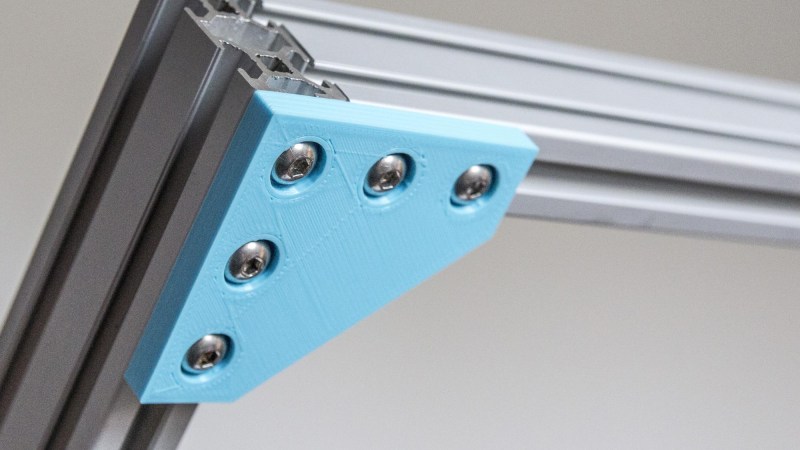
Aluminum extrusions are a boon for mechanical assemblies, but they require a stock of brackets and other hardware to be kept on hand. [mightynozzle] has decided to make things a little easier for prototyping and low-stress assemblies by creating a collection of 3D printable brackets for aluminum extrusions. 3D printing your own bracket hardware means faster prototyping, and if the assemblies don’t need the extra strength and rigidity of metal brackets you can just stick with the 3D printed versions.
The files are on Thingiverse, and include STL files of common brackets as well as an OpenSCAD script for customizing. Not familiar with OpenSCAD? No problem, we have a quick primer with examples.
This project showcases two things well. The first is that while brackets are not particularly expensive or hard to obtain, it can still be worth 3D printing them to reduce the overall amount of hardware one needs to keep on hand to make prototyping faster. The other is that 3D printing can shine when it comes to the creation of things like brackets: a few dimes’ worth of plastic can be turned into precise yet geometrically simple objects that would be a pain to make by other means. It certainly beats sitting on one’s hands waiting for parts to be delivered.


you could make those brackets in 2 minutes with a saw and drill, what’s the point?
But… 3D Printing!!!
The part you cut out of a sheet of plastic will likely be stronger… but I’m betting the dimensions and hole positions will be more accurate on the 3D printed part.
Print the holes on a paper and use it as a template to drill and cut. Start with tiny drill bits and work your way up to desired size. If done correctly, we can get about 0.1mm on the point, which might be print resolution of the printer and the layers inside the holes might be off by 0.1mm. Plus, you don’t waste hours in printing, while you can cut and drill in minutes.
I’ve also had luck freehanding brackets quick n’ dirty by setting up a nice, straight fence on my drill press. You can slide the bracket along that, punching holes in a perfect line. If they’re screwing into extruded aluminum like these, the spacing doesn’t need to be even.
But of course there are applications where it pays to have extra precision. In that case I’d want to have drilled holes anyway, since 3d printed holes would have unevenness and slop. Make it out of metal plate to keep things sturdy.
If you need a bajillion brackets and don’t want to sit around batching them all out by hand, printing sounds pretty dang handy. More options is always nice.
if you need “bajillion’ you outsource it to a waterjet or a laser in 5mm or thicker steel/aluminum. Even if you need like a 100 it will cost less to laser or waterjet than using a ton of filament
And waterjet cut brackets made of steel or aluminum will be sturdier, so you can make them smaller. And how log it will take to 3D print even 100 brackets? Several days?
You could also next day ship them from somebody who has stock if you really needed them quickly. Printing these is going to be somewhat time intensive if you need more than a few and the end result is extremely poor in mechanical properties. Not to mention probably about the same price anyway.
This feels akin to everybody thinking that 3D printing was going to mean people don’t need to buy things like disposable cutlery ever again because they can just print their own. Injection molding has plenty of strengths, particularly when it comes to large quantity, commodity goods. While the metal brackets are not injection molded, this falls into a similar category.
Still, neat to be able to do if you really have to have one but this is hardly a great approach either.
No, dont start with tiny drills and work bigger, this inevitably leads to inaccurate holes and a slew of other issues.
Use a spot drill to make a spot and then drill to size. Or just use good 135 degree split point bits. Or plastic bits for plastic.
I am not an expert at this. That was my experience when working on things. Your way might be better. Still, I thing that we agree on that the 3D printing is okay for a tiny number of brackets. you don’t want o do a 100 by 3D printing.
I am, I have worked as a machinist among other things. Don’t step up in drills. The only exception is with very large bits that are not split point, there you use a single pilot drill about the size of the flat point on the tip of the drill.
Only if you use the right plastic, the acrylic they used to make cheap 3dprinters out of cracked if you torqued them too hard. There PLA blends that have way more strength and flexibility than acrylic.
Delrin or sheet ABS. Maybe lexan.
I wonder how many people have a 3d printer that don’t have a saw?
More than you would think. It’s hard to accurately cut different types and shapes of aluminum.
As long as it involves straight lines, it IS easy, just needs the right technique for the tool. The real fun starts when there’s curves involved.
now that’s an interesting statement, never thought of it that way…
” fm’ “, you do have a point there, somethings are simply done faster (and better) when done using conventional tools, but if you just don’t have conventional tools there is no option. Buying those tools is an option, but honestly, if that person was really needing it (or had the interest of using it) then he/she already had one.
3D printers are the tools that let people make things without having traditional tools and/or skills. Which results in contraptions/creations that amazes the people who do have the tools and/or skills.
Thanks for this insight.
A 3D printer is also the tool for people that don’t have much space. I’m in an apartment, and definitely don’t have room for even a small machine shop. But I do have a square foot of desk.
How do you address the fumes that the machine creates in such a small space?
If you’re using PLA there aren’t really fumes since its corn syrup or cane sugar based. When I print ABS I just leave the door cracked with a fan blowing.
@internet
A 120mm fan ducted into some aquarium charcoal works well enough for light duty.
If you don’t have a machine shop, then you probably won’t need these brackets?
OMG… A troll… on the internet…
If you think that, you’ve clearly never fabricated a bracket from sheet stock.
Drawing the layout, measuring, cutting, cleaning up the cuts, laying out the holes, drilling the holes, counterboring the holes, cleaning everything up, painting or otherwise finishing….sounds like a bit more than 2 (or 20) minutes to me.
I like the idea and applaud the effort. I don’t typically use extrusion myself, but this collection is going in my bookmarks for the day when I might need it.
Sheet stock? We mean plastic sheet stock, right? You could very quickly make these. You ought to have drill bits with a depth stop and the counterbore cutter at the base of the pilot bit, along with a square and a straightedge. It really doesn’t take much time or effort. It’s good for the hands, these fine motor skills need to be maintained in our era of laser-cut this and 3d-printed that. If making a triangle with three holes arranged in a right angle takes 20 minutes, it’s probably necessary practice.
If you took a little longer and made it out of steel that would be even better. I’ve done plenty of that on my cheapass Harbor Freight bench top drill press. Even that would take less time than printing one of these.
All that said, I see the appeal of making it on the printer and I applaud the creator for providing these models free of charge. If you needed to make a whole pile of them you could lay them out and walk away. There’s a moment for all methods.
HOPEFULLY, you can print out 2 (or 3) that have dovetail joints, or mortise & tenon.
Then you slide them together, and finish off by screwing in the extrusions.
Joints can be a challenge to create if your carpentry skills are lacking – good joins require precision cutting.
http://homeguides.sfgate.com/wood-joints-advantages-disadvantages-99088.html
I don’t see any fancy Japanese joinery going on here. It’s just a few gussets and brackets. A blind monkey with a pistol could successfully make these.
Ikea Vigda three track curtain rail, cutting boards, a hand drill and a jigsaw built my plotter. The accuracy came from the design.
Do show! Link here, or tips@hackaday.com
Wow. Yeah I want to see that, sounds cool!
@Alan: That link to woodworking joints is horrible — it goes straight from butt joints (which is really no joint at all to speak of) straight to dovetails which are archaic, demanding, and structurally weak.
Box joints for the pro, dovetails for show.
A lap joint (cut both pieces down to 1/2 thickness so there’s plenty of long-grain overlap on both inside faces) works for most cheesy home hackups. Put a screw or dowel through it if you need something stronger, but your glue is probably as good as the wood you’re gluing anyway.
Dados work where you need a T instead of an L.
All simple, straight cuts.
External brackets like the printed ones here are perfect for framing.
“straight to dovetails which are archaic, demanding, and structurally weak.”
and beautiful!
They’re nice to look at for sure! And I’ve got my share of superfluous dovetails holding stuff together in the basement shop, just b/c it’s fun to cut wood. And I’ll maybe retract my derision for the sliding/running dovetail, where the dovetail is used along its length across another piece to keep it from warping over time. Those really work as advertised, and I don’t know of a good substitute.
Had a woodworking teacher whose dovetail examples, out of contrasting pieces of wood, were pieces of art. Really. The spacing and relative sizes were just beautiful, for lack of a better word. (But the pintails on one piece were like 5mm wide at their thinnest — I could probably break them with my bare hands.) I can’t do that, artistically or technically.
For beginner woodworkers, lap joints and dadoes are the shizz. Easy to cut, they don’t rack, and they’re as strong as your glue.
I agree, i would 3d print a jig though, to help me hand drill holes consistantly
You can’t have both!!
And if you print in natural PLA about 3% larger than intended, you can then make a aluminum pour of those brackets.
PLA/ABS isn’t *That* rigid. But aluminum most certainly is. And 3dp allows easyish pathway from PLA->lost pla casting-> aluminum part.
That might be worth it for complex parts, but if you have a hacksaw and a drill press these would be easier cut by hand.
@Douglas Price, Indeed correct. If you need right angle brackets, they’re cheap and easy to get locally or order from a mass supplier.
But the tricky part – what happens when you need 6 quantity 34 degree angle bracket for X project? I know some places like Misumi will do odd angle stuff for you, but the price is prohibitive, the lead time is long, and it’s annoying to make it to their required file formats.
It’s not the common stuff 3dp shines – it’s the odd stuff you cant get elsewhere, at least not without a cost of “arm+leg”.
Not everyone has a workshop to make a mess cutting stuff and drilling, my 3d printer sits on my desk and makes no mess whatsoever. I have a saw, and a drill.
I Could’ve done it with a 555 timer and a 9v cell.
My vote is for the 3D printed version too. I’m one of those who cannot drill 2 holes that line up. But I can 3D print stuff and design things (through trial and a lot of error) that can fit together.
And I don’t have a mill. My workshop tools do include 2 x 3D printers though :)
Buy expensive aluminum extrusions and screw them together with plastic.
Great for cost savings and quickie “git ‘er done and try it” work… but this is nothing for a permanent install.
yeah, that is slightly funny, those rails aren’t cheap. But you choose those rails because of the (relatively) rigid and straight and very strong properties. Which are then instantly discarded by a piece of plastic.
If this is done for saving money, why not use a simple piece of angled aluminum extrusion or even better… use wood, you can drill in it, screw screws in it, glue it and paint it in every color you like. If build properly it can create very rigid/solid frames for most purposes. I’ve heard people are actually building houses with it, also that complete forests are made of that stuff, but now I’m being silly.
If you need rigidity aluminum extrusion is pretty terrible. Mostly due to the slop in the t-slot & flex in the brackets. For a basic mounting frame they’re rigid enough but for instruments or machining they leave a lot to be desired. Depending on use case of course.
I designed this thing for prototyping purpose or using for temporaly use, until the steel or aluminium brackets arrives. I’m using these brackets for my productive 3d printer together with 90° aluminium angles. I wouldn’t use these brackets standalone. In this combination, it is pretty rigid.
This is cool, thanks for the models. I appreciate the work put into making a collection and putting it out there for free. Even if there are plenty of ways to make or buy these, it’s nice to have this option to add to the utility belt.
I feel like I just watched you evolve from a troll to a nice person, capable of making constructive comments, in 23 minutes.
I think I’m going to make a new year’s resolution next month to quit being an asshole. It’s a big problem.
Let us know how it goes. It can be an inspiration for lot of folks here :)
Personally I would laser cut the brackets and counter sink the holes if needed. Just my preference for speed and familiarity.
Just do it using titanium …
I’ve used these (http://www.thingiverse.com/thing:1646870) for a bash-up light fixture frame for plants: basically just a 50cm x 1m x 1m box that takes no strain. They work great. Printed in PETG filament, which is a little stronger and a little more flexy than PLA. My 2020 seems to have smaller than usual slots — I had to wedge the corners in with my most persuasive hammer.
I chose this model b/c of the old-school Hackaday sticker in the background of one of the photos. Figure HaD readers know what they’re doing. I was not disappointed.
On whether this makes sense to print or not: I have a decent wood shop in the basement and tons of scrap 8 mm birch plywood. It would only take an hour (realistically) to cut up enough brackets and make them look nice. It took > 5 hours of printing time to make a full set of brackets, but it only took about 20 minutes of human time to find the models and press go.
Printer time is nearly free on the margin, while human time is constrained in my household. Printing the parts was the right thing for me.
This is the key point. I have two 3D printers and a whole shop full of equipment, including a CNC mill. I could easily machine parts like these out of aluminum. But it’s much easier to slap a model on one of the 3D printers and walk away. It might take hours, but I can spend those hours doing something else and come back (or wake up) when they’re done.
I also don’t have to have or buy the right thickness aluminum. I don’t break cutters or wear out drills. And I don’t have to clean up the chips or clean the cutting oil off the parts when they’re done.
The aluminum parts are stiffer and stronger, but if 3D printed parts will work for the application, the 3D printer requires way less effort.
Came here to write this, but already written by this poster. 3d printed brackets have replaced quite a lot of cardboard cad models testing things are as they should be and I’ve not missed some tiny unobvious nuance before committing to expensive raw stock.
Even if I printed one and then decided it should be in aluminium or steel, I have a handy dandy 3d printed drill guide and jig to hand that I know already fits that I can just clamp to a piece of stock, which would be even quicker to walk over the guillotine/bandsaw/drill press with in hand, than to take the cad model, post process it, touch off the tools and boot then load stock onto the cnc mill.
Oh yeah, I completely forgot about that part: the dumb mistakes you catch in the first (or second (or third)) print that weren’t obvious until you had a physical part in your hand and tried to make it fit.
Hey Elliot, thanks for plugging my project in the comments and you nice words about my design. I would love the hell out of it if you posted a thing made to thingiverse! When I get some time I’m gonna finish my RepRap-XY-i2 printer that these corner brackets were designed for hopefully soon.
As for strength I printed mine out of inland PLA at 40% infill and they were pretty strong just dry fitting with the extrusion, I got that far before the project got shelved. I’m hoping it will be stronger when innerbrackets are added and all is bolted together.
Im going to skip the printed vs hand made debate and look a bit deeper
the openscad file is not too bad, but the creator could have used a better way to categorize the different types of brackets instead. I have a solidworks file that will allow me to create similar brackets entirely parametrically with out having 20 different categories. Now that i remember it, i think i should go see if i can find it and translate it to a configurable openscad file.
Please tell me a better naming or categorizing for these brackets!
BTW the the drop-down list of the bracket types is only for the preview. After hitting on “Create Thing”, all brackets will be generated in separated .stl files.
It was a while before I realized that in some cases, I was 3d printing basically flat parts that are better and faster to laser cut from plexi. Now I examine the piece to determine which process is better suited before I build it.
I stop use alluminium exrusion to build 3D printer or related project 1 year ago because you can’t reach enough stiffnes to bring down structure resonance to very low level. V-slot and friendd are good to try out things for fast testing, a bit like advanced Lego, but for final product to use every day to obtain constant quality print is a really limited system. If you confuse CNC machines with 3D printer for sure you take the wrong direction.
This article had me wondering if AL extrusions would strengthen a cheap 3D printer,
but I guess (from reading comments) that it would improve (somewhat) the cheapest frames.
Quite possible. Sometimes you can slap on a single piece to improve stiffness in one direction (eg as needed in the printrbot metal). A piece of Makerbeam and epoxy was all it needed.
Joe Prusa”s new i3 (finally?!) uses extrusion for the Y-axis, replacing the old threaded-rod design. OTOH, if you make the X frame out of profile, the devil is in the details — and in the joints.
But alu profile based printers have been popular since at least the Mendel Max in 2012(ish?). Some of the hot new Chinese printers (Creality) have jumped on this wagon. It’s certainly quick and easy to frame something up in profile.
The great part is, I can include a perfect replica of my middle finger for all the people saying ‘make it out of wood’.