If you’ve been hanging around 3D printing communities, or reading the various 3D printing posts that have popped up here on Hackaday, you’ve almost certainly heard of OctoPrint. Created and maintained by Gina Häußge, OctoPrint allows you to turn an old computer (or more commonly a small ARM board like the Raspberry Pi or BeagleBone) into a network-accessible control panel for your 3D printer. Thanks to a thriving collection of community developed plugins, it can even control other hardware such as lights, enclosure heaters, smart plugs, or anything else you can think to hook onto the GPIO pins of your chosen ARM board. The project has become so popular that the new Prusa i3 MK3 has a header on the control board specifically for connecting a Pi Zero W running OctoPrint.
Even still, I never personally “got” OctoPrint. I was happy enough with my single printer connected to my computer and controlled directly from my slicer over USB. The majority of the things I print are of my own design, so when setting up the printer it only seemed logical that I would have it connected to the machine I’d be doing my designing on. If I’m sitting at my computer, I just need to rotate my chair to the right and I’m at my printer. What do I need to control the thing over WiFi for?
But things got tricky when I wanted to set up a second printer to help with speeding up larger projects. I couldn’t control them both from the same machine, and while I could print from SD on the second printer if I really had to, the idea seemed painfully antiquated. It would be like when Scotty tried talking into the computer’s mouse in “Voyage Home”. Whether I “got it” or not, I was about to dive headfirst into the world of OctoPrint.
Raspberry Filled PrintrBot
I picked up a used PrintrBot Play online because it had a small footprint (I could put it up on a shelf when not needed), all metal construction, and automatic bed tramming so I wouldn’t have to fiddle with re-leveling the bed after moving it around. Perhaps most importantly, I knew there was plenty of room available in the base of the machine so I wouldn’t have a problem fitting additional hardware in there.
While OctoPrint can run on pretty much anything, the Raspberry Pi appears to be the platform of choice for most people. At $10 it’s pretty hard to turn down the Pi Zero W as an OctoPrint host, so that’s what I decided to go with. My research told me that the Pi Zero wouldn’t have the zip of the Pi 3 when it comes to slicing STLs, but that didn’t seem like too bad of a trade-off given the small size and reduced power consumption.
I was specifically interested in low current draw, as I wanted to run the Pi directly off of the expansion port of the Printrboard, which I knew had a 5V regulator that’s only rated for 300 mA. Everything I read online told me this wouldn’t be a problem for the Pi Zero, especially since I could turn off the HDMI port as it would be running headless. But as I was about to find out, reality doesn’t always agree with the documentation.
An Early Setback
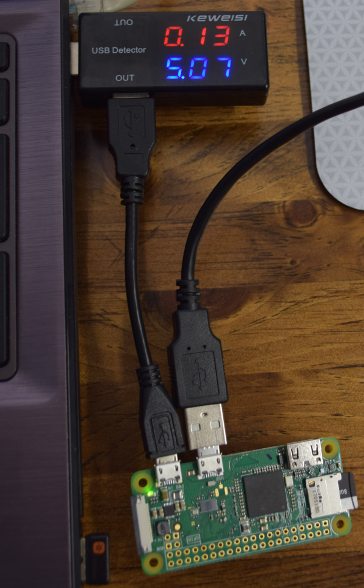
I wanted to power the Pi off of the printer’s controller board like in the Prusa i3 MK3, so I needed to make sure it wasn’t drawing more power than the board could handle. Before I tried putting the Pi into the printer, I set it up on my desk with a USB current monitor and fed it an SD card with OctoPrint installed.
This first test was very promising, it showed that the Pi Zero seemed to top out at about 180 mA when performing resource intensive tasks such as slicing or updating packages. I did need to disable HDMI output to get the power consumption this low, but as the Pi would be installed inside of the printer and never needed to get connected to a display, this really wasn’t a problem.
Feeling confident, I soldered some headers to the Printrboard’s expansion port and the Pi’s power pins, and connected them with a couple of jumpers. I powered up the board and waited patiently for the Pi to hop on the network and allow me to connect to OctoPrint. But…nothing.
Upon close inspection, the Pi’s power indicator light seemed to be showing it shutting down during the booting process. After renabling HDMI and hooking it up to a display, sure enough it would get to a certain stage and then restart. Using my multimeter inline between the Pi and the Printrboard I was able to see that for a brief moment the current jumped up into the neighborhood of 280 mA right before it restarted; obviously just a bit more than the Printrboard could handle.
Plan B
Since powering it from the main board looked like a dead end, I picked up a small BEC (Battery Eliminator Circuit) module which is generally used in RC vehicles to convert the main battery down to 5V for the radio receiver. With micro-sized quadcopters all the rage anymore, it was easy to find one for a few bucks that’s only a little bit larger than a peanut.
While I had hoped to do this project without permanently attaching anything to the Printrboard, I had to suck it up and solder the BEC module’s leads to the underside of the PCB where the main power connects. The other side of the BEC module has a standard servo connector, which I was able to plug directly into the Pi’s GPIO header. So at least I can still take the Pi out of the printer if needed.
Hardware Layout
This image shows the final hardware layout inside the base of the PrintrBot Play.
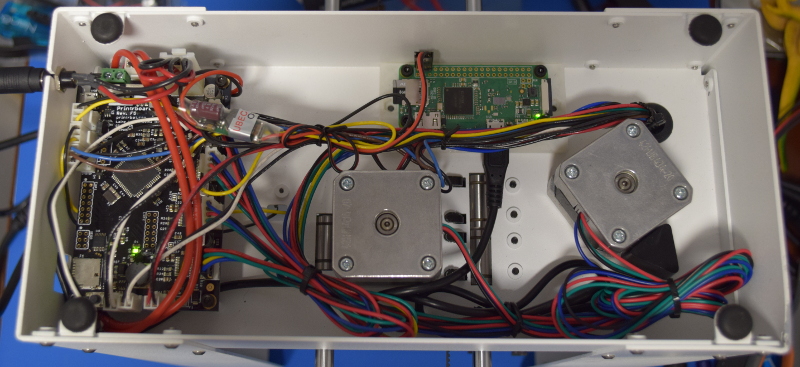
The BEC module can be seen between the Printrboard and the center stepper motor. The Pi itself is screwed into a 3D printed mount I designed. The keen-eyed reader may notice that the Pi mount has nut traps on the flanges; originally I planned on drilling holes in the case and screwing the mount down from the other side. But right before I popped the holes through the steel, I realized the screw heads would interfere with the movement of the bed so I had to settle for double-sided tape.
Getting Started with Octoprint
If you’re using the Raspberry Pi, there is a pre-made SD image called “OctoPi” maintained by Guy Sheffer that contains the latest OctoPrint and all ancillary packages to give you a turn-key experience as soon as you pop the card in. Really, it’s just that simple. Even if you’ve never touched a Raspberry Pi or Linux before, you’ll have no problems getting the software up and running.

The first time you connect to the OctoPrint web interface, you’re presented with a very slick setup wizard that walks you though the basics of getting your printer setup. OctoPrint assumes you’ve already been using your printer with Cura on the computer, and will ask you to import configuration information from it. It will also ask you how you want to handle security: you can either leave OctoPrint completely open for anyone to connect to, or setup user authentication so only trusted individuals can use the printer. This is important if you plan on making your printer accessible remotely.
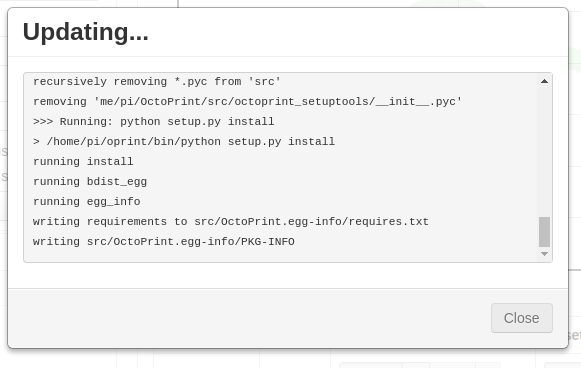 After the basic setup completed, there’s a decent chance it will prompt you to update either OctoPrint or one of its components. This is completely handled within the web user interface. Here again, even if you aren’t a Linux master, you’ll have no problems making sure you’ve got the latest and greatest version installed.
Once everything is updated and OctoPrint has rebooted, you’ll be presented with the main interface which should look very familiar to anyone who’s used a 3D printer before. There’s manual controls for moving the printer around, an area to enter in desired temperature for the hotend (and heated bed, if you have one), and even a basic file manager to allow you to organize and load the STL and G-Code files stored on the Pi.
Speaking of which, as of the current versions of OctoPrint you can slice an STL file right on the Pi. But you’re almost always going to be better off doing it in Cura on your desktop and sending the sliced file over. This is due to the processing capability of the Pi and the limited slicing options within OctoPrint. But the option is there, and if the STL isn’t too complex it works well enough.
Should You Upgrade?
I’ve only used OctoPrint on this printer for a couple of weeks now, but I have to admit, I’m extremely impressed. In my particular case I’ll still keep my primary printer hooked up to the computer, but it’s extremely handy to have on a secondary printer that I don’t want to tether to a computer. Even if you use it for nothing else, the ability to monitor your print progress remotely (say, from your smartphone) is a huge convenience.
The capability of OctoPrint, especially with the community plugins, is vast. There’s no way to do it justice with a single post like this, so I won’t even try. More advanced topics like adding a camera for print monitoring or controlling enclosure lighting from within the web interface will have to wait for future posts. There’s so much potential here it’s hard not to get overwhelmed.
But the short answer, the answer I was looking for when I started this project is clear. Yes, it’s absolutely worth upgrading your printer to OctoPrint. It’s not a perfect experience, but it’s very close, and honestly the handful of glitches or annoyances I’ve seen are hardly worth mentioning in the grand scheme of things.
The bottom line is: for as cheap as a Pi Zero W is, this is an upgrade that simply can’t be beat in terms of return on investment. Whether you go through the trouble of integrating the Pi into the printer like I did, or simply tape it to the side, just do it.


I love my octoprint. I upgraded the original Pi 1 with a Pi 2 to get a snapier web server experience. Added a webcam to the pi and a solid state relay to turn on and off the printer remotely within Octoprint.
After trying a lot of plugin the only one that I still use is the fullscreen webcam plugin (usefull with dual-screen).
I loved my OctoPi rig until it stopped connecting to WiFi or the Pi got corrupted. I’ll have to set it up with my Zero W.
Nice article.
I’m a big fan of octoprint. It’s great with a webcam, so I can monitor a print upstairs on my laptop, while my printer is running in my basement. The big reason I started using it though was it allowed me to do anything on my computer while printing, without risking a computer crash halfway through a 6 hour print (admittedly more of a problem when I was running Windows on my main PC rather than Linux).
What kind of computer is it that it is likely to crash within six hours? Or perhaps I should ask… what are you doing with it that this happens under Windows but (apparently) not under Linux?
The reason I ask is because my 3D printer is controlled completely via Mach3 (the program that is the G-code interpreter and that directly drives the steppers). It is running on an old Windows XP machine via the LPT port. It does this for a few years now without any problem whatsoever.
Should I worry?
Once bit rot starts to happen and the “1” and “0”s start to fall out, then yes you’ll have to buy a whole new machine. :-p Seriously as long as it stays off the internet and you are careful making software changes (updates breaking things) then you’re OK.
I am about to convert my mill to a printer by adding an extender with a separate temp controller. I plan to slice with simplify and “post “ the g code in a Mach3 friendly format….
I would very much like to run Octopi to monitor the prints.
Has anyone hooked it up to Mach3??
It is a very common controller in the CNC world….
For some reasons, ~3 years ago I had the same problem. Windows and Cura. Normally, computer does not crash and only gets restarted for updates every some weeks – months. But running the 3D printer made it crash within hours. Moved to octoprint for the same reason.
I had that same exact kind of random crash problem with Cura in 2017 on a 64 bit machine, even when Cura was not running. Had to uninstall Cura. So for a long time I ran it on a 32 bit laptop -in both cases I was writing my gcode to an SD card. But I tried again in 2018 under 64 bit with no problems.
For me, Octoprint is the only way to print. I have two Pi Zero W’s set up for my printers on the other side of my office. I send a file up, hit start, and walk away. Having dealt with corrupted sd cards and my pc going to sleep ruining prints, this is the best solution in my opinion.
That said, having some linux experience is needed to make this work if you don’t use the prebuilt image.
There’s a raspberry pi clone called orange pi you can get off of aliexpress for less than $10 which includes everything a raspberry pi has, but is cheaper, has built-in wifi, and other little things. I’m currently using the orange pi zero running octoprint.
I am a Orange PI user and was thinking if I could use Octoprint with it.
I just got in 2 Orange PI prime’s with 2 gig of ram. I will have to give it a try.
AFTER I get my new controller for my Printer in. I kind of blew up 2 controllers for my 3D printer.
Don’t ask how!
Looking forward to trying.
Thanks for the post. Nice job…
How?
I know; you said don’t ask. The thing is, this community likes to learn from failures too, and we prefer those failures be ones that other people have encountered, rather than duplicating the failures on our own… :)
Since, you mentioned it – Just how did you blow a board?
How?
Which Orange Pi did you get? There’s a number of variations that I see.
while you’re at it you could put this on there too… https://hackaday.com/2017/12/26/fast-3d-printing-with-raspberry-pi-but-not-how-you-think/
Completely agree, octoprint+klipper is an excellent pairing. I installed, configured and calibrated them with ease and my delta printer works a treat.
Yes, i agree but you need more then a PI Zero to make it work correctly. I got all kinds of pause problems in mid print because Octoprint uses to much CPU during gcode sending (80% vs 20% for klipper) which leeds to blobs in the print.
I prefer repetier server. I run 3 printers on one pi and it works great. Very similar but no plugins unfortunately. Also some features require you to buy it but the free version does fine except for web cam.
Octoprint on a Pi has been running flawlessly for me for almost 2 years. Until last week, when i decided to accept the most recent update… It prints fine, and has a couple of nice updates, but the UI has got almost uselessly slow. It takes over a minute to start up, for example.
I can’t find the cause of the slowdown. Google searches report others with the same problem, but I have not come across a solution that works yet.
Anybody else have the slowdown issue? Got a solution?
OctoPrint is great!
One problem I’ve encountered, and I think it’s more about my local network and not at all OctoPrint’s doing, is that large uploads through the web GUI fail. It’s a hack, but I wrote a command line script to manually upload: http://blog.tommy.sh/posts/uploading-to-octoprint-by-command-line
If you rely heavily on OctoPrint, consider supporting Gina on Patreon!! https://www.patreon.com/foosel
My experience has not been so sunshine and roses. I built a Pi Octoprint server and was quite enjoying it. I also run (ran) a Pi ADS-B data feed. And (coincidentally?) I was also running a NTC C.H.I.P. monitoring the humidity and temperature in the shop/printing room.
The ADS-B station (in the detached garage) ran fine for over a year.
The Octoprint Pi (in the shop) ran fine for 4-6 months or more.
The CHIP had some issues, needed a full reinstall and then ran somewhat fine for a couple months.
Then within a span of 2 weeks, all 3 crashed and corrupted the file system to the point where I’m staring down a full system refresh, reload, reconfigure (didn’t back enough up).
My understanding is the SD cards combined with the file caching? means that any power glitches that crash the computers risk corrupting the file system – sometimes to the point of no recovery.
And so, my humidity monitor will be retired and rebuilt on a different platform (the CHIP was never stable enough for my liking). The ADS-B is on my bench waiting for a rainy day for me to rebuild. And the Octoprint Pi has been replaced with an old laptop running Windows XP and Repetier Host.
To extend the life of SD cards, some systems disable file system journaling. That combined with a power loss can easily cause corruption. Raspbian should have journaling enabled though I don’t know what tweaks have been made for the OctoPi variant. That would make power loss safer but not totally safe. It could just be the SD card crapping out which is plenty common as well.
If you really want OctoPrint you could try a few things. x86 running Windows and Octo, x86 running Debian/Ubuntu and Octo, or RasPi with an SSD over USB. SSD will have waaaay better read/write cycles than an SD card, should throw warnings before it dies, and hopefully ‘dies’ gracefully by going into read-only mode.
In my experience, most of my issues with the Pi corrupting (micro-)SD cards comes from sudden power loss (intentional or not) while the OS is running. If there are any writes being done when this happens you are likely to corrupt large amounts of data, likely much larger than what is being written. Occasionally you’ll corrupt the metadata on the SD card which can leave it in a state where it cannot be reformatted(!) to be reused. This is apparently an issue with flash drives in general, my understanding is that some/most? SSDs either use supercaps or batteries to mitigate against power failures.
The only sure-fire way to prevent SD corruption on a PI is to boot with the SD card with all partitions mounted read-only. There are various tutorials online on how to do this, I’ve stress tested power failures on a Pi Zero booted this way with no issues. Of course, if you want to persist anything, now you’ve got to remount in RW mode and run the risk of having a failure.
I found this research quite illuminating on the subject of flash corruption: https://cseweb.ucsd.edu/~swanson/papers/DAC2011PowerCut.pdf
P.S. Journalling won’t help with this issue, may actually make it more likely to occur.
As elsewhere in comments, I run octoprint on a Beaglebone black, 100% reliability. I dont use Pi’s because of prior bad experiences with the same corruption issues over time on the occasions I have tested them.
I have to add that I just chop power to the entire ensemble to turn it off when I’m not going to be using it for a week or two, no shutdown -r now or graceful close down, just click, turn the light off on the power strip feeding everything. Its really bad, but every time it comes back up no issues.
Your luck will probably run out eventually. I did the same for about a year on mine and the SD card eventually failed. I could produce the same results in about a week on a Pi zero though. Either way, just re-flash and you are back in business until it eventually ruins the SD card too.
I’ve read you can brick them this way too, but I’ve never killed one *that* way yet.
I wish our CEL Robox supported this. It’s a nice machine on its own but the software is closed-source. They made an Octoprint-like software for RasPis called “root” (goes along with “tree”, a shelving unit thing for multiple printers) but it crashes and we can’t fix it since it’s Java and closed source. We got root on the root heheh and installed some webcam software but the crashes were unfixable. Still no software update from CEL …
So we’re stuck using a Windows machine for our remote printer and webcam. It’s functional but mediocre. Our next printer needs to be much more open.
As a tip, try quitting AutoMaker and powering the Robox ON & OFF. :) I can get Repetier Host and other host software, Pronterface, et al to talk to the Robox direct. You need start scripts end scripts et al, but it works for me.
Cool. Are you the same Mike on the Robox forum? I see the post discussing Repetier Host. I’ll check it out
The issue with CEL root was the web server max file size. It was hard coded to something like 10MB which is easily exceeded on complex files when the gcode is uploaded.
I am Maave, but playing with Simplify3D and direct to print with the Robox DM at the moment. having temperature setting issues?? :)
Google “tmpfs” to find out how to use ram caching to cut down on SD card writes. I also like using the full Raspberry Pi 3 instead of just a Zero. Noticeable speed improvement and since you have to add dongles/hubs to the W to get 2 usb ports (for your webcam if you don’t do a pi webcam) it’s kind of a wash from a cost perspective.
One of my good friends built a really neat board for the Raspberry Pi that provides power for the Pi, controls power to the Printrboard, and routes comms with the Printrboard over serial (freeing up a USB port if you use a Pi that only has one). It’s been on my Printrbot Play for years now. Details here:
http://www.potatofi.com/2016/04/printrbot-control-with-octoprint-and-pi.html
Before having this board, I used a very cheap cigarette lighter to USB adapter to convert 12v to 5v. I just branched some wires off the 12v supply before it reached the Printrboard, soldered it into the 12v inputs on the USB cigarette lighter adapter, and plugged a short USB cable into the cigarette lighter. It was super compact and provided clean power to the Pi. It was so tiny that I tucked it into the body of a Printrbot Simple model 1405.
+1
Pays to refresh before commenting. :)
I have used your second approach for years with dirt cheap hardware and zero issues. A slightly more expensive 2A car charger will run a BBB just fine too. Stays cool enough to encapsulate just the board in a sleeve of heat shrink as well for a nice clean result.
For the impatient, most dollar stores have USB car chargers which will take 12-24v down to 5v 1A for you guessed it… $1.
Has worked flawlessly for me.
Some are only rated to 15v though, so be sure to double check if you are running a 24v system.
I’ve read the article, and the comments. I still don’t get Octoprint. DO you people have some sort of printer that requires a computer to operate? My cheap Anet A8 came with a controller board built in that runs the thing. I put my print on an SD card, plug it in, use the HMI to configure, select and print. NO PC NEEDED.
What am I missing here? Why does a 3d printer NEED to be hooked to a computer? Or perhaps better put, what advantage does it give you?
Octoprint isn’t about fulfilling a need. It’s more about convenience. It becomes cumbersome to shuttle SD cards back and forth between your computer and your printer. It’s even more cumbersome if you have multiple printers.
I would also note one issue not brought up in this article. Octoprint has a very real serial to USB bottleneck that I found to be problematic. During complicated prints with lots of short curves, Octoprint can’t transfer the gcode to the printer fast enough, and it leads to brief pauses and jerky movement at times. Most of the time it’s acceptable, but I’ve found that the Klipper firmware eliminates this issue while adding some other benefits.
If that works for you, then you’re good.
I liked being in my living room tinkering on a model, uploading the STL file via a web browser to the Octoprint server in my basement, slicing the file, starting the print, periodically monitoring the print progress from my phone/tablet while doing other family related things around the house.
Now that my Pi is dead, I have to excuse myself to the basement/shop to load the STL file, slice it, start the print. And then periodically head down to check up on the print progress.
It worked for me.
Why use sneakernet? We have wifi. We aren’t savages.
Sure, I can walk my file over to my printrbot on a microSD card. No HMI needed, even. It.Just.Prints. But why bother with the fuss of transferring the file to a card, unplugging it, walking it over, plugging it in, etc.
Kinda silly to do all that when you can just use the printer like, you know, any other kind of networked printer.
Remote printing. I share my printer with 2 other people and we all live in different parts of town. We remote in, start a print, and then pick it up later. So we can start a print in the morning, during work, or in the middle of the night, and the host only has to remove it from the bed when he’s home. We’d like to set up a robot arm to automate removal as well.
Thanks all for your input and information. I guess the fact that I need to level my bed, make sure it all comes up to temp, that no filament is clogged, and that it is all working smoothly before I walk away is what would prevent me from using this. I suppose if I had one of those fancy-dancey hands-off levels-itself perfect-print-every-time type 3d printers that everyone else seems to have, I wouldn’t need to be near it to print, and maybe I could see some advantage in that case.
Maybe i’m just simple that way :)
Yep, I do the same, just copy stl to the micro SD card and sneakernet it to the printer.
Not long ago I had read about Octoprint and it seemed interesting, so I went to their site. The very first thing I wanted to do – of course – is ask the logical question “Is Octoprint compatible with my brand XYZ printer?”.
Could not find anything anywhere that showed a list of printers it supports, nor in the faq.
Not at all impressed so that was the last I bothered with it.
Nothing against octopie but you absolutely can absolutely connnect more than one printer at the same time to any computer.
Great! This is probably a good place to ask this.
I have a Pi-Zero (original, not the W variant) lying around doing nothing. I am thinking of using it for Octoprint. The lack of networking does not bother me. I prefer wired ethernet anyway. I have a spare USB nic that works great with it. I don’t expect to require a USB hub because I intend to connect directly via UART and leave the USB connector on my printer connected to my desktop for uploading firmware updates.
So… after a lot of Googling I find tons of people saying that one CAN run Octoprint on a Pi Zero. But nobody wants to talk about if one SHOULD do this. Of course it is slower than a Pi3 and a Pi3 isn’t THAT expensive. Should I just go for it or should I wait until I can get ahold of another Pi3?
I do like the idea of slicing on the Pi because then maybe I can go straight from downloaded stls to the printer all on my cellphone in the livingroom while watching a movie. I have never used Cura before though, only Slic3r.
Is the Zero to slow for practical slicing? How about the Pi3? Should I forget that idea and do all my slicing at the desktop?
Of course.. .when I get the time I can just try it but it will be interesting to ask.
Thanks for your opinions!
https://photos.app.goo.gl/mUrN3rR5hqKT8Wj03
I slice on my desktop and just upload it to the pi.
I use a Raspi3, but you can connect Octopi to Cura with an API key from Octoprint so you slice in Cura on your PC then hit the print button which automatically sends the file to the raspi and Octopi takes over from there.
That way the pi doesn’t need to do so much heavy lifting.
This exact question is answered in this article…
But the short answer is that you’re better off slicing on desktop no matter which Pi you get. OctoPrint only has very basic slicing capability, and even simple things like rotating the model or printing more than one model at the same time aren’t available without unofficial plugins.
I just did this with a Pi Zero, a 3.5 inch TFT touch screen and Touch UI. Next step is to just create a small pi hat that extends the screen headers out to a different set of pins (for the screen) and also has a voltage regulator with power supply power hooked to it powering the Pi on the regulated side.
I stuck a Raspi3 in my Duplicator 6 with an official Raspi touch screen in a 3D printed enclosure.
https://www.thingiverse.com/thing:2491086
Works awesome and I love it. I have it connected to Cura with the API key so I set my slicer settings, hit print in Cura and the system does the rest.
I use octoprint with my m3d printer….they only print with the m3d printer software….but octoprint has the m33 fios…saved a perfectly good 3d printer from the shelf…and the print results are much better than with the m3d software. really impressive software…
I love Cctoprint, it doesnt matter which pc I’m at, I just slice on the server which is connected to my home lan by ethernet.
One important difference to author, its a beaglebone black not a Pi, upshoot, same sd card is fine and its never been reinstalled since I did it, quite a while back now.
With BB its just as easy to add in bits to control extra fans, bed psu’s and other extras too.
When you’re ready to take it to the next level, add power control. I get quite a high when I start a new print remotely. Turn on the 3D printer, heat up the bed, upload a file and print from miles away! It’s also handy for turning off the printer remotely.
I use an off the shelf WiFi outlet and an Octoprint plugin, but I heard you could just add a relay too.
And what if you don’t use Cura ?
Simplify3D can be coaxed into printing directly to Octoprint but as I dont have it, I’ve never tried it. Using modern versions of Cura, I find that it does a fantastic job of managing the printer. I had more issues with removing and replacing the SD card to the point of the sd slot failing. Its so much easier when you dont have to keep wearing things out plugging them in and out.