Vectrex, Finally In Color

The Vectrex is everybody’s favourite vector-based console from the early 1980s. Vector graphics really didn’t catch on in the videogame market, but the Vectrex has, nonetheless held on to a diehard contingent of fans that continue to tinker with the platform to this day. [Arcade Jason] just so happens to be leading the pack right now.

The Vectrex has always been a monochrome machine, capable of only displaying white lines on its vector monitor. Color was provided by plastic overlays that were stuck to the screen, however this was never considered a particularly mindblowing addition to the console. [Jason] decided he could do better, and dug deep into his collection of vector monitors.

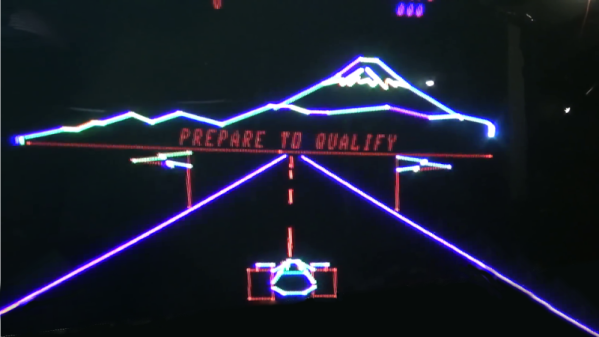
With a 36″ color vector monitor to hand, the Vectrex was laid out on the bench, ready for hacking. The bus heading to one of the DACs was hijacked, and fed through a series of OR and AND logic to generate color signals, since the original Vectrex hardware had no way of doing so. This is then fed to the color monitor, with amazing results.

[Jason]’s setup is capable of generating 8 colors on the screen, and it’s almost by some weird coincidence that this really does make the classic Vectrex games pop in a way they never have before. It’s also a testament to a simpler time that it’s possible to hack this console’s video signals on a breadboard; modern hardware runs much too fast to get away with such hijinx.

It’s an epic hack that through experimentation and some serendipity, has turned out some exciting results. [Jason] is now in the process of taking this to the next level, experimenting with adding color intensity control and other features to the mix.

It’s not [Jason]’s first time around these parts, either – we saw his big-screen Vectrex just a month ago!

[Thanks to Morris for the tip!]

Continue reading “Vectrex, Finally In Color”

Tips On Building The BlackIce BBC Micro

You can look at pictures and video of the Grand Canyon, Paris, New York City or anywhere else, and yet when you finally see those places with your own eyes it is somehow different. Fielding an old computer like the BBC Micro on an FPGA has been done before. But there’s always something to learn when you do it yourself. [Machina] took a BlackIce board and made a BBC Micro replica, but he learned a few things along the way and decided to share them for our benefit.

He used the BlackIce board with [Dave’s] BBC Micro implementation that we’ve covered before. [Machina] was impressed that the board takes PMOD plug ins, so it was easy — almost — to add a VGA and keyboard port. Although both gave him some unexpected problems.

Continue reading “Tips On Building The BlackIce BBC Micro”

See This Slick RC Strandbeest Zip Around

Bevel gears used to mount motors vertically.

Theo Jansen’s Strandbeest design is a favorite and for good reason; the gliding gait is mesmerizing and this RC version by [tosjduenfs] is wonderful to behold. Back in 2015 the project first appeared on Thingiverse, and was quietly updated last year with a zip file containing the full assembly details.

All Strandbeest projects — especially steerable ones — are notable because building one is never a matter of simply scaling parts up or down. For one thing, the classic Strandbeest design doesn’t provide any means of steering. Also, while motorizing the system is simple in concept it’s less so in practice; there’s no obvious or convenient spot to actually mount a motor in a Strandbeest. In this project bevel gears are used to mount the motors vertically in a central area, and the left and right sides are driven independently like a tank. A motor driver that accepts RC signals allows the use of an off the shelf RC transmitter and receiver to control the unit. There is a wonderful video of the machine zipping around smoothly, embedded below.

Continue reading “See This Slick RC Strandbeest Zip Around”

Celebrate Display Diversity For A Circuit Circus Clock

There’s a lot to be said for nice, tidy projects where everything lines up and looks pretty. Seeing straight lines and pleasing proportions speaks to our obsessive-compulsive tendencies, and tends to soothe the mind and calm the spirit. But disorder is not without its charm, and mixing it up a little from time to time, such as with this mixed-media digital clock, can be a good idea.

Now, we know what you’re thinking — yet another Nixie clock. True, but that’s only half the story — or more accurately, one-sixth. There’s but a single Nixie in [Fuselage]’s circus-punk themed clock, used for the least significant digit in the hours part of the display. The other digits are displayed with four seven-segment devices — a Numitron, a vacuum fluorescent display, and an LED dot display — plus a real oddball, an old electromechanical display with individual slides for each character and a rear-screen projector. The RTC part of the project is standard Arduino fare, but as you can imagine the power supply needed for such a diversity of displays is pretty complex and has to provide everything from +5 to -270 volts. Each display needs its own driver, too, making this more of a zoo than a circus. The mixed up look just works with the circus theme, too. We’d really like more information on the projector display, though.

Looking for a real statement for your next clock build? Check out the rare as hens’ teeth NIMO tube.

Continue reading “Celebrate Display Diversity For A Circuit Circus Clock”

OpenBraille Is An Impressive DIY Embosser

In 2024, the Braille system will have been around for 200 years. What better way to mark the occasion than with an open source project devoted to making embossing equipment affordable for the visually impaired? This long overdue cause became the plight of [ccampos7], who couldn’t find a DIY embosser kit and set out to build one himself.

While other embossers forcibly punch the letters in one go, OpenBraille takes a more gradual approach to ensure a clean impression with a rolling motion. Paper is placed between a mechanical encoder with moving pins and a dimpled roller that provides resistance and a place to land. The embossing head is driven by an Arduino Mega and a standard RAMPS board, as the rest of the system relies on Cartesian movement.

The encoder and roller.

The encoder mechanism itself is pretty interesting. A micro servo drives a 3D printed wheel with three distinct tracks around half of the edge. The peaks and valleys encoded in these plastic tracks actuate the embossing pins, which are made from nails embedded through the sides of hex nuts. There’s a quick demo of the encoder movement after the break, and another video of it in action on the OpenBraille Facebook page.

[ccampos7] has all the files up on Thingiverse and plans to post the software soon. You should also check out this compact embosser that was recognized in the first round of the 2017 Hackaday Prize which is a nice all-print Braille concept. Continue reading “OpenBraille Is An Impressive DIY Embosser”

Lunar New Year Is Coming, Shipping Times May Vary

With one holiday period coming to a close, another looms on the horizon: Lunar New Year. That means three things in my mind: nice weather, a beautiful holiday with great food, and that I had better get all my orders for electronic parts for the next few months out immediately. In fact, I should have done it last month but I’m a bit closer to the source than many of you are.

In any case, Lunar New Year affects our ability to order neat gadgets at a time of year when some of us have received a little money to spend. So I thought I’d take a moment away from hacking to share with you how important this holiday is to much of the world so we can manage our expectations for quick global shipping accordingly.

Continue reading “Lunar New Year Is Coming, Shipping Times May Vary”

Friday Hack Chat: The State Of KiCad

KiCad is twenty-five years old — like most PCB design software — and right now it’s the best Open Source tool to lay out your circuits, plop down a few resistors, and create a PCB from scratch. Over the last few years, a lot of people have been turning to KiCad to design some very impressive boards, something no doubt related to the fact that KiCad is free in both the beer and speech senses.

Join us this Friday for Hack Chat, we’re talking all about KiCad. If you have grievances or praise to heave onto the developers, this is the place to do it. Our guest for this week’s Hack Chat will be Wayne Stambaugh, project lead for KiCad. Among other things, Wayne is responsible for leading the KiCad product roadmap and he’s also one of the authors of the CvPcb Reference Manual

During this Hack Chat, we’ll discuss current and future features in everyone’s favorite Open Source EDA suite. This is a great chance to make suggestions and put forth wish list items. Wondering if KiCad is pronounced ‘Kai-CAD’ or ‘Key-CAD’? It’s the latter, but don’t let that stop you from asking Wayne to change that.

Items up for discussion include:

  • The new features on the 2018 roadmap
  • What’s happened in KiCad since the last KiCad Hack Chat
  • What goes on under the hood, and why should you never trust the autorouter?
  • Where do you turn when you’re just starting out in KiCad?

If you have something you’d like to ask the KiCad devs, make sure to add it to our discussion sheet. To do that, just leave a comment on the Hack Chat Event Page.

join-hack-chat

Our Hack Chats are live community events on the Hackaday.io Hack Chat group messaging. This Hack Chat is going down Friday, January 5th at noon, Pacific time. Time Zones got you down? Here’s a handy countdown timer!

Click that speech bubble to the left, and you’ll be taken directly to the Hack Chat group on Hackaday.io.

You don’t have to wait until Friday; join whenever you want and you can see what the community is talking about.