The module on a green PCB, connected to the Pixhawk controller, powering the servo rail

Anxieties Of Hardware Bringup During Parts Shortage

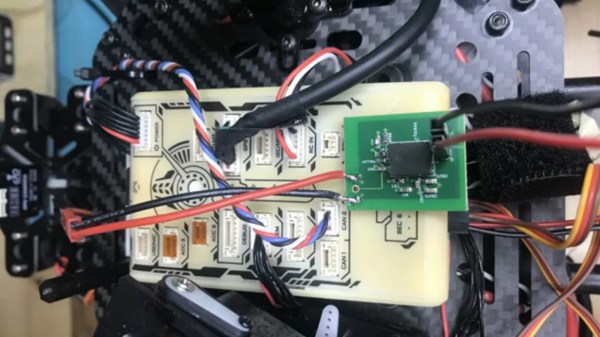
[Dirksavage88] tells us a story about developing a simple BEC in times of chip shortage. He needed a small 5V/3A regulator board for a servo rail on his drone, and decided to use one of the new integrated-inductor modules from Texas Instruments. Hardly requiring any external parts, such modules are exceptionally nice to use for all your power rail needs, albeit at a slightly increased cost – the downside is that, as the parts shortage hit, most of them have been out of stock. Originally priced at about $7 USD, the asking price for these specific modules, LMZM33603, has climbed as high as $800. Somehow, he obtained a few of these modules nevertheless, and went on designing a board.

It can be daunting to test your very first PCBs when the silicon you’re putting on it is effectively irreplaceable for your purposes. TI is known for their wacky footprints, and this module is no exception – the solder paste application took a bit of time, and seeing small solder balls around the module after reflow didn’t exactly reassure him. Thankfully, when he powered it all up, the module worked wonders, and took its rightfully earned spot in his drone’s servo turret. He says we can expect the next revision of his design in 2024, or whenever it is that the reported 100 week lead time is due. In case some of us could use them, Eagle files are available on GitHub!

Quite a few of us are lucky enough to have enough crucial parts for what we need, but most of us got a good few projects shelved until better times – take this WiFi-enabled wall charger project, for instance. Even bigger projects are suffering, from SmoothieBoard to Raspberry Pi. Just a year ago, we had our readers share their chip shortage stories.

Continue reading “Anxieties Of Hardware Bringup During Parts Shortage”

Orphaned Gimbal Gets Second Chance To Fly

A reality of flying RC aircraft is that at some point, one of your birds is going to fall in the line of duty. It could get lost in the clouds never to be seen again, or perhaps it will become suddenly reacquainted with terra firma. Whatever the reason, your overall enjoyment of the hobby depends greatly on how well you can adapt to the occasional loss.

Based on what we’ve seen so far, we’d say [Rural Flyer] has the right temperament for the job. After losing one of his quadcopters in an unfortunate FPV incident, he decided to repurpose the proprietary gimbal it left behind. If he still had the drone he could have slipped a logic analyzer in between its connection with the motorized camera to sniff out the communication protocol, but since that was no longer an option, he had to get a little creative.

Figuring out the power side of things was easy enough thanks to the silkscreen on the camera’s board, and a common 5 V battery eliminator circuit (BEC) connected to the drone’s 7.4 V battery pack got it online. A cobbled together adapter allowed him to mount it to one of his other quads, but unfortunately the angle wasn’t quite right.

[Rural Flyer] wanted the camera tilted down about 15 degrees, but since he didn’t know how to talk to it, he employed a clever brute force solution. After identifying the accelerometer board responsible for determining the camera’s position, he use a glob of hot glue to push the sensor off of the horizontal. Providing this physical offset to the sensor data caused the camera to automatically move itself to exactly where he wanted it.

Continue reading “Orphaned Gimbal Gets Second Chance To Fly”

A New Take On Building A Portable N64

When home consoles go mobile, whether in the form of modded original hardware or emulation, they usually take a pretty standard shape. A screen in the middle, with buttons either on the sides or below it. Basically the same layout Nintendo popularized with born-handheld systems such as the Game & Watch series and original Game Boy. Like the saying goes, if it ain’t broke…

But [Le Nerdarto] had a different idea. He came across a broken N64 and wanted to turn it into a portable console, but not necessarily a handheld one. Noticing the cartridge was about the perfect size to contain a small LCD and in an ideal position, he set out to make what is arguably the most literal interpretation of “portable N64” we’ve ever seen. It might not be the most practical iteration of this concept, but it definitely gets extra points for style.

After he stripped the N64 of its original hardware, he installed a Raspberry Pi 3 and an RC battery eliminator circuit (BEC) to get 5V out of the internal 6200 mAh 7.4V battery. [Le Nerdarto] says this provides power for the Pi, the LCD, and the various lighting systems for up to 10 hours. He’s also added USB ports in the front of the system for controllers, and an HDMI port on the back so he can still connect the system up to a TV when not on the move.

The 3.5 inch LCD in the cartridge is arguably the centerpiece of the build, and while it might be on the small side, we can’t deny it’s a clever idea. [Le Nerdarto] had the good sense to tilt the it back a few degrees to put the display at a more comfortable angle, but otherwise it looks stock since he was able to fit everything in without cutting the back of his donor cartridge out. For those who might be wondering, the “cartridge” can’t be removed, but we’ll admit that would have been a killer feature to add especially with the HDMI port on the back.

Of course, since it’s running emulators on a Raspberry Pi, this isn’t only a portable N64. The front mounted USB ports allow him to plug in all sorts of controllers and emulate classics from pretty much any console that’s older than the N64 itself. Ironically the Raspberry Pi 3 isn’t exactly an ideal choice for N64 emulation, but a good chunk of titles are at least playable.

If you’re more of a purist and want a true portable N64, we’ve covered plenty of those over the years to get you inspired.

Continue reading “A New Take On Building A Portable N64”

“Watch Dogs” Inspired Hacking Drone Takes Flight

They say that life imitates art, which in modern parlance basically means if you see something cool in a video game, movie or TV show, you might be inclined to try and build your own version. Naturally, such things generally come in the form of simple props, perhaps with the occasional embedded LED or noise making circuit. It’s not as if you can really build a phaser from Star Trek or a phone booth that’s bigger on the inside.

But after seeing the hacking quadcopter featured in the video game Watch Dogs 2, [Glytch] was inspired to start work on a real-world version. It doesn’t look much like the drone from the game, but that was never the point. The idea was to see how practical a small flying penetration testing platform is with current technology, and judging by the final build, we’d say he got his answer.

All the flight electronics are off the shelf quadcopter gear. It’s running on a Betaflight OMNIBUS F4 Pro V2 Flight controller with an M8N GPS mounted in the front and controlling the 2006 2400KV motors with a DYS F20A ESC. Interestingly [Glytch] is experimenting with using LG HG2 lithium-ion cells to power the quad rather than the more traditional lithium-polymer pack, though he does mention there are some issues with the voltage curve between the two battery technologies.

But the real star of the show is the payload: a Hak5 Pineapple Nano. As the Pineapple provides a turn-key penetration testing platform on its own, [Glytch] just needed a way to safely carry it and keep it powered. The custom frame keeps it snug, and the 5 Volt Battery Eliminator Circuit (BEC) on the DYS F20A ESC combined with a female USB port allows powering the Pineapple without having to make any hardware modifications.

We’ve seen quadcopters with digital weaponry before, though not nearly as many as you might think. But as even the toy grade quadcopters become increasingly capable, we imagine the airborne hacking revolution isn’t far away.

Continue reading ““Watch Dogs” Inspired Hacking Drone Takes Flight”

Upgrading A 3D Printer With OctoPrint

If you’ve been hanging around 3D printing communities, or reading the various 3D printing posts that have popped up here on Hackaday, you’ve almost certainly heard of OctoPrint. Created and maintained by Gina Häußge, OctoPrint allows you to turn an old computer (or more commonly a small ARM board like the Raspberry Pi or BeagleBone) into a network-accessible control panel for your 3D printer. Thanks to a thriving collection of community developed plugins, it can even control other hardware such as lights, enclosure heaters, smart plugs, or anything else you can think to hook onto the GPIO pins of your chosen ARM board. The project has become so popular that the new Prusa i3 MK3 has a header on the control board specifically for connecting a Pi Zero W running OctoPrint.

Even still, I never personally “got” OctoPrint. I was happy enough with my single printer connected to my computer and controlled directly from my slicer over USB. The majority of the things I print are of my own design, so when setting up the printer it only seemed logical that I would have it connected to the machine I’d be doing my designing on. If I’m sitting at my computer, I just need to rotate my chair to the right and I’m at my printer. What do I need to control the thing over WiFi for?

But things got tricky when I wanted to set up a second printer to help with speeding up larger projects. I couldn’t control them both from the same machine, and while I could print from SD on the second printer if I really had to, the idea seemed painfully antiquated. It would be like when Scotty tried talking into the computer’s mouse in “Voyage Home”. Whether I “got it” or not, I was about to dive headfirst into the world of OctoPrint.

Continue reading “Upgrading A 3D Printer With OctoPrint”