As every Hackaday reader knows, and tells us at every opportunity in the comments, adding an Arduino to your project instantly makes it twice as cool. But what if, in the course of adding an Arduino to your project, you run into a problem and need to debug the code? What if you could use a second Arduino to debug the first? That would bring your project up to two Arduinos, instantly making it four times as awesome as before you started! Who could say no to such exponential gains?
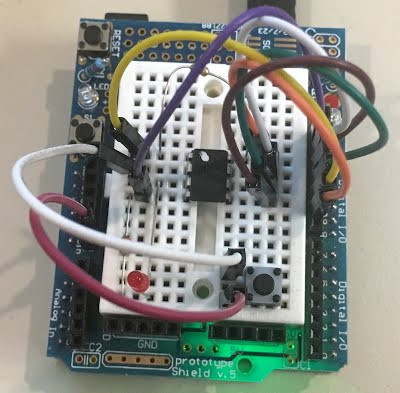
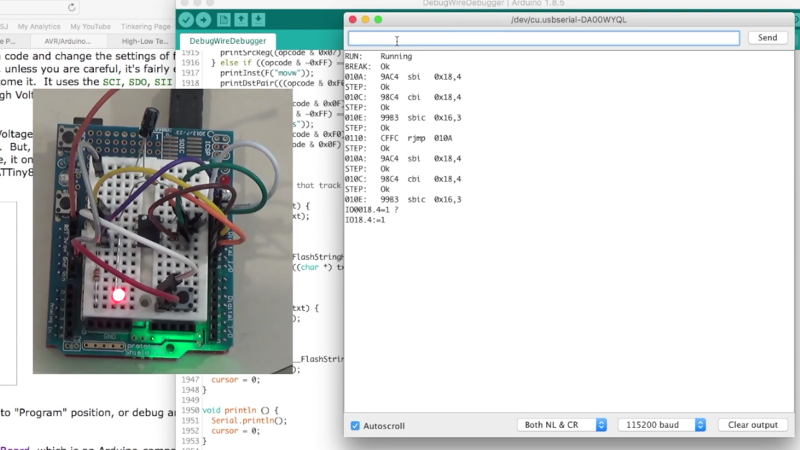
Not [Wayne Holder], that’s for sure. He writes in to let us know about a project he’s been working on for a while that allows you to debug the execution of code on an Arduino with a second Arduino. In fact, the target chip could even be another AVR series microcontroller such as a the ATTiny85. With his software you can single-step through the code, view and modify values in memory, set breakpoints, and even disassemble the code. Not everything is working fully yet, but what he has so far is very impressive.
The trick is exploiting a feature known as “debugWIRE” that’s included in many AVR microcontrollers. Unfortunately documentation on this feature is hard to come by, but with some work [Wayne] has managed to figure out how most of it works and create an Arduino Sketch that lets the user interact with the target chip using a simple menu system over the serial monitor, similar to the Bus Pirate.
[Wayne] goes into plenty of detail on his site and in the video included after the break, showing many of the functions he’s got working so far in his software against an ATTiny85. If you spend a lot of time working on AVR projects, this looks like something you might want to keep installed on an Arduino in your tool bag for the future.
Debugging microcontroller projects can be a huge time saver when your code starts running on real hardware, but often takes some hacking to get working.


I’ll see your debugging a humble 8 bit AVR with another AVR and raise you debugging an ARM STM32 with an ARM STM32
http://www.stm32duino.com/viewforum.php?f=37
Black magic probe, stlinkv1&2, Jlink etc.
Them is 32 bit duino’s so surely that must be 32^2 times more better.
Not to mention that a typical Chinese clone ST-Link costs ~$2, and comes ready to run (including jumper wires).
Would be nice if this could be added to USBASP as another mode.
Cue lawyers?
This is extremely cool, as the only way to do this previously was to shell out for the atmel ICE, along with it’s expensive cables. And which only appears to work with AVR studio, and unfortunately I use the gcc/avrdude toolchain.
The AVR Dragon is a lot less expensive and also supports several programming and debug interfaces. Of course, the Arduino is even cheaper.
I didn’t like having to disable ISP every time I wanted to start debugging using Debugwire. Not sure though if that’s required for every device with Debugwire.
Yes, SPI must be disabled when DEBUGWIRE is enabled. The problem is that on some parts, like the ATmega48/88/168/328, sometimes the DEBUGWIRE and SPI get disabled and there is no way to communicate with the AVR in a low-voltage serial programming mode. You then have to resort to the HVPP mode to reset the fuses back to a sane state. I’ve seen the same thing happen on the ATtiny25/45/85’s as well, which you then have to use the HVSP mode to reset the fuses. In cases where the DEBUGWIRE is still enabled and SPI isn’t, AVRDUDE can temporarily change the fuses to enable and program in SPI mode but it is temporary, so you need to properly set the fuses first.
I always liked the AVR DRAGON and it wasn’t too expensive to acquire at US$60. I was lucky enough to acquire a 2nd DRAGON at an ATMEL workshop for free. Its semi-permanently wired for HVPP for the ATmega48/88/168/328, sockets, headers and wires.
Personally, I prefer to use parts with the JTAG interface for debugging (ATmega2560, AT90USB1286, ATmega32, etc.) because that interface has never failed me. It does however, leave me with 4 analog pins (ADC0 to ADC3) that I can’t use while debugging code. Sigh.
I see MICROCHIP is having a sale on the ATATMEL-ICE at 50% off for the “full kit”. At half of US$130, you’re spending the same US$60 you would be spending on a DRAGON and it has a nice case and cables as well Looks like one can also acquire a “bare board” (no case and cables) for US$50, which is less than the AVR DRAGON.
Peace and blessings.
“In fact, the target chip could even be another AVR series microcontroller such as a the ATTiny85. ”
BURN THE HERETIC!
“As every Hackaday reader knows, and tells us at every opportunity in the comments, adding an Arduino to your project instantly makes it twice as cool.”
Those 555 projects will be so much better.
Bonus points if you can debug an Arduino with a 555.
Or debug a 555 with a 555. ;)
I can debug an ant with a 555. Or a wire, sole of my shoes, or even just my bare fingers.
(c:
This is really great – thank you. I have an AVR dragon and i’ve had an atmega in and out of debug mode with avr studio but i was worried and confused the whole time. this is way more accessible. It actually makes the whole ISP programming process much clearer. I’m definitely going to play with it so i’ve got it in my toolbox when i need it.
I would argue that if adding an Arduino doubles the coolness, adding two Arduinos multiplies the coolness by 2 to the power of 2.
(I’ll get my coat).
I’ve posted a new, part 3 article on my debugger project, along with new code and an overview video. The new code is now able debug an Arduino UNO running at 16 MHz and also includes some bug fixes and enhancements.
https://sites.google.com/site/wayneholder/debugwire3
url=https://youtu.be/F1202b0l5D
Wayne
I just wanted to say, I was really excited when I first saw this post. I’ve been using the ArduinoISP sketch quite a bit, even though I have an old serial port version of the AVR ISP. Getting programmer and debugger in one is something I’ve been hoping to work on myself at some point, but I’ve just had too many other things take up my time. Great work on putting this together Wayne!
I downloaded the sketch, hooked up an ATTiny45 and got to testing. I got as far as programming DWEN but when I tried to enter the debugger, the Arduino seemed to hang. I just couldn’t get it to react to any input after entering the debugger, meaning I could also not unset DWEN. After a bit of testing I realized the problem was that your sketch expects the enter key (or “send” in the Arduino serial monitor) to generate “\r\n” on the console, which seems not to be the case on Linux. After changing the sketch to accept either “\r” _or_ “\n” as end-of-command it works perfectly. I also added echoing of each received character to get some feedback as I’m typing and added “\r\n” to the lines in the debug commands menu, as it goes off on a tangent in my terminal with only “\n”.
Anyway, keep up the good work! Can I get in touch with you to send some patches? I also added back the heart beat/program/error LED indicators from the ArduinoISP sketch, since when it comes to blinkies, more is more, right? I’ll be sure to send that as a separate patch though.