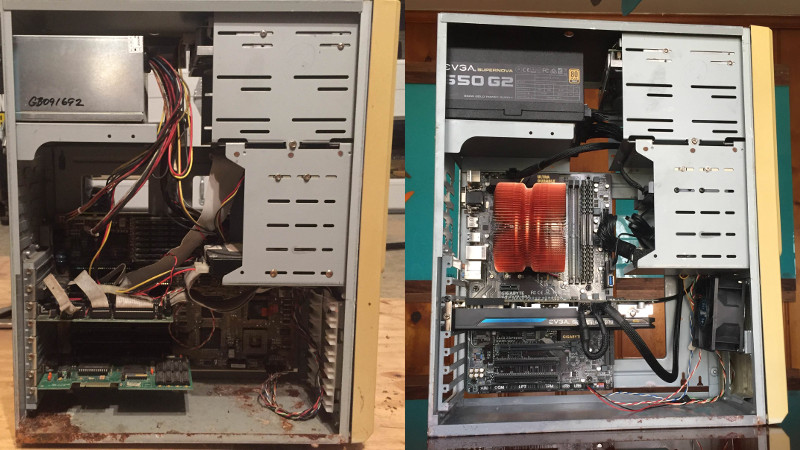
Until a flood claimed its life, the 386 tower [Tylinol] found on the side of the road served him well as a DOS gaming rig. In the aftermath of the flood, the machine was left with ruined internals and a rusted case; it ended up being tossed in storage where it was slowly rotting away. But a recent idea got him to drag this old dinosaur back out into the light of day and give it a new lease on life with some modern gear.
 For our viewing pleasure [Tylinol] documented the restoration of the computer, dubbed SErEndIPITy, from start to finish. The rebuild starts with tearing the machine down to the steel frame and sanding all the rust off. Luckily it looks like no structural damage was done, and a coat of engine enamel got the frame looking more or less like new. The original motherboard mounting solution wouldn’t work for his modern board, so he ended up riveting a piece of sheet metal in and drilling new holes for standoffs to thread into.
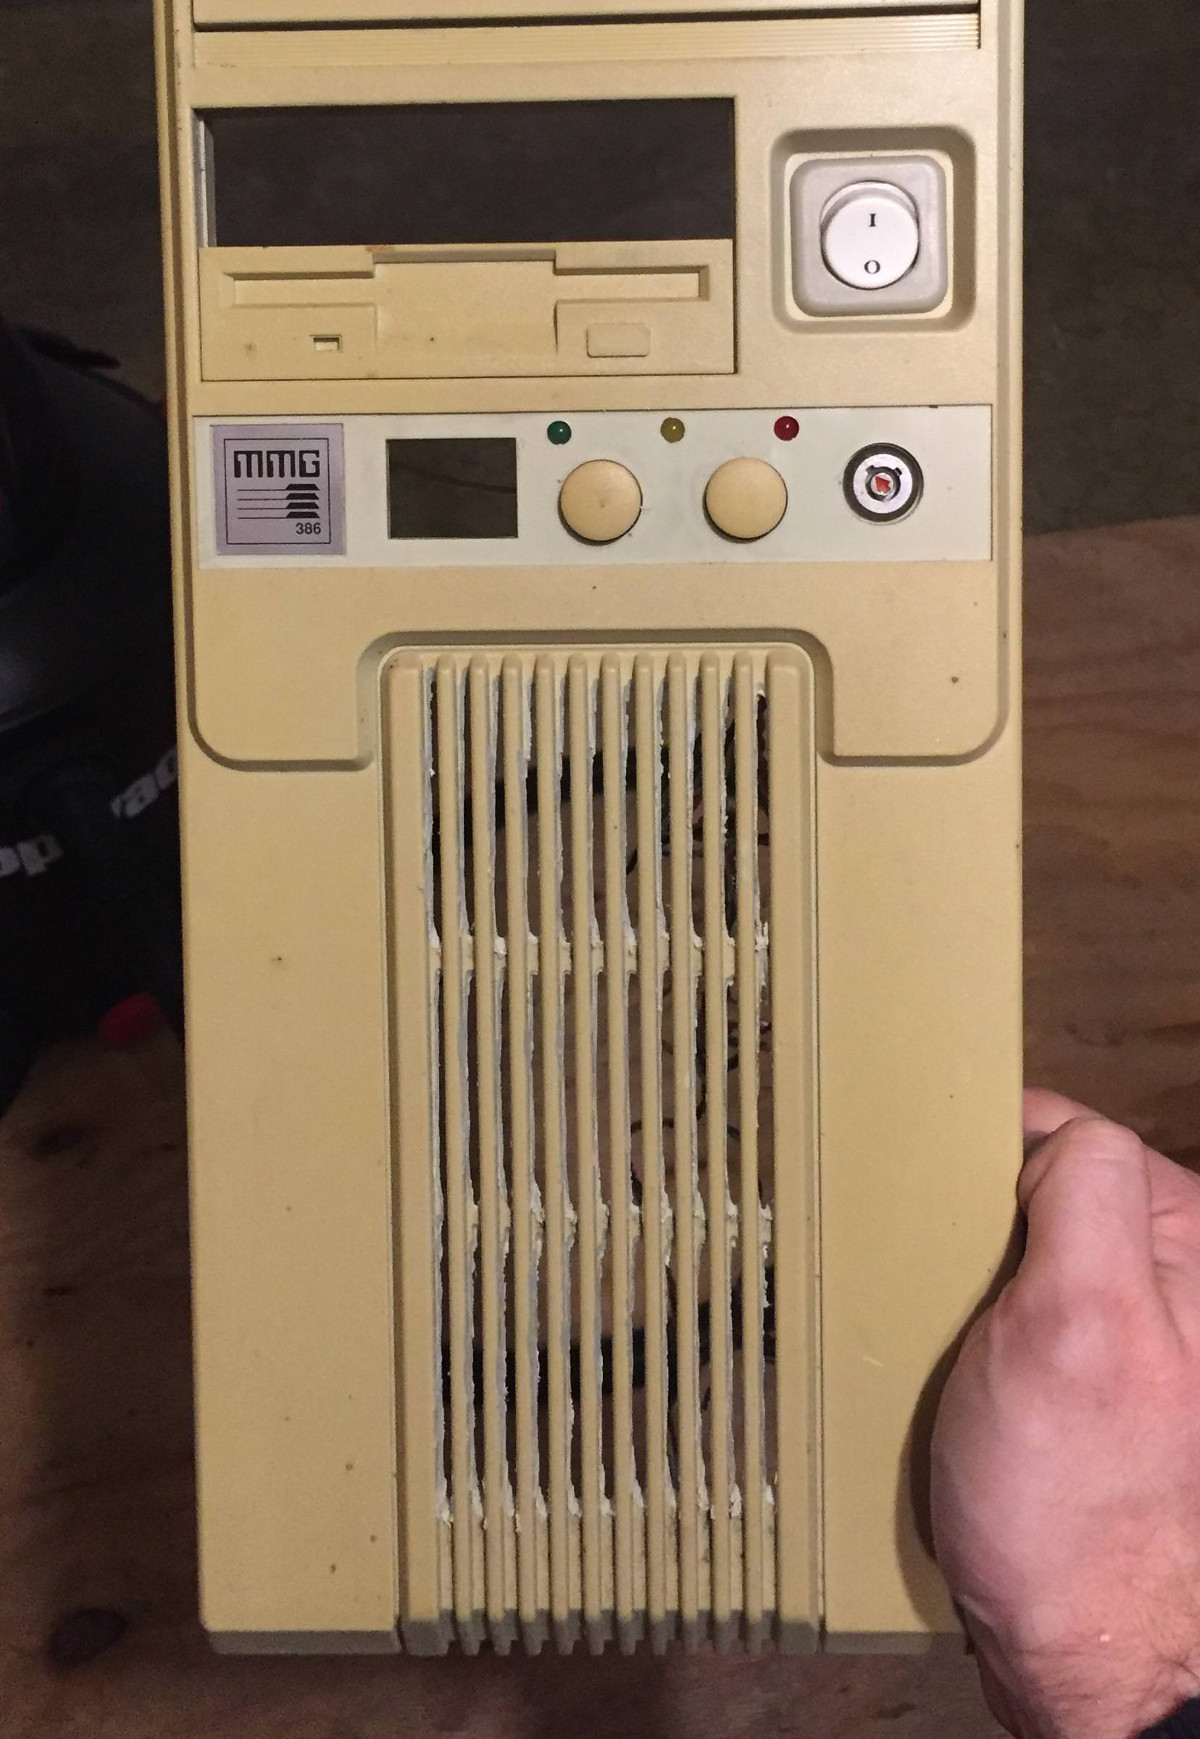
A nice element of this rebuild is that [Tylinol] didn’t want to drastically change the outward appearance of the machine. The customary yellowed plastic was left alone, and wherever possible the original hardware was reused. Rather than blow a hole in the case, he took his Dremel to the decorative ribbed design of the front panel and turned it into a stock-looking vent.
The real star of this rebuild is the LED CPU “Speed” display on the front of the case. In its original form, this was a fake display that simply cycled through predefined digits when you pressed the “Turbo” button on the front panel. By grounding them one at a time, [Tylinol] figured out which lines on the PCB controlled each segment of the display and wired it up to a Teensy 3.5. He was then able to write a C# plugin for CoreTemp to display the temperature.
The rebuilt machine is packing an i5-6500 processor, GTX 970 video card, and 8 GB of DDR4 RAM. Not exactly a speed demon compared to some of the modern desktops out there, but it certainly beats the original hardware. Incidentally, so does the Teensy 3.5 controlling the front panel display. There’s a certain irony there…
Cramming modern hardware into the carcass of an outdated computer is nothing new, of course. But we especially like the builds that take the time to make it all look stock.
[via /r/DIY]


Good build.
I want to do something similar on an IBM PC/AT chassis. :D
I’d like to hot rod a 5170 too – though probably not as far since I’d like to stay using an AT mobo, which probably limits me to P2-era at the latest.
I have a PC/XT chassis that I’d still like to do something fun with. I thought about building my newest computer in it, but it seemed like it would be a lot more work than I felt like at the time.
Then of course there’s the Displaywriter keyboard that I could probably fit a decent Mini-ITX system inside of.
Interesting are old non-rack server cases. About the size of a large footstool.
I had one of those… still regret selling it. it was built like a tank and also had one of those fake CPU speed displays conveniently configured with jumpers
Yes, but the 386 has more RAM than the Teensy… and isn’t susceptible to Meltdown/Spectre like the Core i5.
But will it run Crysis®?
Pack the machine with as much disk space as possible for virtual memory, and yes, maybe, it’d run Crysis…
If the CPU isn’t up to the instruction set, you could conceivably get BSD booted on there and run Bochs, which will let you emulate all the way up to the latest x86-64 CPUs … on the 386.
I can recall doing a 3D render of a scene on our 486 DX/33MHz with 8MB RAM being an overnight affair back in the early 90s, so expect frame rates most easily measured in frames per month… and the strong possibility that virtual memory will have thrashed that hard drive to death before it finishes rendering the first frame.
He said that he does not know the name of cpu cooler. If I’m not mistaken thats one of Zalman CNPS series, like 9700 LED. I Have one with green LED (nvidia something) and still use it for cooling my moms phenom 960t. Copper beast!
Those polished copper heat sinks look good but in their standard from they are very inefficient and require high fan speeds causing noise and accelerated dust buildup. There is a solution though.
Copper is very good for transferring heat within the copper material but no so good at transferring heat to air. Even aluminium is better at transferring heat to air but aluminium is not so good at transferring heat within the aluminium itself. That is why older Intel heat sinks had a copper slug with aluminium fins. The copper slug effectively increased the transfer surface area to the aluminium by having a much larger contact surface area with the aluminium than was available on the CPU itself.
Anything polished is inefficient because it promotes laminar air flow. Raw finishes are better and oxidized finishes are best. Though in the case of aluminium, anodized is better again.
The advantage with copper is that there can be many more fins than is possible with aluminium because copper is malleable and flexible. This increases efficiency because of the far greater surface area exposed to the air.
I had a small form factor Dell PC that had good CPU performance but used a centripetal fan and block heat sink that I called “the megaphone” because of the intolerable noise it would make. I was constantly distracted by the changing fan speed when trying to code.
Here’s how I solved the problem –
I used a copper heat sink that was similar to the one in this 386 but it was half the size and a horizontal bowl shape. I chose that due to space constraints in the small form factor case.
I etched the copper heat sink except for the CPU contact surface to create and oxide coating that dramatically increases efficiency.
I then used a resistive divider to reduce the fan speed to a low speed where it would be quiet and still transfer the heat to the surrounding air even at max CPU usage. This reduces both noise and dust buildup.
I then added an ultra quite case fan that was connected to where the CPU fan normally connects and was temperature controlled so that air (and dust) into the case and noise was minimized. The case fan also had a air filter.
The original setup was noisy and the CPU heat sink needed cleaning every two to three months or so.
The upgraded system was whisper quiet and the easy-to-get-to external clip-on filter needed cleaning every six months or so and the CPU heat sink has not needed a clean in years.
Pretty sure the “Intel design” is purely a cost-cutting driven solution, given the price of copper and constant use of paste between the IHS and chip…
as for the etched copper – interesting idea, might test that on some old server heatsinks :D
Nice build!! The floppy door could cover an SD card reader as well as a couple of USB ports, adding modern functionalities but keeping the retro style.
Main reason I don’t have my old beige case is the airflow was poor for modern processors and video cards.
might be nice to treat the yellow plastic too, like they do with old C64’s.
also they’d better be using an IBM model M, and a big chunky CRT, .. any maybe one of those good old trackball mice.
and what happened to the 7-segment clock speed display and turbo button ?
well at least there’s no blue LEDs..
True. Blue LEDs went from ridiculously expensive exotic technology at over a quid per LED, to the hallmark of cheap Chinese shit, in the period of one particular year. That Japanese guy must be so proud of himself.
oh, i missed it at first, should read the whole article before commenting, nice twist for the 7-segment display, although a Teensy seems very overkill. The numbers for normal and turbo were usually set on the back of the little pcb with jumpers btw.
Those CPU speed displays weren’t fake, if you set the jumpers to make them display the actual CPU speed. From the Turbo XT through the 80486 generation almost all PCs had a connector on the board for a turbo switch that when shorted would increase the clock speed. The boards also usually had a header to connect a turbo LED so the user would know when the computer was running at the higher clock speed.
The speed displays just took that turbo LED signal to switch between two jumper settings to display the Mhz.
What would be extra cool for a hack is to make the speed display show POST codes while booting.
nice idea, showing Power-on-self-test codes, though 2 digits will not cut it i’m afraid ..
POST codes are just the bytes written to port 0x80. Two hexadecimal digits should be plenty…
They’re fake, in that they don’t actually measure the speed of anything. You can set the display to anything you like, doesn’t have to be a number representing clock speed, which is what it pretends to be.
POST codes would be quite neat. It’d be nice to have a little controller do it, so you can add buttons and have it scroll through each code. Though usually the one it stops on is the problem. Just how to connect it is the problem. How easy is the LPC bus? It’s just a squeezed-down serial version of the old ISA bus, and that was very easy to add stuff to.
At the very least, on the superI/O chip on my mainboard (nct6776) if the manufacturer didn’t enable the parallel port (by tying a pin high) and the BIOS/UEFI doesn’t switch the pins to GPIO mode, 9 of the pins can drive a multiplexed two-digit 7-segment LED display according to the values written to port 80h.
I used to set them as “HI” and “LO”.
I guess there’s a difference of opinion on what “fake” means. They weren’t fake in the sense it was a sticker or something, but in that it was just toggling between preset numbers rather than actually measuring the clock speed.
Now the display is software controlled and could show a real-time representation of whatever the user wanted (as long as they are OK with it scrolling by 2 characters at a time anyway).
Actually usually closing the Turbo button slowed the CPU down. That way, if you didn’t bother wiring up the switch, or if there wasn’t one, the board would default to normal, fast, speed.
Did a similar build a few months ago. I re-used an old slightly yellowed mini-tower case of an old P3 based PC for a home server build with a G4600, 4GB of RAM, 3 NICs and 9 HDDs. Fortunately the mainboard mount was standard ATX, so I didn’t have to mod anything except for cutting a small hole in one of the face plates to add a front USB port.
…guaranteed the new tech won’t be able to run Future Crews ‘Panic’, ‘Second Reality’ or Triton’s ‘Crystal Dreams 2’ demo correctly, as the 386 did.
Yeah, what’s the point of doing all that work on an old PC tower when there’s already thousands of them going to the scapyard every day, then replacing the old components with the CPU and GPU of a mid-range gaming PC?