Ingenuity is the name of the game with manual machine tools. You often have to get creative to use the tools you have to create the part you want. That’s exactly what happened when [John] needed to cut internal splines and keyways using his lathe.
Lathes are usually used to turn metal, but internal keyways and splines are operations often performed with a broach. An older tool called a shaper would be perfect here, but shapers are relatively rare these days — or are they? There are many examples of shaper attachments for lathes. These are human-powered devices that scrape a bit of metal off each pass. The lathe itself is used to keep the workpiece in place and move the tool in a repeatable way.
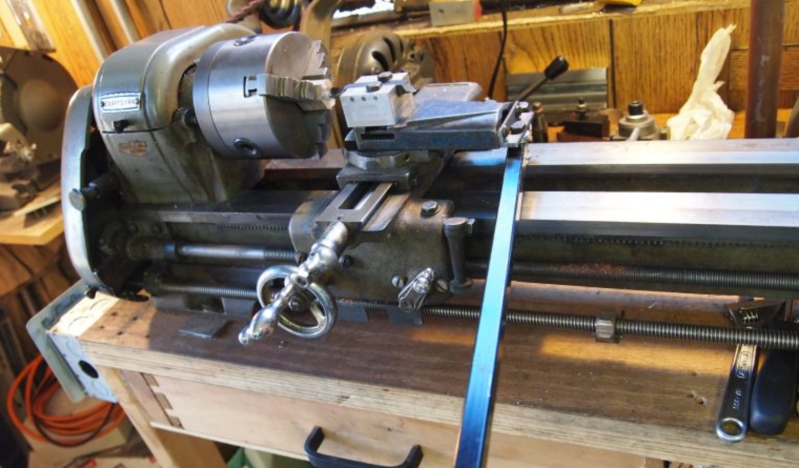
Rather than create a shaper jig from scratch, [John] decided to use his compound slide as the shaper slide itself. He removed the compound slide lead screw, which allowed the compound to slide freely. He then fabricated a double hinged bar and bolted this to the compound slide. Moving the bar causes the slide to move. Just add a cutting tool, and you’re ready to cut a keyway. Add an indexing plate, and you’re ready to cut a spline. You can see the tool in action after the break.
If you want to learn more about lathes and what goes into them, you can learn how to build one from scratch.
[wpvideo hRO3oOxn]


If you like this, I’m working on identical functionality but which mounts to an Aloris-style QCTP. If I ever finish the thing I’ll write it up.
The first version of this I tried, I had the toolbit clamped in an 0XA toolholder on a dovetail-style QCTP. What I found was that since the center of rotation of the compound slide is about 35mm outboard of the point of contact of the tool with the work, the torque exerted was far more than needed to twist the compound slide. (Or twist the QCTP in the compound slide, but I milled slots on mine so it sits down in the compound slide t-slot, so that’s not an issue for me.) Hence the fancy milled aluminum toolholder here: the tool contact point is less than 3mm off the compound’s center of rotation, and it’s biased to twist the contact point out of contact with the workpiece so it doesn’t just dig in and freeze.
BTW, this is sort of like threading. You want to cut a channel behind the area you’re splining, or otherwise the spline chips don’t break off the work and jam up, preventing you cutting to the full depth. You can help this by spinning the cross slide out 0.020″ or so and doing a dry plunge that just hits the chips and breaks them all off, but the right answer is, like threading, to have an open space for the chips to break off into.
Those are fantastic insights, thanks!
In my own case, I’ll be cutting internal keyways, so there’s already a natural place for the chip to end. There’s a drawing of something very similar to all of this in one of my model engineering books from which I’d been drawing inspiration. I’ve hit a point now where I need milling capability to finish the project, so it will be on hold until I can make the time to get over to Artisan’s Asylum for an afternoon.
It looks more like slotter than shaper.
A sharper slotter shaper!
B^)
Yep, Shapers usually have an interchangeable tooth that cuts one way then kicks out on the retract and can be used for cutting all sorts of things including surfacing and cutting ways. This however would be awesome for cutting key-ways and with an index-able head could cut some awesome inner gear teeth.
I’m trying to figure out how to get it to retract on the return stroke. I think that’s going to be the fancy version with a linear way, and I can use an off-center mechanism driving the toolpost to lower it into the workpiece and then raise it back out on retraction.
The part of the shaper that handles the tool disengagement is called a clapper box. It isn’t a linear axis on the machine, rather the tool bit pivots so the tool bit doesn’t attempt to cut on the return stroke and resets prior to the next forward stroke.
The video’s not working for me, so maybe I’m missing it. Presumably the carriage is locked to the bed whilst scraping so there’s no force on the leadscrew half nut? That would not be good for it. I searched for ‘lock’ but it’s not mentioned.
I’m assuming the carriage will be locked to the bed using the standard arrangement for doing so. I doubt the leadscrew will see that much force compared to a normal face cut for instance.
While I haven’t really seen many tutorials for actually doing so, this Lathe to Shaper trick is one of those old school machinist tricks that’s been around for a LONG time. If you have access to a proper shaper or broach, that’s vastly preferred, but if you’re stuck on a cargo vessel during a 2 week voyage in the late 60s and the shaft of an important pump strangles itself, a machinist has to get creative. If all you have is a lathe, you can do a LOT of things, some of which a lathe was actually designed to do (or so I’ve been told by an old shipboard mechanic)
Yeah. There’s a carriage lock on the carriage. It’s the hex nut right above the threading dial. I would never do this using the half nut. The longer write-up mentions that I used to do this by driving the carriage back and forth with the carriage traverse wheel, but even that’s a bad idea because the carriage traverse rack is not designed for that kind of loading.
every time I see a shaper in action its cutting the top of a block, so I often wonder what good is this tool, but I had not thought of internal keyways or gear teeth (course I am not a machinist, just some guy who occasionally uses an end mill)
It’s possible but rare to mount a vise on a shaper, with a workpiece in the vise, and mount a plunge tool on the shaper ram so you can cut internal features. Then you could mount an indexing head on the shaper table and do internal splines or gears. If I had a shaper…
Some soviet lathes allowed you to lock the spindle, but still drive the carriage, thus providing a powered shaper option.
Huh. I could do that. A previous hack was adding a second leadscrew to my lathe, so it has the fine-pitch fancy one that I use just for threading, and then a cheap coarse standard acme screw that I use for just driving the carriage along on stock rough removal passes, and I extended the cheap coarse screw past the tailstock so I could drive it with a stepper motor.
Interesting! Would you happen to have a write-up on the second leadscrew anywhere?