File testing rig

Science Vs Internet Trolls: Testing Another Kind Of File System

No matter what you do or say on the Internet, you’re always doing it wrong. Keyboard commandos are ready to pounce and tell you how it’s “ackchyually” supposed to be done. And so it was of little surprise when [Jason] of Fireball Tools was taken to task by the armchair millwright for his supposedly deficient method of filing metal.

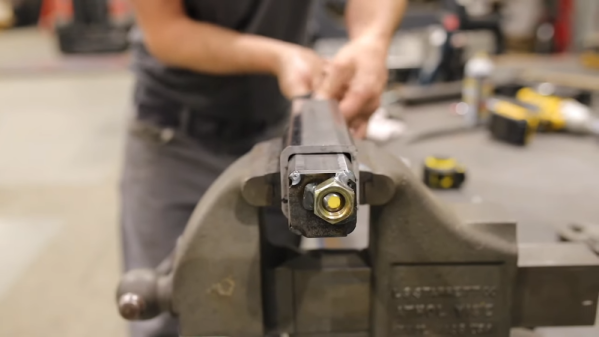
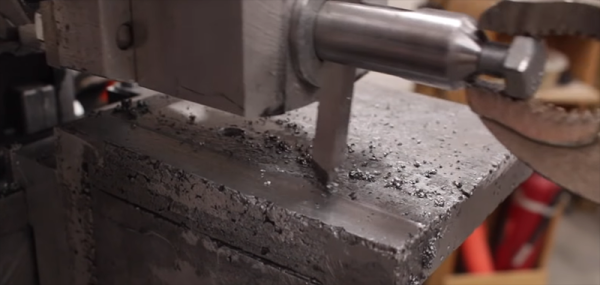
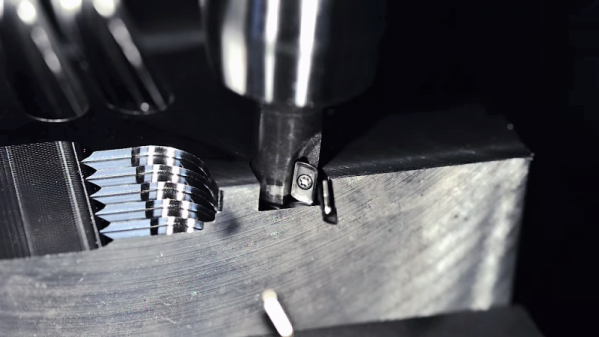
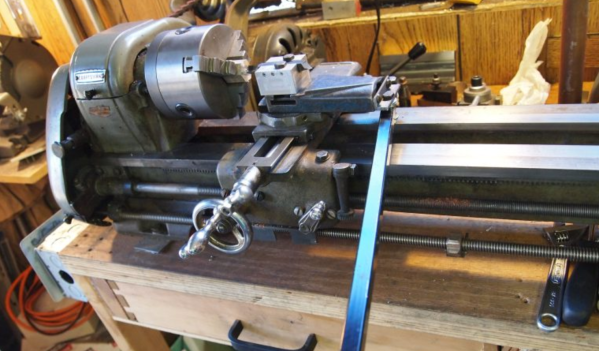
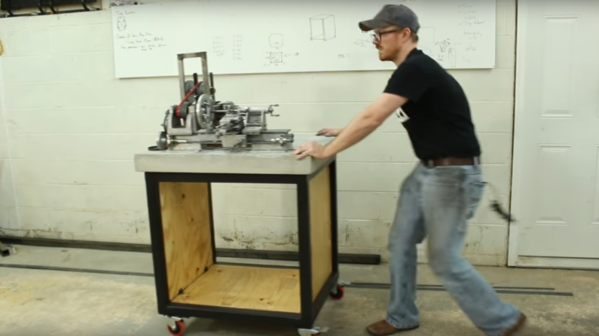
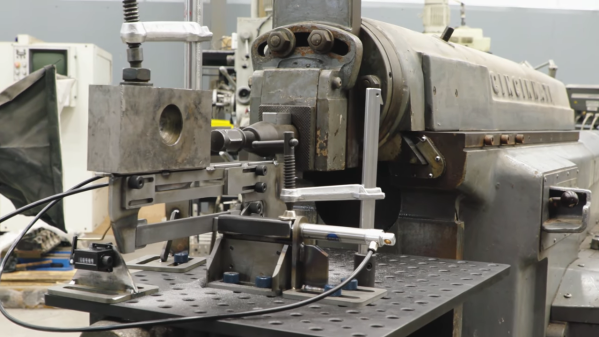
But [Jason] chose to fight back not with words but deeds, building a system to test alternative methods of filing. His filing style is to leave the file in contact with the stock on both the front- and back-strokes, which enraged those who claim that a file must never be dragged back over the workpiece, lest the teeth become dull. The first video below shows the build of the test rig, which leveraged his enormous Cinncinatti shaper as the prime mover, as well as a pneumatic jig to hold the workpiece and imitate both styles of filing. Part two below shows the test rig in action, and [Jason] really outdoes himself with his experimental approach. He tested three different grades of Pferd files — nothing but the best, no expense spared — and did duplicates of each run using both the Internet-approved style and his lazier style.

The result? We won’t spoil that for you, but suffice it to say that the hive mind isn’t always right. And what’s more, [Jason]’s careful myth-busting yielded a few interesting and unexpected results. His channel is full of great shop tips and interesting builds, so check him out if you want to see how metalworking is done.

Continue reading “Science Vs Internet Trolls: Testing Another Kind Of File System”

Shop-Made Tools Turn Cheap Steel Into Telescoping Tubes

Beginning metalworkers are often surprised at just how cheap steel can be. It’s a commodity made by the gigaton, and there are always plenty of extra pieces and scraps left over from big projects that are available for pennies a pound. But what you’ve got is often not what you need, especially when it’s steel tubing with welded seams that prevents one tube from fitting inside another.

[Jason Marburger] from Fireball Tool has some great tips for cleaning interior welds in steel tubing. The first part of the video below details manual methods for cleaning off seam welds, including chiseling, sanding with a narrow belt sander, and grinding them down with a die grinder. Those all work well, but only for short lengths of tubing. Longer tubes need special treatment, which is where the clever tools [Jason] designed come in handy.

By attaching a chunk of high-speed steel to a slug made from the next size tube down and driving it through the tube to be cleaned with a hefty piece of threaded rod, he basically created ain internal shaper to shave the weld down. It works like a charm, as does the tool he made for round tubing by laying a bead of hard facing welding rod around the edge of a mild steel slug. Driving this tool into the seamed round tubing with a shop press cleaned up the weld nicely too.

Hats off to [Jason] for coming up with a couple of great shop tips to keep in mind. We’ve seen similar expedient tools for metalworking lately, like this homemade die-punching tool and a linear track to keep your plasma cutter in line.

Continue reading “Shop-Made Tools Turn Cheap Steel Into Telescoping Tubes”

Cast Aluminium Becomes A Machine Tool

Shaper tools were, at one time, a necessary tool for any machine shop. With a shaper and a lathe, you can rebuild or manufacture almost anything. At the very least, you can make the tool to manufacture anything. For the last few months, [Makercise] has been working on building his own homemade shaper, and now it’s making chips. (YouTube, also embedded below.)

First off, what exactly is a metal shaper? It’s not commonly seen in machine shops these days, but at the turn of the last century, these were popular and practical machines to cut keyways into a piece of stock. Effectively, it’s kind of like a jigsaw, in that it cuts with a reciprocating action and is able to plane the entire surface of a metal plate. Today, if you want to surface a piece of stock, you would just throw it onto the Bridgeport, but there are still some use cases for a metal shaper.

The design of this shaper comes directly from the Gingery series of books, the famous series of books that are step-by-step instructions on how to build a machine shop starting from the technology of rubbing two sticks together. [Makercise] has built one of these machines before, the metal lathe, and the second in the Gingery series of books after a foundry, and the next book is instructions on how to build a mill.

Sure, [Makercise] is using modern tools and modern techniques to build this shaper. There’s a CNC machine involved, and nobody is going to Greenland to make aluminum anymore. Still, this is a flat piece of metal made from scratch, an a great example of how far you can take home machining in a post-apocalyptic scenario.

Continue reading “Cast Aluminium Becomes A Machine Tool”

The How And Why Of Tungsten Carbide Inserts, And A Factory Tour

It seems a touch ironic that one of the main consumables in the machining industry is made out of one of the hardest, toughest substances there is. But such is the case for tungsten carbide inserts, the flecks of material that form the business end of most of the tools used to shape metal. And thanks to one of the biggest suppliers of inserts, Sweden’s Sandvik Coromant, we get this fascinating peek at how they’re manufactured.

For anyone into machining, the video below is a must see. For those not in the know, tungsten carbide inserts are the replaceable bits that form the cutting edges of almost every tool used to shape metal. The video shows how powdered tungsten carbide is mixed with other materials and pressed into complex shapes by a metal injection molding process, similar to the one used to make gears that we described recently. The inserts are then sintered in a furnace to bind the metal particles together into a cohesive, strong part. After exhaustive quality inspections, the inserts are ground to their final shape before being shipped. It’s fascinating stuff.

Coincidentally, [John] at NYC CNC just released his own video from his recent jealousy-inducing tour of the Sandvik factory. That video is also well worth watching, especially if you even have a passing interest in automation. The degree to which the plant is automated is staggering – from autonomous forklifts to massive CNC work cells that require no operators, this looks like the very picture of the factory of the future. It rolls some of the Sandvik video in, but the behind-the-scenes stuff is great.

Continue reading “The How And Why Of Tungsten Carbide Inserts, And A Factory Tour”

Superb Wood Floor Inlay Shows Off Computer-Augmented Tools

It’s been a few years since we first started hearing about “tools of the future changing the way we work” but this astounding whole-room floor inlay might be the best argument for them yet.

The Shaper Origin

A couple of years ago we wrote a hands-on preview of a unique tool called the Shaper Origin. If a milling machine is classically defined as having a stationary tool head with moving stock, the Origin is the reverse. To use an Origin the user adheres specially marked tape to the stock material, then holds the origin down and moves it much like a hand router.

The Origin has a camera which tracks the fiducial patterns on the tape, allowing it to know its precise position, even across an entire room. The operator sees a picture on the screen of the tool that guides them with superimposed lines, while the tool head makes its own precision adjustments to perfectly cut the design in the X, Y, and Z.

Floor in Progress

But what do you use a tool like this for? Cutting boards, small tables, and toy blocks are fine examples but don’t highlight any unique features of the tool. Many could just as easily be made using a ShopBot, X-Carve, Carvey, or any of their ilk. What you can’t do with any of those tools (or really anything besides manual labor, endless patience, and master skill) is inlay an entire floor in situ.

[Mark Scheller] (eight time winner of Wood Floor of the Year awards) used an Origin to cut a curvaceous 22 foot long rendition of the first 9 bars of Handel’s Passacaglia into the floor of a lucky homeowner’s music room. Without decades of practice, it’s difficult to imagine doing this any way besides with a Shaper Origin. You can’t put an entire room into a CNC router. The individual floorboards could be cut, but that would be tedious and increasingly difficult as the room gets larger. With the Origin it seems almost trivial. Do the design, place the marking tape, and cut. The same model is used to cut the inlays for a perfect fit. This is an incredible example of a unique use for this unusual tool!

Turn Your Lathe Into A Shaper

Ingenuity is the name of the game with manual machine tools. You often have to get creative to use the tools you have to create the part you want. That’s exactly what happened when [John] needed to cut internal splines and keyways using his lathe.

Lathes are usually used to turn metal, but internal keyways and splines are operations often performed with a broach. An older tool called a shaper would be perfect here, but shapers are relatively rare these days — or are they? There are many examples of shaper attachments for lathes. These are human-powered devices that scrape a bit of metal off each pass. The lathe itself is used to keep the workpiece in place and move the tool in a repeatable way.

Rather than create a shaper jig from scratch, [John] decided to use his compound slide as the shaper slide itself. He removed the compound slide lead screw, which allowed the compound to slide freely. He then fabricated a double hinged bar and bolted this to the compound slide. Moving the bar causes the slide to move. Just add a cutting tool, and you’re ready to cut a keyway. Add an indexing plate, and you’re ready to cut a spline. You can see the tool in action after the break.

If you want to learn more about lathes and what goes into them, you can learn how to build one from scratch.

Continue reading “Turn Your Lathe Into A Shaper”

Bulking Up A Lightweight Lathe With A Concrete Cart

When it comes to machine tools, a good rule of thumb is that heavier is better. A big South Bend lathe or Bridgeport mill might tip the scales at ludicrous weight, but all that mass goes to damping vibration and improving performance. So you’d figure a lathe made of soda cans could use all the help it could get; this cast concrete machine cart ought to fit the bill nicely

Perhaps you’ve caught our recent coverage of [Makercise]’s long and detailed vlog of his Gingery lathe build. If not, you might want to watch the 5-minute condensed video of the build, which shows the entire process from melting down scrap aluminum for castings to first chips. We love the build and the videos, but the lightweight lathe on that wooden bench never really worked for us, or for [Makercise], who notes that he was never able to crank the lathe up to full speed because of the vibrations. The cart attempts to fix that problem the old fashioned way – more mass.

There are a few “measure twice, cut once” moments in the video below, as well as a high pucker-factor slab lift that could have turned into a real disaster. We might have opted for a countertop-grade concrete mix that could be dyed and polished, but that would be just for looks. When all is said and done, the cart does exactly what it was built to do, and there’s even room on it for the shaper that’s next on the build list. We’re looking forward to that.

Continue reading “Bulking Up A Lightweight Lathe With A Concrete Cart”