The practice of developing wearable electronics offers a lot of opportunity for new connector designs and techniques for embedding electronics. Questions like these will eventually come up: How will this PCB attach to that conductive fabric circuit reliably? What’s the best way to transition from wire to this woven conductive trim? What’s the best way to integrate this light element into this garment while still maintaining flexibility?
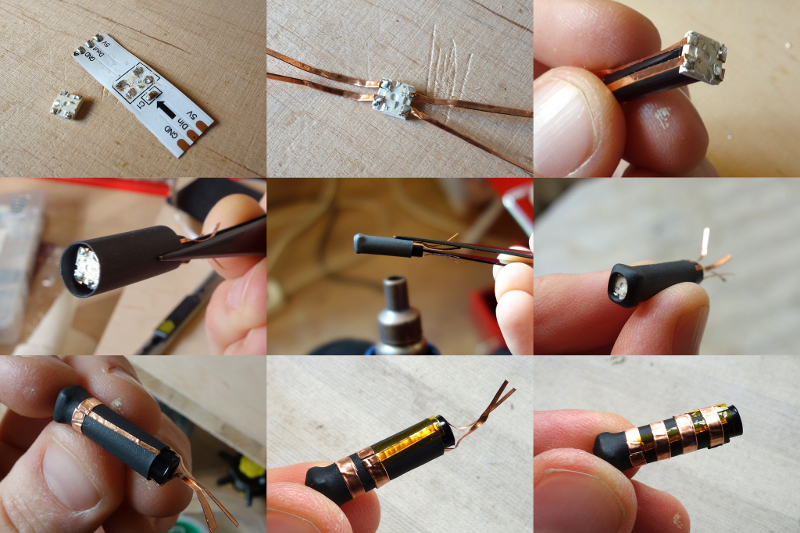
Mika Satomi and Hannah-Perner Wilson of Kobakant are innovators in this arena and inspire many with their prolific documentation while they ask themselves questions similar to these. Their work is always geared towards accessibility and the ability to recreate what they have designed. Their most recent documented connector is one they call the Bumblebee Breakout. It connects an SMD addressable RGB LED, such as Adafruit’s Neopixel, to a piece of side glow fiber optic 1.5mm in diameter. On a short piece of tubing, the four pads of the SMD LED are broken out into four copper rings giving it the look of a striped bumblebee. To keep from shorts occurring while wrapping the copper tape contacts around the tube, they use Kapton tape to isolate each layer as they go.
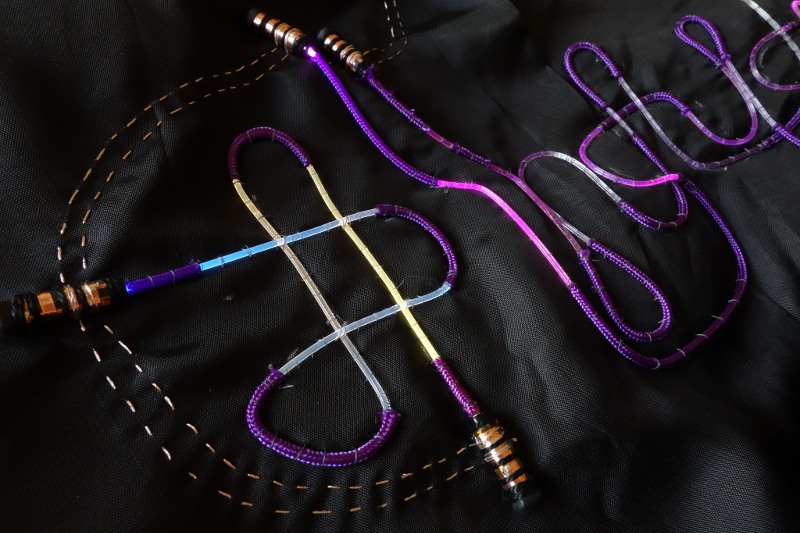 This connector was originally created to be used in a commission they did out of Koba, their e-textile tailor shop located in Berlin. Fiber optics were applied to jackets for a performance called “All Your Base Are Belong To Us” produced by the Puppetry Department of the Hochschule für Schauspielkunst Ernst Busch.
Peruse more e-textiles techniques and learn how to build a connector transitioning from an embroidered thread bus to a wire and how to knit solderable circuit boards. And make sure to click around Kobakant’s website, it’s full of e-textile DIY tutorials!


cool hack.
i’m waiting for someone to come up with a decent solution to none of those darn led strips ever sticking to anything longer than a few days. (3M tape my *ss)
It really depends on the quality of the tape, the humidity, the cleanliness of the surface you stick it to, etc etc… I had a roll sitting around for about 5 years and applied it to my IKEA bed, worked perfectly a year later. Meanwhile a duplicate of the same roll failed to stick to the dusty/chalky matte paint in my window area but worked fine on the eggshell paint in my closet.
Wipe the surface first with either IPA (finished/delicate) or acetone (metal)
Or forego the tape all together , use thumb tacks, two at the connection seam on the sides.
have it mounted that way on my porch for 3 years now.
but the do make clips for them.
I usually go for the rigid SMD strips nowadays and just mount them with screws. It seems that even if the tape initially works, the heat generated will eventually dry it out.
“A few days” seems to be a very good record. I had some which were falling off on one side, while I was still sticking on the second half. Substrate: painted wall and glossy painted wood. The hot-glue gun helped, or you can use small strips of gaffer/duck-tape between single LEDs.
I use nails or thumbtacks, the only solution that works for leds strip
Yes, the tape sucks. I found that gluing them with a glue gun cartridge of transparent polymer (used to seal windows boat) works amazing. The hardest part is to remove the M3 tape, with an hot air gun, quite time consuming.
I left the tape where it was and added small beads of hot glue every like 30cm on both sides of the LED strip just on it’s edge (half on the strip half on the wall). This is perhaps not the cosmetically perfect solution, but I didn’t care more. The strip sticks under the ceiling in >3m height. For a close look you need a ladder.
Now, if the tubing was very soft, so it could deform a little, and you pit a strong bar (rod) magnet inside, a pair of these might make a nice detachable connector setup.
So you basically built a 4 way tip-ring connector yourself. Why not use ready made ones, like 4 way 3,5mm for phone headsets?
becuase it has to interface not only with a number of electrical connections, but also a FIbre optic and it has to hold the Neopixel.
Thanks k-ww and Martin for your comments. Detachable could be nice. But also, if the tube (and conductive areas) were squishy it would help improve electrical contact (kind of like this hack: http://www.kobakant.at/DIY/?p=2592). And yes, it is basically a 4 way tip-ring connector! Only the end that normally connects to the cables, connects to the addressable LED.
Plus, here our idea of “deetachable” solution. You sew stretchy rings of conductive fabric that can be pulled over the Bumblebee….
https://www.flickr.com/photos/plusea/40113490844/
https://www.flickr.com/photos/plusea/40822487321/
https://www.flickr.com/photos/plusea/25951150237/
Good hack, but hard to do in a repeatable way; if I had to make my own connectors I’d go with coated flexible PCBs for light ones and magnetized ones with ball contacts. Traditional jacks can also be improved for example by making the tip bigger and thanks to a lever mechanism using the same force applied to push them inside the receptacle to add some force to the other contacts, so that all contacts, not just the tip, get a better connection.
Wow, what CAN’T you use copper tape for?
Awesome project!