ETextile Spring Break Tackles Signal Blocking, Audio Generation, And Radio Transmissions

Finding a killer application for e-textiles is the realm of the hacker and within that realm, anything goes. Whether it’s protecting your digital privacy with signal shielding, generating audio with a wearable BeagleBone or 555 timer, or making your favorite garment into an antenna, the eTextile Spring Break is testing out ways to combine electronics and fabric.

You may be asking yourself “What are e-textiles good for?”. Well, that’s an excellent question and likely the most common one facing the industry today. I’m afraid I won’t be able to give a definitive answer. As an e-textile practitioner, I too am constantly posing this question to myself. There’s an inherently personal nature to fabric worn on the body and to our electronic devices that makes this answer elusive. Instead of trying to fabricate some narrow definition, what I offer is a look at topics of interest, material experimentation, and technical exploration through the lens of a week-long event held recently in New York called eTextile Spring Break.

Continue reading “ETextile Spring Break Tackles Signal Blocking, Audio Generation, And Radio Transmissions”

Let’s Bring Back The Age Of Automatons

Long before the concept of A.I., as we know it today existed, humans started building machines that seemed to move and even think by a will of their own. For decades we have been building automatons, self-operating machines, designed to resemble humans and animals. Causing the designer to break down human and animal movements, behaviors, and even speech (by way of bellows and air tubes) into predetermined sequential actions.

[Greg Zumwalt] created what he calls a hummingbird themed automaton inspired by his wife’s love of watching hummingbirds gather near their home. His 3D printed and assembled hummingbird automaton moves almost as fluid as its organic counterpart. The design is simple yet created from an impressive number of 97 printed parts printed from 38 unique designs which he includes in his Instructable. Other than meticulous assembly design, the fluid motion lends itself to a process of test fitting, trimming, and sanding all printed parts. Plus adding petroleum jelly as lubrication to the build’s moving parts. Along with the print files, [Greg Zumwalt] also gives you the print settings needed to recreate this precision build and a parts list accounting for all the multiple prints needed for each design. Continue reading “Let’s Bring Back The Age Of Automatons”

Bumblebee Breakout, A DIY Wearable Connector

The practice of developing wearable electronics offers a lot of opportunity for new connector designs and techniques for embedding electronics. Questions like these will eventually come up: How will this PCB attach to that conductive fabric circuit reliably? What’s the best way to transition from wire to this woven conductive trim? What’s the best way to integrate this light element into this garment while still maintaining flexibility?

Mika Satomi and Hannah-Perner Wilson of Kobakant are innovators in this arena and inspire many with their prolific documentation while they ask themselves questions similar to these. Their work is always geared towards accessibility and the ability to recreate what they have designed. Their most recent documented connector is one they call the Bumblebee Breakout. It connects an SMD addressable RGB LED, such as Adafruit’s Neopixel, to a piece of side glow fiber optic 1.5mm in diameter. On a short piece of tubing, the four pads of the SMD LED are broken out into four copper rings giving it the look of a striped bumblebee. To keep from shorts occurring while wrapping the copper tape contacts around the tube, they use Kapton tape to isolate each layer as they go.

This connector was originally created to be used in a commission they did out of Koba, their e-textile tailor shop located in Berlin. Fiber optics were applied to jackets for a performance called “All Your Base Are Belong To Us” produced by the Puppetry Department of the Hochschule für Schauspielkunst Ernst Busch.

Peruse more e-textiles techniques and learn how to build a connector transitioning from an embroidered thread bus to a wire and how to knit solderable circuit boards. And make sure to click around Kobakant’s website, it’s full of e-textile DIY tutorials! 

Mechanical Wooden Turing Machine

Alan Turing theorized a machine that could do infinite calculations from an infinite amount of data that computes based on a set of rules. It starts with an input, transforms the data and outputs an answer. Computation at its simplest. The Turing machine is considered a blueprint for modern computers and has also become a blueprint for builders to challenge themselves for decades.

Inspired by watching The Imitation Game, a historical drama loosely based on Alan Turing, [Richard J. Ridel] researched Alan Turing and decided to build a Turing machine of his own. During his research, he found most machines were created using electrical parts so he decided to challenge himself by building a purely mechanical Turing machine.

Unlike the machine Alan Turing hypothesized, [Richard J. Ridel] decided on building a machine that accommodated three data elements (0, 1, and “b” for blank) and three states. This was informed by research he did on the minimum amount of data elements and states a machine could have in order to perform any calculation along with his own experimentation and material constraints.

Read more about Richard’s trial and error build development, how his machine works, and possible improvements in the document he wrote linked to above. It’s a great document of process and begs you to learn from it and take on your own challenge of building a Turing machine.

For more inspiration on how to build a Turing machine check out how to build one using readily available electronic components.

Continue reading “Mechanical Wooden Turing Machine”

Precision DIY Calipers? That’s A Moiré!

Moiré patterns are a thing of art, physics, and now tool design! [Julldozer] from Mojoptix creatively uses a moiré pattern to achieve a 0.05 mm precision goal for his custom designed 3D printed calipers. His calipers are designed to validate a 3D print against the original 3D model. When choosing which calipers are best for a job, he points out two critical features to measure them up against, accuracy and precision which he explains the definition of in his informative video. The accuracy and precision values he sets as constraints for his own design are 0.5 mm and 0.05 mm respectively.

By experimenting with different parameters of a moiré pattern: the scale of one pattern in relation to the other, the distance of the black lines on both images, and the thickness of black and white lines. [Julldozer] discovers that the latter is the best way to amplify and translate a small linear movement to a standout visual for measurement. Using a Python script which he makes available, he generates images for the moiré pattern by increasing line thickness ratios 50:50 to 95:5, black to white creating triangular moiré fringes that point to 1/100th of a millimeter. The centimeter and millimeter measurements are indicated by a traditional ruler layout.

Looking for more tool hacks and builds? Check out how to prolong the battery life of a pair of digital calipers and how to build a tiny hot wire foam cutter.


Continue reading “Precision DIY Calipers? That’s A Moiré!”

Nerds Unite: Prosthetics Inspired By Comics And Beyond!

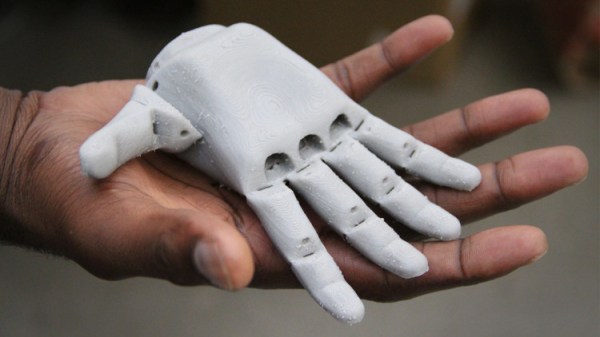
Open Bionics is a company creating prosthetics inspired by heroines, heroes and the fictional worlds they live in. The designs emblazoned on their first set of bionic hands include ones drawn from Queen Elsa from Disney’s Frozen, and Marvel’s Iron Man. The best thing about what they are doing is they offer you, dear reader, a chance to lend your own super powers of design and engineering. Open Bionics offers up 3D print files for several hand designs, hardware schematics and design files for their controller boards, firmware, and software to control the robotic hands with. Other than their website, you can also find all of the files and more on their GitHub account. If you’d like to devote a good amount of time and become a developer, they have a form to contact them through. To help with sourcing parts for your own build, they sell cables for tendons, muscle sensors, and fingertip grips in their online store

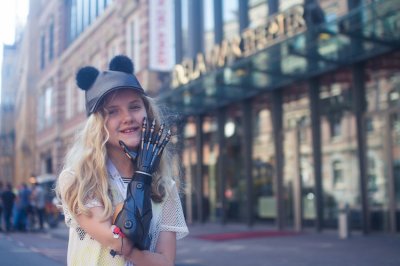
 We first came to learn about this company through a tipster [Dj Biohazard] who pointed to a post about their partnership with an 11-year-old Tilly, who is pictured on the left. Her bionic hand is an Open Bionics prototype whose design is based on the video game, Deus Ex. The best way products like these are improved are through the open source community and people like her.

Specific improvements Open Bionics state on their website are:

  • The customised bionic arms are manufactured in under 24 hours and the revolutionary socket adjusts as the child grows.
  • The bionic arms are light and small enough for those as young as eight.
  • The bionic arms use myoelectric skin sensors to detect the user’s muscle movements, which can be used to control the hand and open and close the fingers.

Read more about Tilly’s story and her partnership with Open Bionic’s on Womanthology. Tilly seems to have a dream of her own to “make prosthetics a high fashion piece – something that amputees can be proud to wear.” 

We at Hackaday have written about several open source prosthetic developments such as a five-day event S.T.E.A.M. Fabrikarium program taking place at Maker’s Asylum in Mumbai and the work of [Nicholas Huchet]What superhuman inspired designs would you create? 

Casting Metal Parts And Silicone Molds From 3D Prints

The invention of the relatively affordable 3D printer for home use has helped bring methods used to produce parts for prototypes, samples, and even manufacturing, closer to designers. This tutorial on how to cast metal parts from 3D printed silicone molds is a perfect example of how useful a 3D printer can be when you are looking to make a custom and durable metal part at home.

After 3D printing a mold design using an Ultimaker 2 [Matt Borgatti] casts the mold using Smooth-On Mold Star 15 that can withstand heat up to 450 °F (232 °C), which he points out is ideal for the low-temp metal casting alloy tin-bismuth comprised of 58% Bismuth and 42% Tin with a melting point of 281 °F.

You may have heard of molds created from 3D printed parts before, but what makes this tutorial great is that the author, [Matt Borgatti], really sets you up to be successful. He offers up plenty of insights including mold-making techniques and terminology like why you would need a well and runners designed as part of your mold when casting with metal.

You can either reproduce his designs or use the tutorial to create your own which makes it a good start for beginners as well as another method to file away for people who already have experience 3D printing molds. This post is also really a twofer. Not only do you get detailed instructions for the method but [Matt Borgatti] uses his casted metal part for a flat-pack camera arm he designed to document projects with which you can also build using his files found on Thingiverse.

To create molds for precision parts and to learn more about using a 3D printer as a tool in the casting process, check out this method for creating higher resolution molds with a resin printer.

Continue reading “Casting Metal Parts And Silicone Molds From 3D Prints”