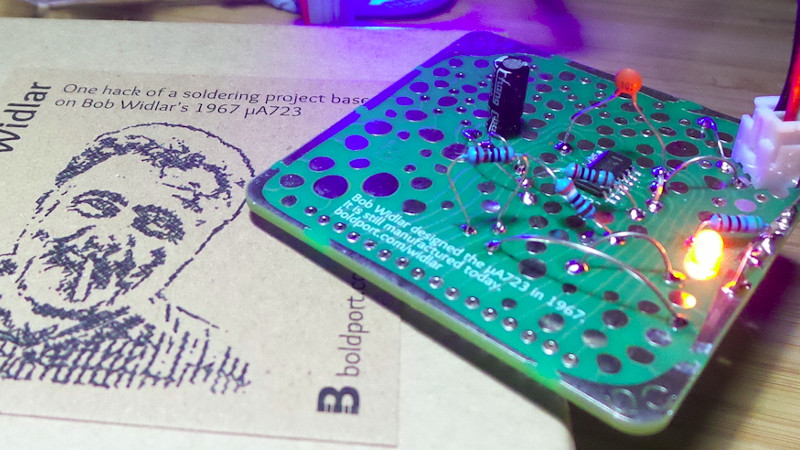
Regular Hackaday readers will be familiar with the work of Boldport’s [Saar Drimer] in creating beauty in printed circuit board design. A recent work of his is the Widlar, a tribute to the legendary integrated circuit designer [Bob Widlar] in the form of a development board for his μA723 voltage regulator chip.
The μA723 is a kit of parts from which almost any regulator configuration can be made, but for [tardate] it represented a challenge. The μA723 is so versatile that what you can create is only limited by the imagination of the builder. Having done the ordinary before, [tardate] looked toward something unconventional.
 The result is modest, a simple LED flasher using the error amplifier as a not-very-good op-amp, building an oscillator at a frequency of about 2 Hz. This is pretty neat and if you are used to the NE555 as the universal integrated circuit, perhaps it’s time to set it aside for the obviously far-more-useful μA723.
Here at Hackaday we harbour at least one fan of the μA723, not to mention also of artful PCBs. If the Widlar looks familiar, we featured the switch mode regulator from the μA723 data sheet on it a few months ago.
Disclosure: [Jenny List] wrote the documentation for Boldport’s Widlar kit.


“This is pretty neat and if you are used to the NE555 as the universal integrated circuit, perhaps it’s time to set it aside for the obviously far-more-useful μA723.”
I could’ve done that with a 55… uh, wait…
“what you can create is only limited only”
Fixed. Thanks, [Mike], if that is really you.
@JennyList On the boldport site, board images, are they pictures or renders? I have dispute on this here, can you settle it?
All this Boldport images so far are well made photographs. You can have a look at the mostly unprocessed original photo here: https://luckyresistor.files.wordpress.com/2018/05/widlar-original.jpg
The photo was made using a Sony Alpha 7II, using the Sony 90mm Macro lens. For the final image, 16 photos with slightly shifted focus points were made. These images were stacked (focus stacking) to create a perfectly sharp result as shown in the photo above. Colours are light is adjusted to match all other images in the series. Next, the object is cut from the background and unwanted elements are removed (dust, hairs, leftover flux). The image is composed, using a new flat background and adding an artificial shadow. That’s all. No magic behind.
Producing this image took about 4 hours (setup, photos, pre and post processing). Creating a render of the same image in this quality would have taken several days.
Thanks for explanation! This exact one was in dispute, as it has for me, Keyshot scent all over it. Please take friendly feedback: From client side, this is case where all that fine work might be counter productive as it seeds doubt of product existence. This particular is simple and well documented, but with ocean of crowdfund over-promises, everything that has renders instead real product shots gets big red bulb flashing. Again, that’s my personal opinion, with help, not attack. Congrats on photo technical skills.
Apologies, am on holiday. Glad to see it answered, I would have said images because I saw some of the prototypes.