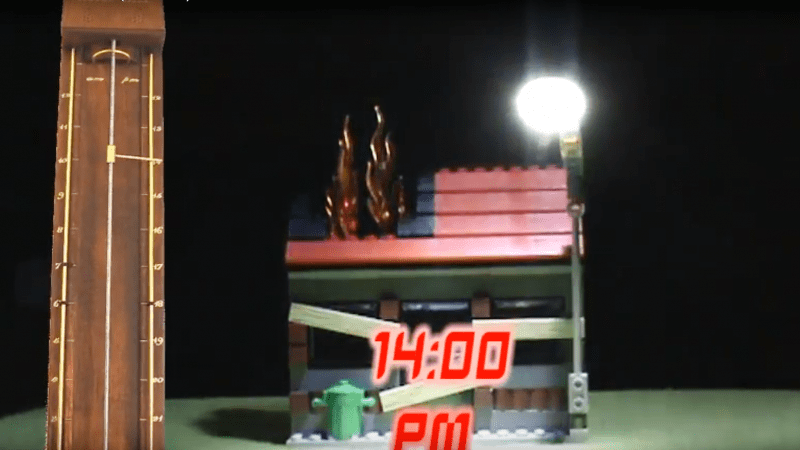
There are usually two broad user interfaces for clocks. On the one hand you’ve got the dial clock, the default display for centuries, with its numbered face and spinning hands. The other mode is some form of digital clock, where the current time is displayed directly as alphanumeric characters. They’re both useful representations of time, but they both have their limits.
Here’s a third model — the linear clock. [Jan Derogee] came up with it thanks to the inspiration of somewhat dubious run-ins with other kinds of clocks; we feel like this introductory video was made with tongue firmly planted in cheek. Whatever the inspiration, we find this idea clever and well executed. The running gear of the clock is just a long piece of M6 threaded rod and a stepper motor. A pointer connected to a nut rides on the rod, moving as the stepper rotates it. There are scales flanking the vertical rod, with the morning hours going up the left side and afternoon hours coming down the right. The threaded rod rotates one way for twelve hours before switching to the other direction; when the rotation changes, the pointer automatically swivels to the right scale. For alarms, [Jan] has brass rods running along each scale that make contact with the pointer; when they encounter a sliding plastic insulator to break the contact, it triggers an alarm. An ESP8266 controls everything and plays the audio files for the alarm.
Unusual clocks seem to be a thing with [Jan]. His other builds include this neat phosphorescent clock and YouTube subs counter, which is sure to turn heads along with this clock.


Does it come in metric units?
haha… technicaly yes, the clock’s scale uses 1mm=1minute. This was mostly a practical decision, (smaller would make the clock unreadble) larger would make the clock longer then a meter. Considering that the standard size of metric threaded rod at the local hardware store is exactly 1 meter the size of the scale was thereby defined. By using M6 threaded rod one rotation would result in 1mm of travel of the indicator, this also makes calculations much easier, although that’s not really that important.
if you want more details of the build, feel free to watch the build video.
https://www.youtube.com/watch?v=5m1d_hA9wQs
Like
“Time doesn’t go around in circles”… Hmm, don’t tell that to the Earth, it’s been spinning on its axis for how long now?
And my day is spent running around in circles :-)
Everyone does this. You get out of bed, only to end up there again.
Yes, but whose bed you end up in each night is what matters.
If the curved bar at the top tells the motor to switch directions at noon, what tells it to switch directions at midnight?
Good question:
The curved bar at the top, is only a homing sensor. When the clock is switched on the motor is moving the indicator up until the indicator touches the home sensor. Because the exact position of the home sensor related to the scale is known, the exact position of the indicator is known. The indicator is moved down towards the 12:00 point on the scale and from that point the clock starts to count/display time. Meaning that after homing the clock knows exactly how many steps it must move to the desired hour on the scale. The home sensor is not used any more for as long as the clock runs. Although it is very unlikely that steps are lost and therefore very unlikely that the indicator would drift away from it’s known position) it still might be sensible to do add some functionality to the firmware to home once a week, just to be sure.
So in short, when the position is known and the size of the scale it known then the clock knows when it should change direction. It’s nothing more then a counter, instead of seconds the clocks is counting (many thousands) of steps. And by knowing it’s exact position along the scale there is no need for additional sensors to confirm that position.
The home sensor on the top of the scale is located approx. 60mm (one hour) above 12:00 meaning that the clock during normal operation, the indicator will never come in contact with the home sensor.
Re-homing could just be a function that’s done at noon every day. I assume there’s a function that takes care of the noon change of direction, so this would be the natural place to put a rehoming step. At noon, if the sensor doesn’t indicate it’s at he top, step up to the top. Then do the 180. Then step down until the sensor goes off.
“There are usually two broad user interfaces for clocks”
New around here?
It’s not exactly pretty is it? I feel someone with more artistic talent could do more with this.
I’m looking forward to your hackaday post where you do exactly that.
Beauty is in the eye of the beholder. But you are right, the Lego house isn’t the prettiest, the main problem was that it was the only Lego house-like-thing I could find as such a short notice. I wanted a real house so I could make the sun come up on the left and go down on the right, the concept looked much prettier in my mind.
This design allows for easy addition of Sun / Moon rising / setting times and for daylight-saving adjustment.
Yeah – imagine a screen running down the side – could show icons for each dynamically, even hourly weather :)
Growing up we had a neighbor who collected and restored old clocks and music boxes. Now, I regret not spending time to learn more about what he was doing. One clock he had was a “Hickory-Dickity-Dock” clock. As you might expect at 1 o’clock a mouse that pointed to the current hour moved from the top of the clock to the bottom to restart it’s climb back up the clock.