Sometimes the best way to get a hacker to do something is to tell them that they shouldn’t, or even better can’t, do it. Nothing inspires the inquisitive mind quite like the idea that they are heading down the road less traveled, if for nothing else to say that they did it. A thrown gauntlet and caffeine is often all that stands between the possible and the impossible.
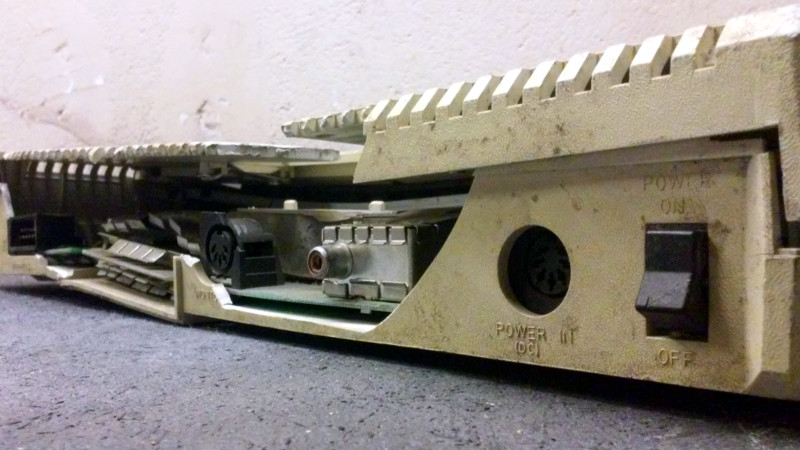
So when [Drygol] heard a friend comment he had an old Atari 800 XL that was such poor shape it couldn’t be repaired, he took on the challenge of restoring the machine sight unseen. Luckily for us, his pride kept him from backing down when he saw the twisted and dirty mess of a computer in person. He’s started documenting the process on his blog, and while this is only the first phase of the restoration, the work he’s done already is impressive enough that we think you’ll want to follow him along on his quest.
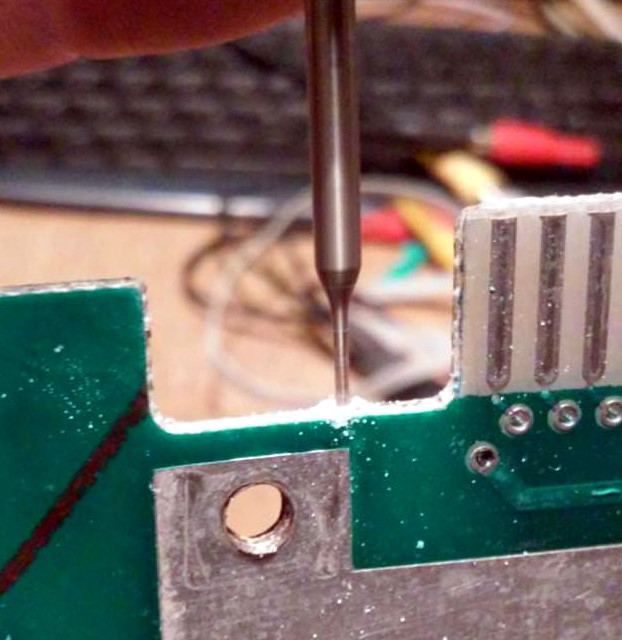
There’s no word on what happened to this miserable looking Atari, but we wouldn’t be surprised if it was run over by a truck. The board was cracked and twisted, with some components missing entirely. The first step in this impossible restoration was straightening the PCB, which [Drygol] did by clamping it to some aluminum bar stock and heating the whole board up to 40C (104F) for a few days. Once the got most of the bend out, he used a small drill bit to put holes in the PCB laminate and inject epoxy to add some strength. It’s an interesting technique, and the results seem to speak for themselves.
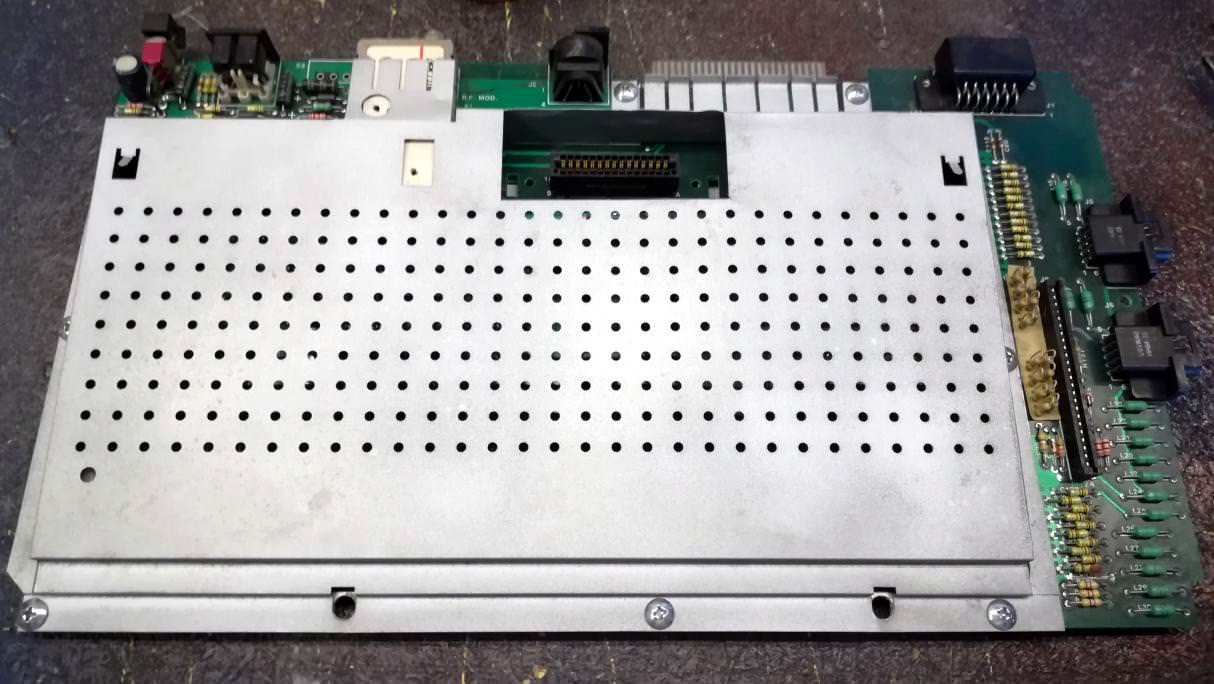
Once the board was straight, he went through replacing blown passive components and broken chip sockets. All the ICs were pulled and treated to an isopropyl alcohol and acetone bath in an ultrasonic cleaner to get them looking like new again. The CPU was cooked and needed to get swapped out, but otherwise it was smooth sailing, and before long he had the machine booted up. While most would have been satisfied to just get this far, [Drygol] considers this to be the easy part.
He next straightened out the metal shielding with a mallet, sanded it down, and sprayed it with a new zinc coating. The plastic around the keyboard and the metal trim pieces were also removed, cleaned, and refinished where necessary. Rather than going for perfection, [Drygol] intentionally left some issues so the machine didn’t look 100% pristine. It’s supposed to be a functional computer, not a museum piece behind glass.
We’ll have to wait until the next entry in this series to see how he repairs the absolutely devastated case. Any rational person would just use a case from a donor machine, but we’ve got a feeling [Drygol] might have something a little more impressive in mind.
In the meantime we’ve got plenty of incredible restorations to keep you occupied, from this sunken VIC-20 to a Pi-packing Osborne.


That was a tough challenge. Reminded me of when someone salvaged a Game Gear out of trash. It had lots of corrosion: http://www.sega-16.com/forum/showthread.php?22763-Let-s-consolize-and-old-dirty-broken-Game-Gear-found-in-the-trash
“Sometimes the best way to get a hacker to do something is to tell them that they shouldn’t, or even better can’t, do it. Nothing inspires the inquisitive mind quite like the idea that they are heading down the road less traveled, if for nothing else to say that they did it. A thrown gauntlet and caffeine is often all that stands between the possible and the impossible. ”
YOU CAN’T EXCEED THE SPEED OF LIGHT! Now let’s see you all make something of that.
Scientists have trapped photons in a crystal, rendering them effectively stationary.
I can walk faster than the speed of (some) light!
:D
You didn’t specify in a vacuum! Cherenkov radiation.
Now making that in a garage might be a difficult feat that gets you thrown in Guantanamo. I wonder if a polywell would do it.
Absolutely professional restoration! The techniques and skills this guy has are very impressive! And before someone says something stupid like “it’s cheaper to buy another Atari”, keep in mind that all this work can be applied to more rare and impossible to replace type computers and equipment. This guy is a master and can teach an old dog like me several tricks!
Yeah, the keyword is “beyond economic recovery”, but a point that I think David Murray was making in his recent VIC-20 restoration is that as time goes on and these things get rarer, the amount of recovery effort that’s worthwhile goes up. Maybe today it’s cheaper to junk it and get another one off of eBay, but what about in another 10 years? And thanks to slightly crazy people who go the extra mile, we have one more surviving machine. So if you care about preservation, give this guy a hand.
“Once the board was straight, he went through replacing blown passive components and broken chip sockets. All the ICs were pulled and treated to an isopropyl alcohol and acetone bath in an ultrasonic cleaner to get them looking like new again.”
With PCB plans* one could create a new board and transfer over needed components.
*Does the restoration community even have stuff like that?
sure… they have… they aren’t idots… they have internet too you know.
Despite the fact that making a new PCB can be costly it is mostly considered as cheating.
I bet you don’t dare to say this to a passionate Maserati collector, how do you think he would respond when you’d say “sir, you don’t need to repair those damaged rusty parts… here are the building plans, just build a new one”.
Restoring is not about getting the end result and use it, it is about the fun in preserving the old and damaged, giving it a new live where others have given up.
PS: by practicing/using your skills on the parts that aren’t worth it (as there are plenty of Atari 800XL left), you are an expert in restoring when it really counts. Because one day there will appear a damaged prototype of a special design and it that does require the skills, then you only have one change to do it right.
Kind of missed the point. With enough money a lot is possible. But the question does the community at large go to the trouble to recreate PCB plans, ESPECIALLY if it’s considered “cheating”. Combine that with degree of difficulty. Double-sided pretty easy. Start adding layers it becomes harder.
Hmm, interesting viewpoint. I have a few unique protoype machines (so no circuit diagrams etc) – I’ll definitely track down some broken eBay fodder to repair before attacking them.
A group of us have done the new PCB thing with the Australian Dick Smith brand ‘Super 80’ TRS-80 computer.
Accurate replica PCB’s are done, with V2 still on the way, which will have just the minimum necessary changes to accomodate modern parts where needed.
Hmmm, some jobs are best left for e-bay.
My father had one of those! We throw it away when we cleaned the garage! Amazing work!
My question… what on EARTH happened? Did it get hit by a truck or something? A gamer got frustrated and so literally jumped on the machine?
Even a rough user shouldn’t cause damage like that.
I’m interested in how this came to be is such piss-poor shape as well
Based on the pictures, I’d guess that it was stored in a garage or shed for a couple of decades and had an object along the lines of a full gallon can of paint or a bowling ball fall on it from a shelf 4 or 5 feet higher than where it was. Depending on how long the plastic had to get brittle first, possibly a heavier item and/or a greater height.
I guess we can rule out the paint theory, otherwise I’d imagine the force would have blasted the lid off and paint would have gone everywhere.
Bowling ball, or something similarly heavy and dense is a prospect though.
This is incredibly well done. I’m envious of the skills displayed here.
True that!
But this is not [Drygol]’s first rodeo. https://hackaday.com/?s=drygol He’s been restoring every vintage computer that he can get his hands on.
Practice makes the master.
Ha at first I wondered if it was mine I chucked into the dumpster a couple of years ago but it is not. That thing was cursed and brought out the worst in human beings. Never met more assholes than the two weeks I spent trying to give that thing away. After the last asshole balked at it being stored in its original box with the styrofoam, I ended up going Office Space on the whole thing and throwing the multi-parted mess into the snow-filled dumpster.
I had bought an Atari 400 on closeout. I never did do much with it, stores no longer stocked cartridges for it.
I gave it to the same guy I gave my Vic-20.
Those 800XL frames were tough. I don’t think a bowling ball can do it.
The original 400 you could roll a tank over while you were playing Star Raiders and it wouldn’t flicker. The later models, not so much, although they were still over-engineered with solid aluminium internal casing, to keep the interference in.
The difference is because in the early 1980s, when home computers were starting to take off, the FCC regulations changed. Prior to that they were ridiculous, so the very early models like the 400 / 800 suffered lots of compromises because of it. After, things weren’t so bad. Plenty of later 80s computers had fully plastic cases.
Second part published! Go and see as it’s MUCH more impressive – rebuilding a case!