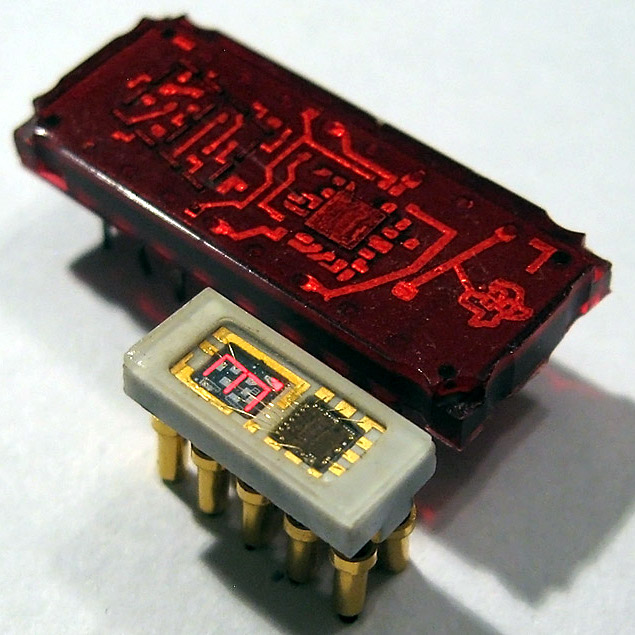
The Soviet-era 490IP1 LED. The digit is a mere 2.5 mm in height. Pictured with the Texas Instruments TIL306. [image: industrialalchemy.org]It’s easy to assume that older components will be less integrated and bulkier than we might otherwise expect. Then something seems ahead of its time, like the teeny-tiny 490IP1 LED which was produced in the former Soviet Union. [AnubisTTP] obtained and shared images of this tiny integrated single digit LED display in which the number measures a scant 2.5 mm tall; in production it was made easier to read with an external bubble lens magnifier clipped to the outside. The red brick the 490IP1 is pictured with is the Texas Instruments TIL306, a relatively normal sized DIP component with similar functionality.
The 490IP1 is called an intelligent LED display because the package contains a decade counter and driver circuitry for the integrated seven-segment LED digit, complete with a carry signal that meant multiple displays could be chained together. It is notable not just due to its size, but because the glass cover makes it easy to see the die inside, as well as the wire-bonded pads.
It’s always fascinating to see glimpses of the development path that display technologies took. It’s easy to take a lot of it for granted today, but back before technology was where it is now, all sorts of things were tried. Examples we’ve seen in the past include the fantastic (and enormous) Eidophor projector which worked by drawing images onto a rotating disk of oil with an electron gun. On the smaller end of things, the Sphericular display used optics and image masks to wring a compact 0-9 numerical display out of only a few lamps at the back of a box.
If you are building a robot to fight fires, why not use the water that you are fighting fires with to propel your robot? That seems to be the idea behind the Dragon Fire Fighting robot built by [Professor Satoshi Tadokoro], and his team at Tadohoku University. Their dragon robot is raised by the same directed jets of water that are used to stop the fire.
The three-meter robot also uses these jets of water to steer, moving the dragon’s head by firing water jets at angles. I’m not sure how practical it really is, though: the jets that the robot uses to steer could do as much damage as the fire itself if it wasn’t used carefully. The idea is to attach it to the end of a ladder or crane used by firefighters, so it can explore a building on fire without anyone having to step inside.
Perhaps you’ve noticed, but we here at Hackaday have a slight obsession with the over-engineered. One could fairly say there’s a linear relationship between how likely we are to feature a project and how needlessly complex it is. That said, it isn’t as if we are unable to appreciate a minimalist approach. Taking the scenic route can be a lot of fun, but sometimes it’s nice to just get where you’re going before you run out of gas.
This very slick Spotify “Now Playing” display created by [Jon Ashcroft] is a perfect example of that principle. The hardware is so straightforward that it’s barely worth mentioning: a Raspberry Pi with a small HDMI display, tucked neatly into a photo frame. Nothing to get too excited about there. The real hook with this particular project is the software.
[Jon] is a web developer by trade, so it’s natural he would approach his personal projects with that same mentality. Rather than one of the “usual suspects” for a Pi project like Python, he wrote his software in ES6; which the Pi is running through Chromium in kiosk mode (full screen web content, no top bar). For those of you who aren’t keeping up on web languages, ES6 is short for EcmaScript 6: a new version of the standard on which JavaScript is based. It’s a bit heavier on resources than is strictly necessary, but it works well enough in the end.
Using Spotify’s excellent API, his software pulls down the current track information and stores it locally. It does this every ~4 seconds, checking to see if the track has changed. [Jon] isn’t thrilled with this brute force method, but it works for now. It displays the current playing song and artist, and uses a library called node-vibrant to extract a dominant color from the album art and use that to create a complementary background color. Very slick.
[Jon] provides all of his source code and made it easy to connect to your own Spotify account, so don’t be surprised if you see this running on a “Magic Mirror” near you soon.
How do you start a good habit? As a blogger, someone who spends a spectacular amount of time on Twitter, and a Thought Leader Life Coach, I can tell you: the best way to start a good habit is by doing it every day. [Arduino Enigma] has just the solution to procrastination, laziness, or whatever else is stopping you from forming a good habit. It’s a good habit tracker, and far too many switches on a single PCB.
The inspiration for this build comes from the master of shitty robots, [Simone Giertz], who built something containing 365 switches and 12 LEDs. The idea is simple: every day, [Simone] would do 10 minutes of yoga and 10 minutes of meditation, then flip a switch. At the end of the month, an LED would light up. Do it every day for a year, and all the lights are on, hopefully beginning a new, good habit.
[Simone]’s version is rather large, and quite possibly used panel-mount switches. Where there’s a will, there’s someone able to make a PCB, so [Arduino Enigma] whipped up a board with 365 switches, 12 resistors, and 12 LEDs.
The circuit for this good habit tracker is extremely simple. It’s simply power going into 30, 31, or 28 switches in series, one after the other. At the end of the month, the LED lights up.
Is it complicated? No, but that’s not exactly the point. We’re hacking behavior here and not electrons, although this is a great example of how PCBs can be simultaneously far too complicated and far too simple.
You might think that a microcontroller would be needed to handle a vending machine’s logic. For one thing, only the correct change should activate them and the wrong change should be returned. If the correct change was detected then a button press should deliver the right food to the dispenser. But if you like puzzles then you might try to think of a way to do with without a microcontroller. After all, the whole circuit can be thought of as a few motors, a power source, and a collection of switches, including the right sized coin.
That’s the way [Little Puffin] approached this donut dispensing vending machine. What’s really fun is to watch the video below and wonder how the logic will all come together as you see each part being put in place. For example, it’s not until near the end that you see how the coin which is a part of the circuit is removed from the circuit for the next purchase (we won’t spoil it for you). Coins which are too small are promptly returned to the customer. To handle coins which are the right size but are too heavy, one enhancement could be to make them fall through a spring-moderated trap door and be returned as well. We’re not sure how to handle coins which are the right size but too light though.
Korg Introduced the Monotron analog mini-synthesizer back in 2010. They also dropped the schematics for the synth. Hackers wasted no time modifying and improving the Monotron. [Harry] incorporated several of these changes into his build. The Low-Frequency Oscillator (LFO) has been changed over to an envelope generator. The ribbon controller is gone, replaced with a CV/gate interface to sound notes.
The CV/gate interface, in turn, is connected to an ATMega328P which converts it to MIDI. MIDI data comes from one of two sources: A two-octave full-sized keyboard pulled from a scrapped MIDI controller or a MIDI connector at the back.
The user interface doesn’t stop with the keyboard. The low-cost pots on the original Monotron have been replaced with much higher quality parts on the front panel. The tuning pot is a 10-turn device, which allows for precision tuning. All the mods are mounted on a single board, which is connected to the original Monotron board.
Sometimes the best way to get a hacker to do something is to tell them that they shouldn’t, or even better can’t, do it. Nothing inspires the inquisitive mind quite like the idea that they are heading down the road less traveled, if for nothing else to say that they did it. A thrown gauntlet and caffeine is often all that stands between the possible and the impossible.
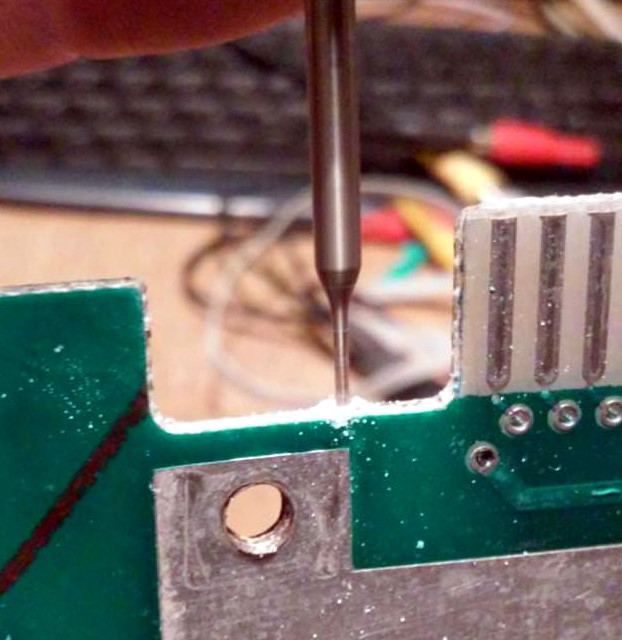
Preparing the PCB for epoxy injection
So when [Drygol] heard a friend comment he had an old Atari 800 XL that was such poor shape it couldn’t be repaired, he took on the challenge of restoring the machine sight unseen. Luckily for us, his pride kept him from backing down when he saw the twisted and dirty mess of a computer in person. He’s started documenting the process on his blog, and while this is only the first phase of the restoration, the work he’s done already is impressive enough that we think you’ll want to follow him along on his quest.
There’s no word on what happened to this miserable looking Atari, but we wouldn’t be surprised if it was run over by a truck. The board was cracked and twisted, with some components missing entirely. The first step in this impossible restoration was straightening the PCB, which [Drygol] did by clamping it to some aluminum bar stock and heating the whole board up to 40C (104F) for a few days. Once the got most of the bend out, he used a small drill bit to put holes in the PCB laminate and inject epoxy to add some strength. It’s an interesting technique, and the results seem to speak for themselves.
Once the board was straight, he went through replacing blown passive components and broken chip sockets. All the ICs were pulled and treated to an isopropyl alcohol and acetone bath in an ultrasonic cleaner to get them looking like new again. The CPU was cooked and needed to get swapped out, but otherwise it was smooth sailing, and before long he had the machine booted up. While most would have been satisfied to just get this far, [Drygol] considers this to be the easy part.
He next straightened out the metal shielding with a mallet, sanded it down, and sprayed it with a new zinc coating. The plastic around the keyboard and the metal trim pieces were also removed, cleaned, and refinished where necessary. Rather than going for perfection, [Drygol] intentionally left some issues so the machine didn’t look 100% pristine. It’s supposed to be a functional computer, not a museum piece behind glass.
We’ll have to wait until the next entry in this series to see how he repairs the absolutely devastated case. Any rational person would just use a case from a donor machine, but we’ve got a feeling [Drygol] might have something a little more impressive in mind.