Octoprint is a household name for anyone into 3D printing and anyone regularly reading Hackaday. Described by creator Gina Häußge as “the snappy web interface for your 3D printer”, Octoprint allows you to control effectively any desktop 3D printer over the local network or Internet. It even has webcam support so you can watch your printer while it works, meaning you can finally put that video baby monitor back into the crib with Junior.
 While the core functionality of Octoprint is fantastic alone, its true power is unlocked through the plugin system and the community that’s sprung up around it. With plugins, Octoprint can do everything from control RGB light strips in your printer’s enclosure to sending status messages via Discord. One particularly popular plugin that has been making the rounds lately is Octolapse by [FormerLurker]. This plugin provides a comprehensive intelligent system for creating time-lapse videos of prints.
What does that mean? Well, instead of simply taking a picture every few seconds like you’d do traditionally, Octolapse actually keeps track of the printer’s motions while its running. It can then take a picture at the opportune moment to create a number of user-selected effects. More importantly, it can even take control of the printer directly; moving the hotend away from the print before taking a picture. The effect is that the print simply “grows” out of the bed.
I thought it would be interesting to take a closer look at Octolapse and see just what it takes to create one of those awesome time-lapse videos. It turned out to be somewhat trickier than I anticipated, but the end results are so fantastic I’d say it’s a technique worth mastering.
Camera Selection
Beyond your 3D printer and the device running Octoprint (probably a Raspberry Pi, but it doesn’t actually matter), you’ll need a compatible camera. Keep in mind that Octolapse itself is not responsible for camera compatibility, it simply uses the camera that’s configured by the operating system. If you’re seeing a video feed in the Octoprint “Control” tab, then you should be good to go. Otherwise, don’t bother trying to get Octolapse working until you’ve figured out what’s gone wrong.
It’s also a good test to run a print using the default Octoprint time-lapse mode to make sure your camera is working properly, you’ve got it focused on the print, the bed is lighted well enough, etc. It’s better to get all that sorted using the much more simplistic integrated time-lapse function before you really dive into the deep end.
Personally I used a Logitech C270 camera, which is well supported and can be had for about $25 USD. It’s only 1280×720 and doesn’t have a zoom capability (making tight shots awkward, to say the least), but it’s a good starter camera. If you want to move up to something high resolution, just keep in mind rendering the final video might get a little painful if you’re doing this on one of the older Raspberry Pi models.
Installing Octolapse
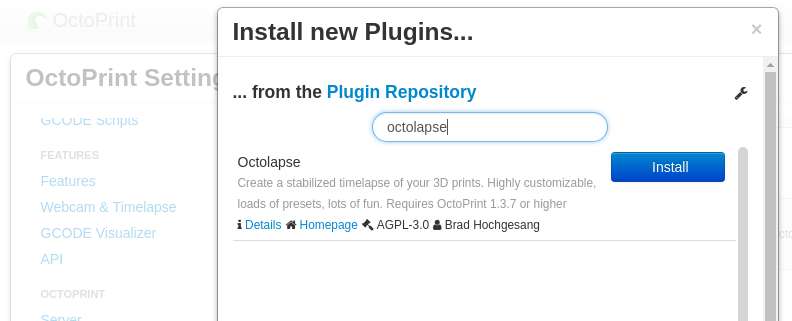
Using the plugin manager in Octoprint, installing Octolapse couldn’t be any easier. Just search for it by name, click “Install”, and off it goes. You’ll need to have your Octoprint installation fully updated to install it, but that’s also easy to keep on top of using the automatic update feature.
Once it’s installed, you need to pick your printer from the list of profiles. This is where things caught me off guard a bit. I was assuming that the compatible printers listed on the Octolapse site were simply those they’ve tested, but no. Those are actually the only printers it works with out of the box, as Octolapse needs some fairly detailed information on your printer before it can safely take over.
As of the time of this writing, these are the printers Octolapse supports:
| Octolapse Supported Printers: |
|---|
| CR-10 |
| Anet A8 |
| Irapid Black |
| Dagoma Neva |
| Anycube I3 Mega |
| Monoprice Maker Select v2/Wanhao Duplicator i3 |
| Genuine Prusa – Mk2, Mk2S, Mk2 w Multi Material, Mk3 |
If you’ve got one of those printers, you’re all set. If you don’t, then you’re not completely out of the game, but you’ll need to do some manual work. Running Octolapse on an “unsupported” printer is certainly possible, as I’m about to show you, but it does require that you know your printer’s hardware pretty well and are willing to yank the power cord out if things start getting out of hand.
Adding a New Printer
 Generally speaking, as long as you have a Cartesian printer (in other words, not a delta), Octolapse should work with a little massaging. You’ll need to manually add a profile for your particular printer, which largely consists of copying data from your slicer configuration.
The first thing it asks you is about retraction: how much filament is retracted and if you’re using Z-Hop. These values are used by Octolapse to ensure the hotend is correctly moved away from the print while the picture is taken. If it doesn’t retract enough, or doesn’t correctly match how much Z adjustment is required, it’s going to leave strings all over the place or potentially ruin the print entirely.
You’ll also need to get the different speed limits from your slicer configuration so Octolapse knows how fast to move the printer while taking a picture. Unless you have a pretty spindly machine it’s unlikely you’ll move it so fast that it’s a problem, but it would still be wise to get the exact values you use during normal prints.
Read through to be sure, but the defaults should be reasonable enough for the rest of the options.
Modifying the G-Code
The most time consuming, and potentially hazardous, part of the setup is the potential need to modify your starting GCode. Octolapse requires the printer to be in absolute positioning mode, which it probably is already, but Octolapse wants to see the commands in the GCode file just to be sure. On my printer the following starting GCode pleased Octolapse enough to get the ball rolling, but remember that yours could very likely look different:
G21       ; Metric values
G90       ; Printer absolute mode
M82       ; Extruder absolute mode
G28 X0 Y0 ; Home X/Y
G28 Z0    ; Home Z
G92 E0    ; Zero extruded length
G29       ; Start bed leveling
To check if everything is working as expected, Octolapse features a status panel which will alert you if anything is out of whack. As long as you don’t have any question marks in the display, you should be good to go. Somewhat confusingly, the “X”s which might normally look like an error don’t indicate a problem:

Looking Cool Takes Time
 If everything is configured properly, you’ll very quickly notice how different printing with Octolapse enabled is. For each new layer, it will move the hotend away to a predetermined position (this can be changed, but defaults to back-center), waits a second, takes a picture, and then continues with the next layer.
As you might expect, this does increase total print time. How much time this little dance will add to your print depends on many factors, but assume at least several additional seconds per layer. If your print has hundreds of layers, that can quickly add up.
For example, the Hackaday 3D benchmark clocks in at 107 layers if printed at 0.2 mm layer height. At three seconds per snapshot, that adds an extra five and a half minutes to the print. This represents a roughly 25% increase in total print time for this model.
Final Thoughts
This is merely a brief overview, Octolapse has a huge number of settings, options, and modes you can play with. From the various animation modes to the video rendering modes, there’s simply too many configurable parameters to do justice in an article like this. Once you get the basic Octolapse functionality going, you should really dive into the settings and start experimenting.
It takes a bit of fiddling to get it configured if your printer isn’t officially supported, and it does add a decent chunk of time to the already slow 3D printing process. But after seeing the final rendered video, it’s hard to knock Octolapse. Watching those prints form like magic is extremely gratifying, and you can find great examples of this like seeing these gear pliers take form. I wouldn’t print with it all the time, but this definitely isn’t the last time I’ll use it either.
We’ve covered the basics of Octoprint, talked about how to control it from your mobile device, and now we’ve looked at using it to create slick animations of your favorite prints. Are there any other Octoprint plugins or features the readers of Hackaday would like us to take a closer look at? Let us know in the comments below.


No stringy bridges between the separate parts of the Jolly Wrencher build!
Deja Vu:
https://hackaday.com/2018/04/13/3d-printer-time-lapse-videos-ditch-the-blur/
Yep, if you read Tom’s article above you’ll see he mentions that article was the inspiration for giving it a try and writing this guide on how he got it working on a non-supported printer.
Yup. THats what I thought too. Be original, B. E. original. I shared a tip of a cool 3D Printed power pod for those $10 foam planes.
https://www.thingiverse.com/thing:2948067
Cool, so that makes two of you that didn’t bother to read it before commenting.
I had an octo lapse once. My octothorpe button quit working. X-D
Only you, me and like 2 other people know what you are talking about….
#c’est ne pas un octothorpe.
probably made a hash of it by pounding too hard on the keyboard
Here is some troubleshooting info that might solve installation issues: https://github.com/FormerLurker/Octolapse/wiki/Troubleshooting
Sorry if it is mostly a wall of text ATM. When I have some time I’ll try to make some better guides.
This would be really cool to use in my CNC Mill !
this would look amazing on an ‘infinite’ build platform
prints would just roll into existence
try printing text left to right as the platform moves left
Would like to get this setup with remote shutter to a proper DSLR
Would like to get this setup with remote shutter to a proper DSLR
Marco Reps did it first using openCV to pick the frame most similar to the last: https://reps.cc/?p=85
First? Marlin firmware has had an M-code to toggle a pin to take photos since time immemorial. (Maybe 2012ish?) Adding this code in, for instance on every layer change, is easy enough with a text editor, and I think is also supported in a few slicers.
The octoprint addition takes it a step further by moving the printhead out of the way first, which is pretty cool, but it’s just another couple lines of Gcode. And it makes it easier to do.
Marco’s approach, using video and image analysis, is crazy overkill, and comes completely out of left field. But I suppose that also means that it’s crazy cool…
So what am I saying? I guess that the basic idea _is_ very old, in fact much older (and simpler) that you think it is.
I did this many years ago, wrote a script to move the bed all the way to the end at each layer. Attached a magnet to the bed, and got my cellphone to take a picture based on the magnetometer detecting the magnet. Way more work than this!
But a damn cool, massively creative hack! Brilliant stuff, that.
Neat. Is there a pro version?
What does this even mean?
Well, the same version. Just that it is neither open source nor freeware. You get a sticker that says “pro” though, so it is probably worth it.
This is free, open source software. Are you ASKING for a commercial version?
You can only time lapse a couple million prints before YouTube is littered with this stuff. I prefer to only show useful videos, but I will say for those who really need this it seems to be a good way to proceed. You know say 6 years ago 3d printing was amazing to watch but now watching a time lapse of it is like watching a microwave cook your food, it was amazing in the 80’s and now it is an everyday kind of experience.