We love watching 3D prints magically grow, through the power of timelapse videos. These are easier to make than ever, due in no small part to a vibrant community that’s continuously refining tools such as Octolapse. Most people are using some camera they can connect to a Raspberry Pi, namely a USB webcam or CSI camera module. A DSLR would arguably take better pictures, but they can be difficult to control, and their high resolution images are tougher for the Pi to encode.
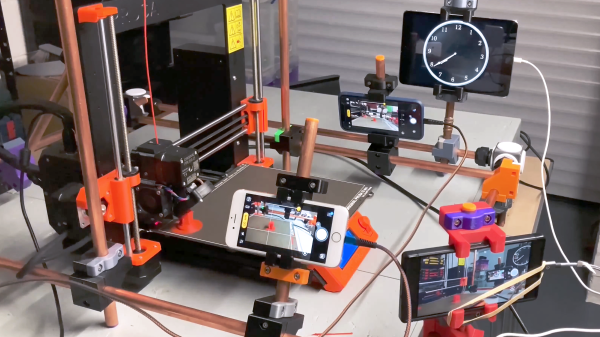
If you’re anything like us, you’ve got a box or drawer full of devices that can take nearly as high-quality images as a DSLR, some cast-off mobile phones. Oh, that pile of “solutions looking for a problem” may have just found one! [Matt@JemRise] sure has, and in the video after the break, you can see how not one but four mobile phones are put to work.
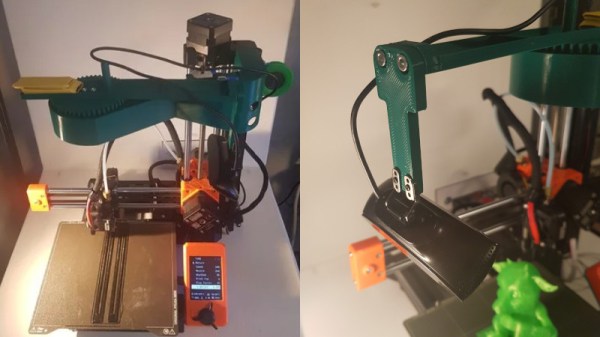
If you’re a maker that publishes projects online, you’ll be well across the production values arms race that’s been raging over the past decade. For those in the 3D printing space, this means that you’ll need to be producing slick timelapse videos of your prints. [BuildComics] is now doing just that, with a custom camera arm to help do the job. (Video, embedded below.)
The arm relies on a 3D-printed gear train that allows a stepper motor to turn it slowly throughout the print’s duration. It’s controlled by an Arduino that receives commands via Firmata. The arm is mounted on top of the printer, holding a webcam above the build plate for a good view. It’s setup via Octolapse to take images as each layer is finished, giving that haunting look of a model materialising on the print bed throughout the duration of the timelapse.
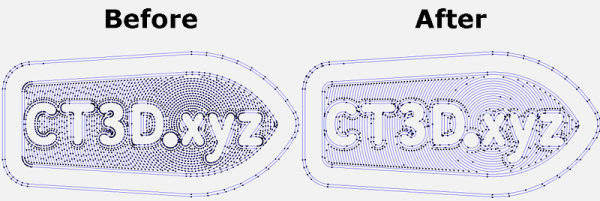
When the slicer software for a 3D printer model files into GCode, it’s essentially creating a sequential list of connected line segments, organized by layer. But when the features of the original model are dense, or when the model is representing small curves, slicers end up creating a proliferation of teeny segments to represent this information.
This is just the nature of the beast; lots of detail translates into lots of teeny segments. Unfortunately, some printers actually struggle to print these models at the desired speeds, not because of some mechanical limitation, but because the processor cannot recalculate the velocities of these segments fast enough. The result is that some printers simply stutter or slow down the print, resulting in print times that are much higher than they should be.
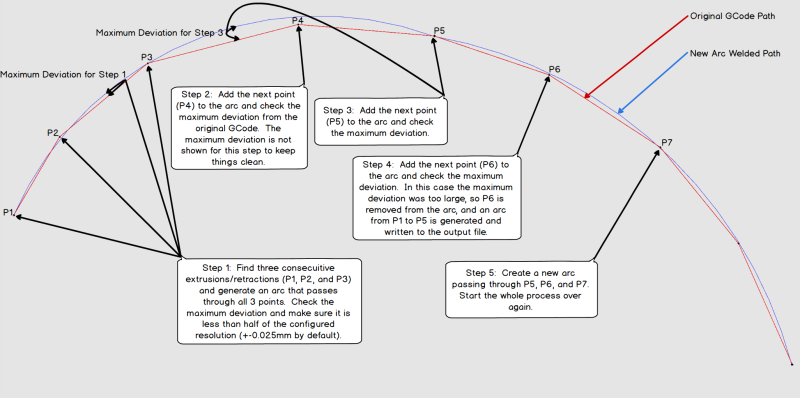
Enter Arc Welder, a GCode compression tool written by [FormerLurker] that scrutinizes GCode files, hunts for these tiny segments, and attempts to replace contiguous clusters of them with a smaller number of arcs. The result is that the number of GCode commands needed to represent the model drop dramatically as connected clusters of segment commands become single arc commands.
“Now wait”, you might say, “isn’t an arc an approximation of these line segments?” And yes–you’re right! But here lies the magic behind Arc Welder. The program is written such that arcs only replace segments if (1) an arc can completely intersect all the segment-to-segment intersections and (2) the error in distance between segment and arc representation is within a certain threshold. These constraints act such that the resulting post-processing is true to the original to a very high degree of detail.
A concise description of Arc Welder’s main algorithm as pulled from the docs
This whole program operates under the assumption that your 3D printer’s onboard motion controller accepts arc commands, specifically G2 and G3. A few years ago, this would’ve been uncommon since, technically, 3D printing and STL file only requires moving in straight line segments. But with more folks jumping on the bandwagon to use these motion control boards for other non-printing applications, we’re starting to see arc implementations on boards running Marlin, Smoothieware, and the Duet flavor of RepRap Firmware.
For the curious, this program is kindly both well documented on operating principles and open source. And if [FormerLurker] seems like a familiar name before–you’d be right–as they’re also the mind behind Octolapse, the 3D printing timelapse tool that’s a hobbyist crowd favorite. Finally, if you give Arc Welder a spin, why not show us what you get in the comments?
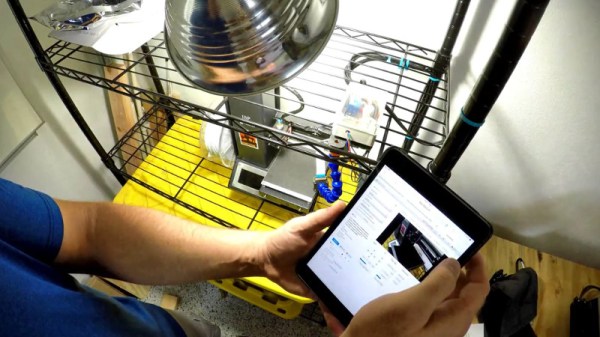
OctoPrint is a great way to monitor your printer, especially with the addition of a webcam. Using a tablet or mobile phone, you can keep an eye on what the printer is doing from anywhere in the house (or world, if you take the proper precautions), saving you from having to sit with the printer as if it’s an infant. But simply watching your printer do its thing is only a small slice of the functionality offered by OctoPrint’s vast plugin community.
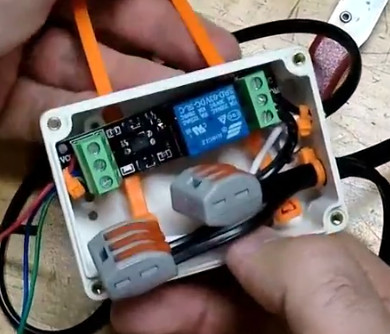
As [Jeremy S Cook] demonstrates, it’s fairly easy to add power control for the printer and auxiliary lighting to your OctoPrint setup. Being able to flick the lights on over the print bed is obviously a big help when monitoring it via webcam, and the ability to turn the printer off can provide some peace of mind after the print has completed. If you’re particularly brave it also means you could power on the printer and start a print completely remotely, but good luck if that first layer doesn’t go down perfectly.
In terms of hardware, you only need some 3.3V relays for the Raspberry Pi running OctoPrint to trigger, and an enclosure to put the wiring in. [Jeremy] uses only one relay in this setup to power the printer and lights at once, but with some adjustment to the software, you could get independent control if that’s something you’re after.
On the software side [Jeremy] is using an OctoPrint plugin called “PSU Control”, which is actually intended for controlling an ATX PSU from the Pi’s GPIO pins, but the principle is close enough to throw a relay. Other plugins exist which allow for controlling a wider away of devices and GPIO pins if you want to make a fully remote controlled enclosure. Plus you can always whip up your own OctoPrint plugin if you don’t find anything that quite meets your switching needs.
Are you using Octoprint yet? It’s so much more than just a way to control your printer over the internet, or to keep tabs on it over webcam when you’re off at work or fetching a beer. The 3D printing community has rallied around Octoprint, creating all sorts of handy plug-ins like Octolapse, which lets you watch the print blossom from the bed via time-lapse video.
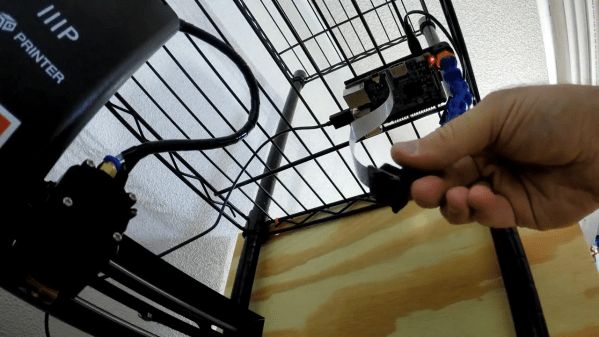
Hackaday alum [Jeremy S Cook] wanted to devise a 3D-printable mount for a Raspi camera after finding himself inspired by [Tom Nardi]’s excellent coverage of Octoprint and Octolapse. He recently bought a wire shelving unit to store his printer and printer accessories, and set to work. We love the design he came up with, which uses the flexibility of the coolant hose to provide an endlessly configurable camera arm. But wait, there’s more! Since [Jeremy] mounted it to the rack with zip ties, the whole rig shimmies back and forth, providing a bonus axis for even more camera views. Slide past the break to see [Jeremy]’s build/demo video.
It’s great to be able to monitor a print from anywhere with internet access, but the camera is almost always set up for a tight shot on the print bed. How would you ever know if you’re about to run out of filament? For that, you need a fila-meter.
Octoprint is a household name for anyone into 3D printing and anyone regularly reading Hackaday. Described by creator Gina Häußge as “the snappy web interface for your 3D printer”, Octoprint allows you to control effectively any desktop 3D printer over the local network or Internet. It even has webcam support so you can watch your printer while it works, meaning you can finally put that video baby monitor back into the crib with Junior.
While the core functionality of Octoprint is fantastic alone, its true power is unlocked through the plugin system and the community that’s sprung up around it. With plugins, Octoprint can do everything from control RGB light strips in your printer’s enclosure to sending status messages via Discord. One particularly popular plugin that has been making the rounds lately is Octolapse by [FormerLurker]. This plugin provides a comprehensive intelligent system for creating time-lapse videos of prints.
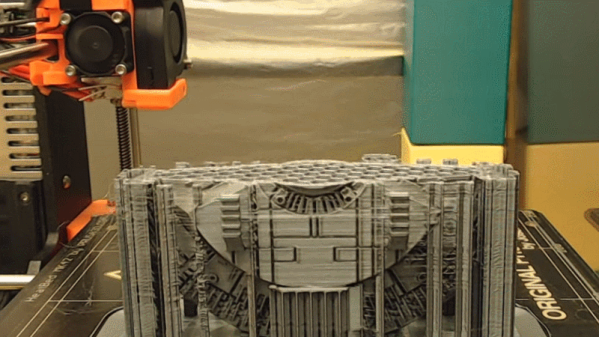
What does that mean? Well, instead of simply taking a picture every few seconds like you’d do traditionally, Octolapse actually keeps track of the printer’s motions while its running. It can then take a picture at the opportune moment to create a number of user-selected effects. More importantly, it can even take control of the printer directly; moving the hotend away from the print before taking a picture. The effect is that the print simply “grows” out of the bed.
I thought it would be interesting to take a closer look at Octolapse and see just what it takes to create one of those awesome time-lapse videos. It turned out to be somewhat trickier than I anticipated, but the end results are so fantastic I’d say it’s a technique worth mastering.
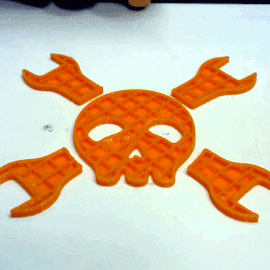
Example output of Octolapse with the print head absent from the images.
Most time-lapse videos of 3D prints show a steadily growing print with a crazy blur of machine movement everywhere else. This is because an image is captured at a regular time interval, regardless of what’s physically going on with the machine. But what if images were captured at consistent machine positions instead? [FormerLurker]’s Octolapse plugin for OctoPrint came out of beta recently and does exactly that, and the results are striking. Because OctoPrint knows where a 3D printer’s print head is at all times, it’s possible for a plugin to use this information to create time-lapse videos where the print head position is consistent instead of a crazy blur, or even have the print head absent from the shot altogether.
[FormerLurker] had originally created stabilized time lapses by hand editing G-code, which had great results but was inefficient and time-consuming. This plugin is the result of his work at automating and enhancing the process, and is also his first serious open source programming project. We’ve covered upgrading a 3D printer with OctoPrint before, and the plugins functionality of OctoPrint means features can be added independently from the core system, which itself largely remains a one-woman effort by creator and maintainer [Gina Häußge].
 While the core functionality of Octoprint is fantastic alone, its true power is unlocked through the plugin system and the community that’s sprung up around it. With plugins, Octoprint can do everything from control RGB light strips in your printer’s enclosure to sending status messages via Discord. One particularly popular plugin that has been making the rounds lately is