Two-part epoxy is one of those must-have items in your toolbox, albeit kept in a ziploc bag to keep all that goo off the rest of your tools. It’s a glue with a million uses, but which brand is best? Should you keep some cheap five-minute epoxy around, or should you splurge for the fancy, long-setting JB Weld. It’s not a perfect analysis, but at least [Project Farm] has done the experiment. This is a test of which two-part epoxy you can find at your local home supply store is strongest.
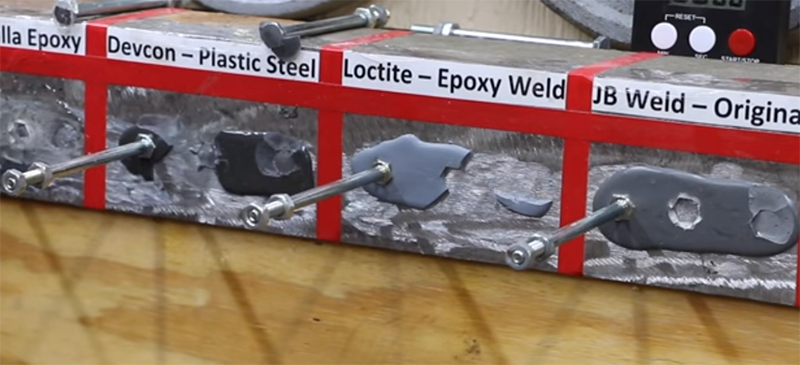
The epoxies tested include Gorilla epoxy, Devcon Plastic Steel, Loctite Epoxy Weld, JB Weld original, JB Weld Kwik Weld, and JB ExtremeHeat. This more or less covers the entire gamut of epoxies you would find in the glue aisle of your local home supply store; the Gorilla epoxy is your basic 5-minute epoxy that comes in a double barrel syringe, and the JB Welds are the cream of the crop.
The testing protocol for this experiment consisted of grinding a piece of steel clean, applying a liberal blob of each epoxy, and placing three bolts, head down, in each puddle. The first test was simply suspending weights in 2.5-pound increments to each bolt as a quick test of shear strength. Here, the losers in order were the JB Weld ExtremeHeat, JB Weld KwikWeld, Loctite, Gorilla Epoxy, Devcon Plastic Steel, and finally the JB Weld Original. Your suspicions are confirmed: those fancy new versions of JB Weld aren’t as good as the original. The fact that they’re worse than 5-minute epoxy is surprising, though. The second test — torquing the bolts out of the epoxy — gave similar results, with Devcon Plastic Steel beating the JB Weld Original just barely.
So, what do these results tell us? Cheap five-minute epoxy isn’t terrible, and actually better than the fancy new versions of JB Weld. Loctite is okay, and the Devcon and original JB Weld are at the top of their game. That’s not that surprising, as you can cast cylinder heads for engines out of JB Weld.


The surface prep is a fail.
Always double wipe with a cotton cloth dampened with a non-residue solvent.
Use a clean rag or portion of it for each pass.
Dust from grinding the mill scale and rust off of the angle iron will cause a bond failure.
As for the bolts? The plating will load that hard wheel and then redeposit onto the bolt heads.
Many moons ago,I worked in an industrial valve shop. We used a belt sander on any fitting/flange cleanup. Never a hard wheel, due to the load up and redepositing issues.
Anything that was painted or labeled, etc, received a solvent wipe down.
Not so good for the planet, but Damn I miss Chlorinated solvents.
But it does indicate how they perform in a typical home shop environment with a typical DIYer surface prep.
That doesn’t make it right. DIY or no, you should be preparing the surface correctly. Performing tests that mimic the poor habits of the inexperienced is just passing the buck and deprives everyone of useful data.
Absolutely right. If you don’t prep the surface properly the bond will fail much faster.
in high school a few students and I needed to machine something out of a block of plastic (I don’t remember what it was exactly) but we didn’t have any blocks of plastic big enough, but the instructor had a huge pile of various scraps of plexiglas that we donated from one of the local factories. One of the students decided to try hot glue and clamps, except he didn’t prep the surface at all, and it came apart in the mill. I took some 40 grit sandpaper, roughed up each side of each piece, and then glued and clamped until I had a piece of the required size. Milled perfectly and didn’t come apart, everyone was quite impressed. Epoxy or something probably would have been better, but it was a case of high school project on a budget and we had to work with what we had.
Thanks for the important tip.
Slightly is right. Not enough of a sample and the hand ground surface is inconsistent. The “fancy new versions” fill different spots in usage so they are going to have different properties. Quick cure epoxies are usually weaker than long cure ones.
Just use the appropriate epoxy for the application and you will be fine. There is one for just about everything.
This. Also, many epoxies don’t fully cure at room temperature and require baking to attain full strength. Room temperature curing epoxies are an exception, not the norm, and other properties are compromised to attain complete low temperature curing. Even then, 24 hours is needed to fully cure. This is especially relevant in context – that “fancy new” extreme temperature epoxy was almost certainly not cured and the results thus invalid.
Just a reminder, all of this testing is only moderately true for the type of steel they used (expect large variations due to surface prep). Expect different results for other metals and plastics.
FWIW re: surface prep, whatever epoxies failed latest are at the very least less sensitive to careful surface prep and might be easier to use.
I’ve enjoyed watching this dude for months now. Yeah it’s true his methodology isn’t the tightest it could be, but it’s close enough for getting the answers I’d casually like to know. Without reading a peer review study on glue and tape.
West system epoxy. You can do just about anything with it..
I do not think it is accurate as a scientific method, because the quantities of epoxy have not been accurately weighed in order to have the right quantities in the test. The differences between the various glues could be dependent on this factor.
I repaired a hole in an AC condenser on a 1986 Cadillac Cimarron with JB Weld. The safety catch for the hood got bent a bit and wore a small pinhole in the top condenser pipe, letting out all the refrigerant. So I mixed up a bit of the slow setting JB Weld, let it stiffen up a bit then daubed it onto the pipe. I then pulled a little vacuum on the system with a rotary vane pump and let it sit overnight. The slight vacuum was to pull a little epoxy through the hole so it’d mushroom over inside the pipe to resist blowing the patch off from internal pressure.
Next day I ran the pump for a couple of hours, then filled it with R-134a (I’d already had it converted from R-12.) The AC worked perfectly from then until I sold the car a couple years later.
You were lucky to find the hole.
Most of the time I find the hole is in one of the rads.
I do enjoy the videos. Yea not perfect, But most definitely informative.
And yea we all would add or remove some of his tests. In his testing of things.
But thats what makes us human. We all think different. Some To Much.
http://www.thistothat.com
I’d love to see Pratley Epoxy included in a comparison like this. Developed in South Africa, the original Pratley Putty was used on one of NASA’s lunar modules, although of course it has advanced since then
References:
http://www.pratley.com/operating-divisions/pratley-adhesives
https://en.wikipedia.org/wiki/Pratley%27s_Putty
http://www.pratleyadhesives.com.au/history.aspx
Epoxy is pretty useful. Most of the resins are the same, the hardners are where the difference comes in. Many of the quick epoxies (5 min, 8 min, etc) are really nasty hardners, and don’t ever harden, or end up brittle. If you want stuff to stick, be patient and get a hardner that is a little slower (12-24hr). Heat affects the hardning time. More hardner doesn’t speed up the curing time, it only makes the epoxy gooey. (polyester resin can use the hardner as a way to control the curing time, but that isn’t epoxy).
Surface prep is key. Clean is good, but rough is better. The epoxy needs to grab onto the surface. If there are edges, the epoxy can grab on to, the adhesion will be better.
Mixing in fibers can make epoxy stronger in certain situations. JB Weld uses metal, most boat stores sell a cotton filler called flox. For building gussets the flox can help. To get two similar parts to stick together on the flat, no filler will probably be better.
Chopped strand mat is the worst crap people us to make fiberglass repairs. Don’t use it, there is no strength, it only makes the finished part heavy. Use properly woven cloth to make fiberglass repairs.
This seems to be one of the worst ways to test shear failure not to mention I doubt anyone uses epoxy to stick 6″ bolts onto a surface. If you’re not going to replicate a good test method at least make it a real world test.
Lastly he should take a page out of [Matthias]’ play book and use a jack on a scale to apply force to his samples.
It is. Glues are terrible against peeling failures, so when you twist the bolt off the differences between glues can be tiny, and anything like a small accidental bubble will start the failure so the results are anyone’s guess.
Glues hold best when loaded directly against or along the surface.
Why does everything have to be a damn video? Can’t I just get the tabular data?
Because YouTube doesn’t pay for tables?
B^)
Obvious solution is to make a table, then make a video of it.
:-)
Ditto. Still lots of good blogs out there, so you don’t miss much if you skip youtube.
I wonder how the gorillia version compares to the cheap stuff from the dollar store. $1.50 Canadian for a large double syringe of 5-minute epoxy. I’ve used a ton of the stuff around the house even for gluing feet onto chairs and for things as mundane as gluing decorative letters to a backplate. I’ve never had a bond fail with the stuff, but I’ve never tried to break a bond either.
I’d be willing to buy the “good stuff”, but never had an issue with the “cheap stuff”.
i am a little late buuut the cheap stuff at dollar store is usually re branded lepage
I think one needs to have 2 types of epoxy available.
Long set and 5 minute set.
Some joints are too complicated to easily clamp together and therefore must be held (by hands) in position until it sets, that is why 5-Minute is needed.
I don’t recall if I’ve used both types at the same time on a joint, but I might have used the 5 minute stuff in a few small places to hold a difficult joint together while the long set cures.
project farm while entertaining is only slightly more scientific than your general kindergarten science experiment and often not even that. Take anything that channel does with a healthy dose of salt not just a grain.
mmmm…. I love salt….
Most epoxies add strength to a joint when the epoxy-joint layer is minimized. Epoxy, in and of itself, doesn’t carry strength. Its the cross-linking nature of the epoxy establishing bonds between the materials forming the joint. Long spans (think gaps) between the articles forming the joint creates a weak bond- the epoxy is making longer bonds to the materials to be joined. A thin gap is best. JB Weld has small metallic materials in suspension, so some gap filling will work with this original formulation.
As others have said, surface preparation is critical to a strong joint. Wear nytril gloves to keep finger oils off the work pieces (and keep solvents / impurities off your hands). My preference is to use a solvent like acetone to degrease/remove contaminants from the joining surfaces. Whatever material (rag, prep pad, etc.) you use to apply the acetone should be low-fuzz or no-fuzz. If fuzz is embeded in the joint, it will weaken the joint. Wipe in one direction, one time with a portion of the rag or wipe, then ideally use a new rag or wipe for the next pass. That way one does not recontaminate the surface. Note any streaks that remain on the surfaces to be joined after the acetone has evaporated and make a second pass across the surface with a fresh wipe or rag. Repeat until the surface is clean. Give the surfaces about five or ten minutes to fully evaporate the acetone, then prepare the epoxy by manufacturers instructions (mix the epoxy parts in the exact ratios indicated in the instructions to ensure the strongest bond possible- too much hardener and the joint will be weakend, too much resin and the epoxy will weaken because there’s not enough hardener) and apply the thinnest possible thickness to both surfaces to be joined. press the two surfaces together and clamp them in proper orientation until the joint has fully set up. I wait until the epoxy is fully cured- as the manufacturer states.
One of my favorite epoxies for airframe work is aeropoxy.
Good job, I make knives and have always used JB WELD ORIGINAL on the handles plus pinning them….
Thank you for your work, you answered the exact questions I was asking myself and as a physicist, I appreciate your methods of testing. Excellent, thank you, you saved me many hours of testing.