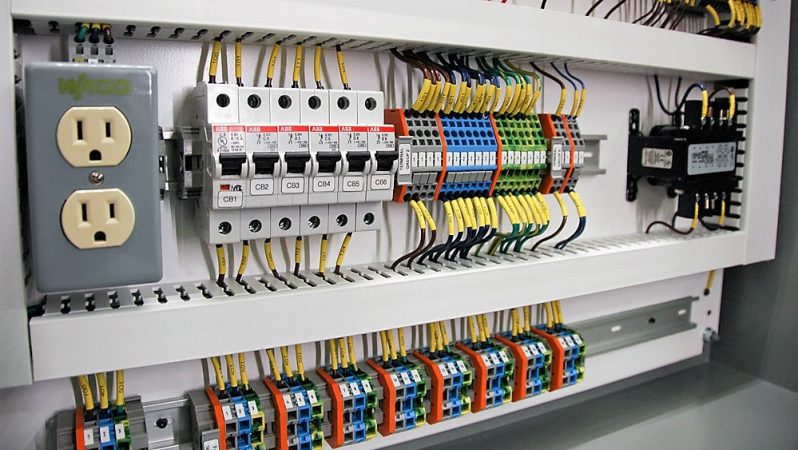
Unless you’ve spent some time in the industrial electrical field, you might be surprised at the degree of integration involved in the various control panels needed to run factories and the like. Look inside any cabinet almost anywhere in the world, and you’ll be greeted by rows of neat plastic terminal blocks, circuit breakers, signal conditioners, and all manner of computing hardware from programmable logic controllers right on to Raspberry Pis and Arduinos.
A well-crafted industrial control panel can truly be a thing of beauty. But behind all the electrical bits in the cabinet, underneath all the neatly routed and clearly labeled wires, there’s a humble strip of metal that stitches it all together: the DIN rail. How did it come to be, and why is it so ubiquitous?
Standards, Please
The development of what would become DIN-rail and the terminal blocks and accessories that mount to it closely tracks the early phases of industrial electrification. As motors and other components become more and more essential to industry, so too did the need for something sensible to connect everything together. Early control panels were a mish-mash of whatever terminals could be found, often plain nuts and bolts in some kind of expedient insulator. Panels were tedious to construct, hard to maintain, and prone to failure.
To mitigate these problems, in 1928 an electrical utility in Germany called Rheinisch-Westfälisches Elektrizitätswerk (RWE) contracted with a supplier of electrical products to develop a new modular terminal blocks system. The young company was called Phönix Elektrizitätsgesellschaft and its founder Hugo Knümann worked closely with engineers from RWE to solve the terminal block issue. (Ordnung muss sein!)
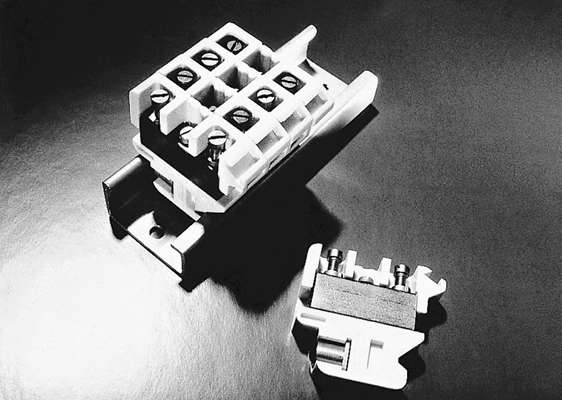
What they came up with was a small porcelain tray containing a metal bus bar. The bar made a connection between two wires through screw terminals, and the porcelain held it firmly. The blocks were designed to be closely packed into long strips, but with only one side of the block enclosed by the porcelain, some way to prevent shorts in case an adjacent block were to be accidentally installed backward would be needed. This requirement, along with the need to mount the strips firmly but still allow removal and repositioning, led to an elegant solution: an asymmetric metal rail into which the blocks could clip. The G-shaped profile would provide a firm mechanical connection, allow terminal blocks to slide laterally along the rail to allow fine positional adjustment, and importantly, prevent backward installation.
As with many innovations, the first one to come up with a design gets to set the standard, and the Knümann design became the first electrical device assembly rail, as the rail is generically known. The G-section rail and components were quickly adopted by other manufacturers, and an industry was born. The G-section was to be joined later by the “top-hat” rail, a symmetrical profile that was more suited to lighter components and which eventually became very popular, to the point where many terminal blocks are compatible with both the G and top-hat rails. A C-section rail was also developed for certain applications.
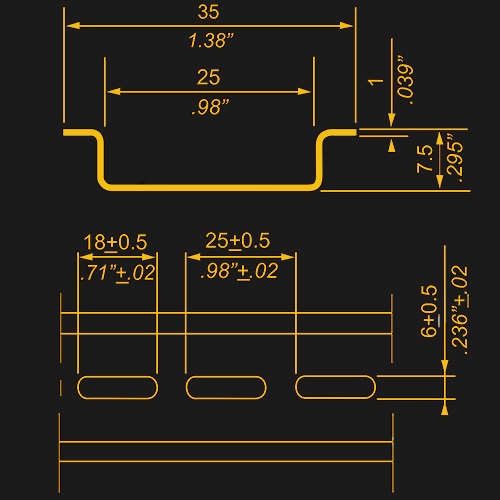
The dimensions and mechanical specifications for the profiles became standardized in the 1950s under a variety of different standards published by the Deutsches Institut für Normung (DIN), which translates to German Standards Institute. These standards have been tweaked a little over the years, and expanded to other European and international regulatory regimes. The same standards were adopted by the North American Electrical Manufacturers Association (NEMA), and today what has come to be known as the DIN rail is a truly worldwide standard.
Shake It Up
Except for special terminals that provide a ground bond to the enclosure, the electrical action on a DIN rail is entirely isolated from the metal of the rail. That means that most of the specifications for DIN rail profiles are purely mechanical, to ensure that the mounted terminal blocks stay put. Given that DIN rail panels are often put into service in extreme environments, like railways and factories, the ability of the rails to stand up to vibration and mechanical shocks is critical. Indeed, one of the early uses of the rails once they became standardized was for Germany’s first nuclear power plants, as demanding an application as there is. The standards specify 350 G shock and 5 G vibration resistance
Corrosion resistance is also a big part of a DIN rail’s job, and given that steel is generally the material of choice for the profiles — although not exclusively, as aluminum is used too — some kind of coating is needed. Chromating is the process of choice, which is a chemical process using chromium solutions. Most DIN rail used to have the golden cast characteristic of hexavalent chromium treatment, but as of 2006, EU rules on the reduction of hazardous substances (RoHS) and OSHA regulations in the US caused manufacturers to switch to trivalent chromium, which lends little color to the underlying zinc-plated steel and so appears silver-white.
If you look in any catalog of DIN rail accessories, like that of Phoenix Contact, the company that Hugo Knümann started, you’ll find a bewildering range of products that can be mixed and matched to do just about anything electrical. It’s really just LEGO for the electrical engineer, and it’s all thanks to the need to neaten things up and bring some standards to the field.
[Featured images: Advanced System Design, LLC.]


somebody likes WAGO lolz, they came by my office and gave out samples. Just need a few mor samples and I can wire my CNC machine!
Yay for standards!…
Except when I was doing a contract to put equipment in place for a company that already put the electrical backbone in place in some cabinets and no cable colors were consistent from site to site in the slightest. Some did Blue-Blue for the plus and minus of the same breaker for instance, some just had a a row of 20 red cables. None had labels whatsoever.
ugh, i hate shoddy documentation (or lack thereof, and yes labels count as documentation). Thats what makes standards so amazing, all of the documentation is already done for you and all you have to do is reference it.
Ugh! Unlabeled wires is a big peeve of mine. More important than colors—but that’s another peeve. Anyhow, I have had the misfortune of specifications that didn’t help either. For example, a set of panels that required red wires for all 110VAC wires—and the panel only had 110VAC wires.
I took up and internship last summer and built these cabinets for a auto manufacturer factory. It was so Zen and so satisfying seeing rows and rows of perfect terminations and rails. Only if I had know there was a subreddit for it. Most cabinets took me a week to build with thousands of connections!
A subreddit, you say? Please share.
I guess this one: https://www.reddit.com/r/cableporn/
Now this is triple X rated!
https://3.bp.blogspot.com/-OSvMadb3w1g/V1oLkWcAC-I/AAAAAAAAAGc/kyW0ThhElhYOshjlkwtXYpAWO_NHrKAgACLcB/s1600/quadro%2Bdo%2Bposto%2Bde%2Bcombustivel.%2B%2528o%2Bfamoso%2Bbalai%2Bde%2Bgato%2B%2529.JPG
I… I think I’m going to be sick!
I open boxes like that at least once a week, the plant was built in the late ’80s and has been added-on ever since. The trick is to open the lid really slowly so that any 600v shorts happen before you get your face in there.
Long time ago I saw a bit more complex cabinet with some solenoid valves. Fluid to control was base and tank was a drum under it. Because of “don’t touch if it works” philosophy cabinet was open so was the drum. Vapour was all over inside so you got that funny filling on your fingers when touching it. Until some malfunction that pushed base back to drum and splashed it all over inside. We had 40 to 80V between wire insulation and ground. Really you could get electricuted when touching equipment housing. It still worked so we were not allowed to clean it. But visually looked ok.
@nik282000: I thought power would be already switched off, when you open a 600V cabinet and “open it slowly” is primarily too keep the dust in and prevent it from becoming airborne.
I’m guessing r/CablePorn.
Nothing like a clean and sexy control cabinet with well laid out DIN rails to get a controls engineer’s blood pumping. I can tell a lot about a company just by the lay out of the components on the DIN rail and how much thought went in to.
Networking needs something like it.
http://3.bp.blogspot.com/-1MAbdInaoeQ/UezE9YiJ-4I/AAAAAAAAGvg/Ve0Zk_VdEgY/s1600/index2.jpg
When I was in the business of sysadmin and small office network cabinets (15 years ago), I’d crimp my own cables to length instead of grabbing pre-made ones that were several times too long from the supply box.
I also put a lot of equipment on the walls with the top-hat style rails. some of the small network appliances had mounts to put them on rails. this allowed me to take the shelves out of out racks, which were always a big source of messy wiring.
SFP+ and VLANs have helped as well. Make neat and keeping it that way. Shame it only works for digital.
Check out the amazing jobs at this link:
https://thenextweb.com/insider/2016/09/04/satisfying-pics-cable-management/
It does have things like the DIN system…wire cable trays come in standard sizes and are widely available.
It must take ages to find anything in a mess like on the picture…
My Grandparents used to tell my mom, “Alles ist in ordnung (Everything is in order).” When I read “Ordnung must sein,” it reminded me that “Order must BE.” ;)
can anyone suggest something DIN rail mountable for distributing 120VAC (power & ground) to a half dozen or so little DC power supplies on the same rail?
Not exactly DIN rail, as that wasn’t ever specified to carry power as well, but similar approaches are used for fuse boxes.
Maybe that’s a good starting point.
I use wago’s 2002 lineup of terminals quite a bit. Both to connector single deck, for connector single deck, and 8 connector double deck. you’ll also need jumpers to connect terminals if you need more than the number of connectors in each terminal. They are not cheap however, an 8 connector double deck cost me about $8 per.
Not all of this stuff is available from an online wholesaler though. Many things are only available through an authorized Wago distributor who will do a custom order for you.
Sorry text typing screwed that up a bit.
Both 2 connector, 4 connector* etc
Seconded. These plus the 2001 series (narrower blocks, lower ampacity) are rock solid. And McMaster-Carr carries them! (as ‘quick and secure modular terminal blocks’)
I’ve never found the actual Wago tool to hold the terminal open when inserting the wire, I just use a 2.5mm flat-blade screwdriver.
They sell the tool on Newark. They actually have a few… A long thin flat blade with a 30 degree bend is better. The wago tools have a real thick long handle and if you’re working in a dense panel they get in the way of actually inserting the wire.
I’m partial to the Wago 221 and 222 clips. They pop into carriers, and the carriers can fasten to DIN hardware in a number of ways. They’re one of the more elegant examples of industrial design I’ve had the pleasure to handle .. amazing that they figured out how to mix flexibility and orderliness so clenly .. you have to use them to appreciate how they work. And they are relatively inexpensive.
And I’ve seen it all as far as wiring for large process control systems .. from stuff that looks like it was done by drunken toddlers, using only their feet, to stuff that looks like it was done by alien beings who had figured out how to warp space-time in order to make wiring cabinets that were impossibly perfect.
Pet peeve – most distributors do not stock the complete range of *anything*. So, you end up not being able to get all the colors you want of terminal blocks. Or wire. Or labels. Or jumpers.
Sure, if you have all the time in the world, you can buy different bits from different distributors, but then you find that the colot you want is not available in that gauge of term block *anywhere*.
And the project’s got to be done in 2 weeks.
:-)\
For this reason I often order straight from the manufacturer. This means I need to keep stock though because 2 weeks is the fastest the delivery time is, often it takes 2 months. Also real important because customers adding things at the last moment means that we always need to add alot more things.
FINALLY, I am useful!
https://www.phoenixcontact.com/online/portal/gb?1dmy&urile=wcm%3apath%3a/gben/web/main/products/subcategory_pages/Distribution_blocks_P-15-13/65a26abb-5625-4434-8539-c7164326fd22
Usually I go for the push-in connection types with ferrules. You can use a small screw driver or pick to depress the buttons. Make sure you follow the amperage ratings and such. They have the end covers and terminal markers for the blocks under the accessories tabs for whichever block. You can write on the markers pretty nicely with super fine tip sharpies, and wipe the writing off with acetone (which also removes the gloss finish on shiny markers).
You’ll also want some end clamps to keep the terminals from sliding around. I find the ones that have screws and a metal clamp to have the best grip, specifically the Allen-Bradley ones. My boss likes to shove the blocks together by prying behind them against the din rail before tightening the clamps, but I prefer to use my hands because they stay straighter, don’t pop off, and don’t get damaged.
ooo man. thank you! i was able to parametric search my way to exactly what i needed in two minutes, and they’re inexpensive.
(thanks to the other respondents as well, that’s all getting bookmarked and filed away for reference.)
https://www.asi-ez.com/member/x235-Power-Distribution-Interface.asp
That should work.
DIN Rail Mounted Power Distribution Module
-250 Vac/dc
-30 A Max per Potential
-16 A Max per Branch
-2 Input Terminals
-12 Output Terminals
https://www.automationdirect.com/adc/Shopping/Catalog/Terminal_Blocks/DINnector_DIN-Rail_Terminal_Blocks
can use push in jumpers between terminal blocks to make up to 20A distribution
All that push in stuff causes issue, give me screws. Takes ages but much better connection.
A site I look after had a major earthquake, and a number of niggly faults I traced to push in stuff. In many cases it still looked connected but had rattled out enough to disconnect
These work out pretty well, come in 1-2 Phase with 2-6 outlets
https://www.mcmaster.com/6367T18
“The G-section rail and components were quickly adopted by other manufacturers, and an industry was born. ”
Just think if a design patent had been applied for.
Then everyone would have their own variation, and none of them would fit together.
Patents: delayers of industry
The other part of a good layout, like in the lead picture, is Panduit (TM), the tab-sided plastic channel that you run your cables through.
The generic being wire duct
The enclosure is also important, it needs a detachable panel and rubber seals around the door. And then you need the waterproof conduit and fittings to run the wires through. And the strain relievers for the cords emerging from the enclosure. If there is a lot of high-powered gear in the enclosure, it might need a cooling system. And most important, there needs to be a document holder on the back of the door where you put a copy of the schematic.
“all manner of computing hardware from programmable logic controllers right on to Raspberry Pis and Arduinos”
God, I hope I never fine a RasPi or arduino in a commercial-industrial control panel.
Don’t know for RaPI, but there are some Arduinos available in DIN-rail mountable packages.
And Phoenix Contact (The US end of that German firm) does sell boxes who will facilitate mounting the RasPi on one.
SIEMENS IOT 2000. Not specifically an Arduino, but compatible with the shields and sketches. Also, I’ve seen way more Beagle Bones in actual production environments than I have PIs or Arduinos, but I can attest that they are there.
For main control, probably a bad idea. RPis especially can be good for data collection though.
I know a large EMS company that eqipped the entire production floor with touch screen monitors driven by RaspberryPis. They use these monitors to display all kinds of information, like step by step assembly instructions, status informations on currently running jobs, access to schematics and documentation for repair/rework… Seems to be running well for them, and it’s a pretty cheap and simple solution. Not shure if they actually bought some off the shelve RasPis, or if they just built theyr own version of the hardware to fit perfectly for this task.
That application makes sense – basic information display terminals. What wouldn’t is trying to turn a Rpi into a PLC for use in a industrial environment that requires a lot of I/O and sensor interfacing.
Yes – the RPi just lacks 24V I/O or galvanic isolation or some transient and overvoltage protection. Surge and Burst in industrial environment are not nice.
Ha, and I thought Pheonix Contact was a company in Arizona. Also, had no idea what DIN actually stands for. Nice research!
The DIN connector, used (among others) in very old computer keyboards (as old as me), also comes from standard by them :)
“DIN connector” can refer to any of thousands of different types of connectors, the IBM keyboard connector is DIN 41524, and the PS/2 connector is DIN 45322. The power connector on my IKEA LED lamps is a DIN 41529 connector.
HAH. RWE. They exist to this day, and at the moment, they are deforestating [1] to dig for lignite (of all things!). So something which used to be forward-thinking is backward-thinking these days, it seems.
[1] https://hambachforest.org/blog/
Last summer, I went into practice and built these cabinets for the carmaker’s factory. It was so great, and it was so nice to see the perfect end connections, rails and rails built. We also bought from them all at https://famaga.com/catalog/nema, and they helped us a lot
Hi,
I’m putting together some junction boxes for domestic lighting using RS own brand DIN terminals in a suitable enclosure (home automation later would favour grouping the wiring into a limited number of JBs with space to accept relays later).
One thing that came to mind was to do with these:
https://ca.famaga.com/catalog/rs-pro/korpusy-stojki-shkafy
They are the special DIN terminals that have a screw operated clamp to the DIN rail which claims to provide electrical continuity.
How might I decide if these would provide suitable and reliable continuity for the circuit CPC on say a circuit protected by a C10 RCBO? Or do you reckon they are just fine?
Points I’ve considered:
Reliability – these clamp to a plated steel rail – so providing the plating holds and the rail does not corrode, then OK
Clamping action seems positive.
Contact resistance: haven’t attempted to measure yet, but I suspect it would be off the bottom of the range of my Megger.
Fault current – worst case scenario: hundreds of amps but no more than 1kA for a very short time.
There is a little leeway in that the circuit is RCD protected, but I feel it would be bad practice to factor that in as a key design consideration.
What do you folk think of such devices?
Many thanks,
I guess I’m not quite happy with CPC on the rail. It may be so specified but habit leads people to think of it as purely structural… and poor earthing isn’t the sort of thing you usually discover until you wish you had sooner.
I like to *know* where my earth is coming from. OTOH, in fairness, I also like star. I might like better, multiple devices earthed through the rail, itself bonded at multiple points, than an earth wire daisy chained.