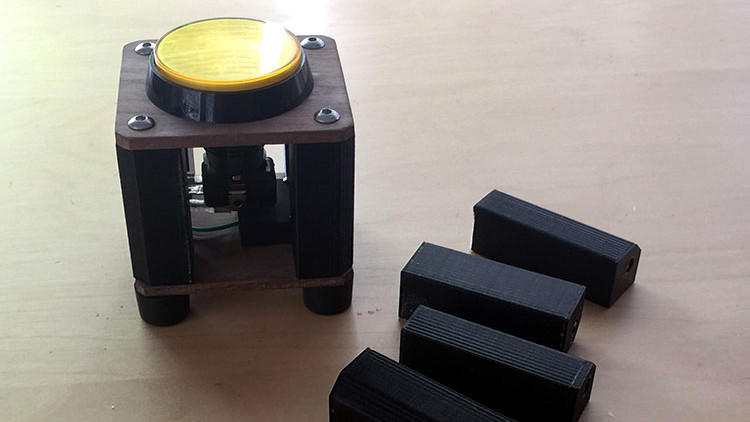
Liquid two-part resins that cure into a solid are normally used for casting, and [Cuddleburrito] also found them useful to add strength and rigidity to 3D printed pillar supports. In this case, the supports are a frame for some arcade-style buttons, which must stand up to a lot of forceful mashing. Casting the part entirely out of a tough resin would require a mold, and it turns out that filling a 3D print with resin gets comparable benefits while making it easy to embed fastener hardware, if done right.
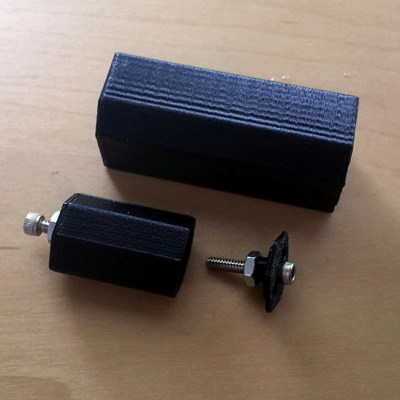
Filling the inside of an object with some kind of epoxy or resin to reinforce it isn’t a new idea, but [Cuddleburrito] learned how a few small design considerations can lead to less messy and more successful results. The first is that resin can be poured with screws in place without any worry of trapping the screws in the resin, if done correctly. As long as only the threads of the screw are in the resin, they can be backed out after the resin has cured. Embedding nuts into the resin to act as fasteners becomes a much easier task when one can simply pour resin with both nut and screw in place, and remove the screw afterwards. A thin layer of a lubricant on the threads to act as a release may help, but [Cuddleburrito] didn’t seem to need any.
The second thing learned was that, for a pillar that needs a cap and embedded nut on both ends, it can be tricky to fill the object’s void with the perfect amount of required resin before capping it off. On [Cuddleburrito]’s first attempt, he underfilled and there wasn’t enough resin to capture the nut on the top lid of the pillar he was making. The way around this was to offset the nut on a riser, and design in either a witness hole or an overflow relief. A small drain hole or a safe area for runoff allows for filling things right up without an uncontrolled mess in the case of overfilling.
Something worth keeping in mind when experimenting in this area is that in general the faster a resin cures, the more it heats up in the process. It may be tempting to use something like 5 minute epoxy in a pinch, but the heat released from any nontrivial amount of it risks deforming a thin-walled 3D print in the process. For cases where resin would be overkill and the fasteners are small, don’t forget we covered the best ways to add fasteners directly to 3D printed parts.


Hmm… are the pillars pillars or are the pillars just a mold that you can leave when you are done.
Anyway, what surprises me the most is that these firm shaped pillars are not expected to be strong enough using 3D printing alone. COnsidering that most of the forces on the pillars are compression forces. So, I would expect when printed using ABS with a fill rate of more then 50% (followed by acetone smoothing and left to cure for a few days to make sure that the acetone has fully evaporated from the ABS) would be more then strong enough. And it’s not one pillar… there are 4!
To me this seems like overkill, but it wouldn’t be the first time that I’d be wrong.
So I’m very curious about the kind of public that will be using it.
Anyway, a nice example and the website contained lots of interesting and detailed photos we all can learn from in some way.
Just what kind of forces are being applied that two or three extra layers of PLA won’t solve? That stuff can be brutally strong, and it’s not that expensive.
I can’t see anything particular in the shape of those supports that requires these to be build with this complex, labour and time intensive process. Cutting a simple aluminum column to the desired length, drilling holes and taping threads would be faster and cheaper. It could even be the subject of an article here: how to avoid 3d printing and postprocessing when one does not need it?
Well, you know the old saying that starts with “When you’ve got a hammer…”.
“When you’ve got a hammer, everything’s a nail. When you’ve got a welder, everything’s whatever the hell you want it to be.”
Epoxy fill has some great applications including potential heat resistance advantages. I’ve had issues with PLA prints warping in the Texas sun. I’ve used epoxy coatings to gain more tolerance, but adding epoxy fill could potentially add a lot of benefits. Combining the internal and external epoxy approaches would offer heat, strength and possible additional chemical resistance to printed structures. Great tip!
They are also, quite frequently used to connect things together. Possibly more often than for casting.
A novel idea, I like it! Maybe it’s a bit overkill for this type of supports but if you’ve got something a little bit more complicated it may pay dividends.
CURA allows top surfaces to remain open, exposing the infill pattern. (I suppose the other slicers do also). My PLA parts, though strong, have warped outside in the hot sun. So I coat the outer surface with Smooth-on then pour casting resin into the open top surfaces. The resin leaks thru the porous infill mesh but is contained at the cured Smooth-on coated surfaces. Works pretty well for shapes for which I’d otherwise need a milling machine.
This is great information to have if I ever need to make a more complex shaped structure than these straight posts. For this particular application however I would have just used four pieces of wood and some Panhead screws.
polymer-modified self-bonding fast-setting cement mixture
By the way, someone I spoke to ages back, mentioned that thin steel sheet box sections could be made much more rigid with low expansion foam in them. Which may be a handy trick where you want to keep parts lighter than solid resin or full infill of print. Or to rigidise something you are finding a little thin skinned and floppy after assembly/testing.
I wanna know what the greater project is about. Is he restoring a game, doing a MAME etc.
This could be implemented into a 3d printer have resin extruder that deposits resin between the infill while it printing leading to some very strong parts. possible you could even use the resin used in sls printers just flash a UV light on it
I did a one off job of some PLA window crank and door handle knobs, and a shifter knob for a classic car. I did them as shells with T ribs inside to ensure the hard urethane resin fill would stay locked to the print. I printed small snap together fixtures to hold drill bits (shank in the knob) to form starter holes for drilling to size. For the shift knob the fixture held a 3/8-16 bolt to form threads to screw right onto the shifter.
The final part was printing clamping blocks to hold the knobs in a vise for drilling.
I filled the knobs with resin, put them in a pressure tank overnight, then post cured at 145F in a food dehydrator. I’d previously tested the Excelvan brand PLA in the dehydrator at that temp and found no shrinkage or distortion. So there should be no problems given that restored classics of this caliber just don’t ever get parked in direct sunlight for hours with the windows up on a cloudless July day. If the knobs melted, I would have heard about it by now.
I got the whole thing done, from receipt of the weathered originals to shipping the knobs in four days. I sent along some extras and a couple of preliminary designs that didn’t work too well so the restoration shop would have disposable items to test how they wanted to fill and finish the outsides.
The car, when finished, was exhibited at Hershey and other concours d’elegance shows, with nobody the wiser that the knobs were made with technology around 90 years newer than the car. :) To make them the ‘traditional’ way by making master patterns then silicone molds to cast resin in would have taken much more time and cost more.
Another item I did, before the knob job, was replicating a commonly broken and unobtainable part for a Brother electronic knitting machine. I got the original by USPS around 11 AM and before the local Post Office closed at 4:30 I had the part designed and printed and mailed out.
What 3D software do I use? Caligari trueSpace 6.6. I’ve used it since version 2 and I know how it works, and how it quirks.
I could see resin-filling as a way to decrease print time.
Is it that much stronger than a print printed at 100% infill though?
I ask because even if printing at 100% any source of resin that I have ever found is still orders of magnitude more expensive than the same volume of printer filament!
Actually, Resin casting is something I would very much like to get into. Every so often I get inspired to start shopping for supplies but… to do the things that interest me resin just isn’t worth the price!