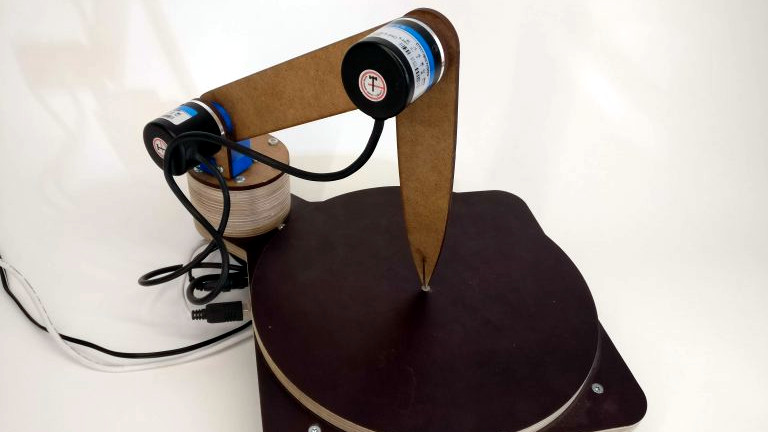
Digitizing an object usually means firing up a CAD program and keeping the calipers handy, or using a 3D scanner to create a point cloud representing an object’s surfaces. [Dzl] took an entirely different approach with his DIY manual 3D digitizer, a laser-cut and 3D printed assembly that uses rotary encoders to create a turntable with an articulated “probe arm” attached.
Each joint of the arm is also an encoder, and by reading the encoder values and applying a bit of trigonometry, the relative position of the arm’s tip can be known at all times. Manually moving the tip of the arm from point to point on an object therefore creates measurements of that object. [Dzl] successfully created a prototype to test the idea, and the project files are available on GitHub.
We remember the earlier version of this project and it’s great to see how it’s been updated with improvements like the addition of a turntable with an encoder. DIY 3D digitizing takes all kinds of approaches, and one example was this unit that used four Raspberry Pi Zeros and four cameras to generate high quality 3D scans.


Much cheaper than a Faro arm! Cool project.
I didn’t see an on/off (Record) switch for the input.
To ignore an input such as when moving the point to the first position, or maybe jumping gaps…
you use the computer keyboard
Put a tiny switch right at the point, so poking your object triggers the switch recording the position.
Memory is pretty fuzzy on exactly which studio did this, but I think it was an early Pixar founder. In the early days of computer graphics they wanted to render a wireframe arm and hand. Drew triangles all over his arm and hand with a pen/marker and did all the measurements between the points manually to translate them into polygons on screen.
Halcyon days I tell ya!
This is a really interesting project and look forwards to watching it grow.
You’re thinking of Ed Catmull https://vimeo.com/16292363. Went on to found/run Pixar.
Very cool. Prior to the link I had only read about it, never had the opportunity to see it. They briefly show a gantry setup with a stylus and footswitch. Something bespoke they made or is this more commonly used for something else back in the early 70s?
Looks like the RD Digital Tracer for Speccy but in 3D.
But can you use it to digitize a vinyl LP?
Very nice ! I want to build one but …
Does anybody know what encoder is used ? I didn’t spot a part reference on the github or the original blog post. Those 1200 positions’ encoders are clearly not like the ones I got here.
Looks like the standard ones you find on ebay.
https://www.ebay.com.au/sch/i.html?_from=R40&_trksid=p2334524.m570.l1313.TR3.TRC1.A0.H0.Xrotary+encoder+600p%2Fr.TRS0&_nkw=rotary+encoder+600p%2Fr&_sacat=92074&LH_TitleDesc=0&_osacat=0&_odkw=rotary+encoder
And as others have said, this has been used for decades to digitise objects.
Thank you, I really didn’t know where to start, I could only find the usual 24 steps encoders I already got. The price of those 1200+ steps encoders (~25$ min. for chinese E6B2CWZ1X knock-offs, wayyyy more for the official German ones from OMRON) puts a halt on my desire to reproduce the build for now.
I agree, the project is not that well written up – and there isn’t a proper parts list..
A quick search on aliexpress finds quite a few – but they all seem pretty pricy and of course you don’t know which ones are ok..
I built one and am still fine tuning it
Have you tried updating the Processing code to export a DXF file?
I’ve looked around at the examples for exporting dxf but I’m failing.
Everything else is working with the table. Great project but I want to take it to the next level….too doopid though
:(
It’s like the old Circuit Cellar potentiometer and pantograph digitiser 3D-ified.
Dude above me beat me to it! Was just going to say that. Cheaper than a Faro arm.
Always wanted a Faro arm- Ive worked in shops that had them. Now in a place that has a Hexagon Metrology 3D scanner equipped CMM.
not sure why exactly you say he is taking a different approach when this is a copy of what many home cnc guys have been doing for years. Nice build and i like the details he put into it but the author really needs to get out more or at least learn how to do a cursory search on literally any search platform.
Think arm missing an axis or at least one linear bar. But thats me.
I built the 3 encoder version and will add the turntable later. But 3 is enough to get a good scan
Have you done any error analysis? I did some noodling and was surprised how quickly the errors stack up. What do you think the error and repeatability is?
I’m still fine-tuning my build and I hope to machine the 3d printed parts out of aluminum.
Please share the results when done.
I somehow doubt in economic justification of this enterprise because cumulative errors will eat precision fast. I’m curious how it will compare to photogrammetry with rotating axes.
This reminds me: I’ve got an old Microscribe digitizer from the nineties that works just like this. It’s lying around in my interesting electronic objects pile I’ve accumulated over the years via University dumpster dives, estate sales and eBay impulse buys. It’s an old serial peripheral, and the software and drivers are now unobtainium. So I think I might try to adapt this source code to its geometry and read from the encoders directly.
http://www.3d-microscribe.com/New_Folder/ms_motorcycle.gif
Everything about it is absurdly high-quality, from the carbon fiber and milled aluminum construction to the bearings and the enormous super-fine-pitch optical encoders. The balance of the whole instrument is also superb. Responds to your touch weightlessly, and there’s never any notchiness or slop in the joints. I think they still cost several thousand dollars. I’d love to get it operational again.
Nice build, but it is missing one joint. …and imagine if it had the joints from the Dexter arm!
Could one use a probe from, say a BL Touch to get your data points?