FPGA Emulates A PDP-1, Breathes New Life Into Classic Video Game

If you’ve ever wanted to sit at the console of the machine that started the revolution in interactive computing, your options are extremely limited. Of the 53 PDP-1 machines that Digital Equipment Corporation made, only three are known to still exist, and just one machine is still in working order at the Computer History Museum. So a rousing game of Spacewar! on the original hardware is probably not something to put on your bucket list.

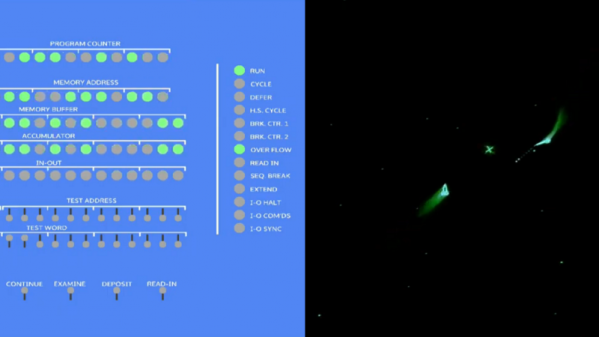
But thanks to [Hrvoje], there’s now an FPGA emulation of the PDP-1 that lets you play the granddaddy of all video games without breaking into the CHM. The project was started simply to give [Hrvoje] a sandbox for learning FPGAs and Verilog, but apparently went much further than that. The emulation features the complete PDP-1 instruction set, 4kB of core memory, and representations of the original paper tape reader, teletype, operator’s console, and the classic Type 30 CRT. All the hardware is displayed on a standard HDMI monitor, but it’s the CRT implementation that really sells this. The original Type 30 monitor used a CRT from a radar set, and had long-persistence phosphors that gave the display a very distinctive look. [Hrvoje] replicated that by storing each pixel as three values (X, Y, and brightness) in a circle of four chained shift registers. As the pixels move through the shift registers, the brightness value is decreased so it slowly fades. [Hrvoje] thinks it doesn’t look quite right, but we’ll respectfully disagree on that point.

We’ve argued before that the PDP-1 is the machine that started hacker culture, and we think this project is a fitting tribute to the machine as we enter the year in which it will turn sixty. Having the chance to play with it through this emulation is just icing on its birthday cake.

Continue reading “FPGA Emulates A PDP-1, Breathes New Life Into Classic Video Game”

Explaining Fourier Again

One of the nice things about living in the Internet age is that creating amazing simulations and animations is relatively simple today. [SmarterEveryDay] recently did a video that shows this off, discussing a blog post (which was in Turkish) to show how sine waves can add together to create arbitrary waveforms. You can see the English video, below.

We’ve seen similar things before, but if you haven’t you can really see how a point on a moving circle describes a sine wave. Through adding those waves, anything can then be done.

Continue reading “Explaining Fourier Again”

Giving An Old Mac Spotify

The Macintosh SE/30 is the greatest computer ever made, and I’m not saying that just because I’m sitting on a cache of them, slowly selling them to computer collectors around the world. No, the SE/30 is so great because of how powerful it is, and how much it can be expanded. A case in point: here’s an SE/30 that’s a Spotify player. Oh, it does it over WiFi, too.

You might be asking yourself how a computer from 1989 (it’s late enough in the year that we can safely say this computer is thirty years old) can possibly play music over the Internet. While the SE/30 supported an astonishing 128 Megabytes of RAM, it’s still just a bit too slow to play MP3s or any modern audio codec. The 68030 CPU just wasn’t fast enough to play audio, to say nothing of streaming it over a network connection. The trick is that this SE/30 is simply a remote for Spotify Connect. You could theoretically get the Mac to speak, “Alexa, play Despacito” and get the same functionality, but that’s not fun, is it? You need to do it wirelessly.

This is a continuation of one of [ants] earlier hacks that basically put a WiFi to Ethernet bridge inside an SE/30. Tie that together with a Finder extension and you have System 7, with WiFi. That’s a connection to the Internet, but [ants] actual wrote an app to connect to a Spotify playlist, browse tracks, and display album art in beautiful 1-bit color. Writing the app involved dealing with OAuth, which means the MacPlayer isn’t entirely standalone; some of it must be done on a ‘modern’ device. This, along with porting a conversion utility that translates UTF-8 text encoding into something the Mac can understand ties everything together.

With all those pieces, the SE/30 becomes a handsome, functional piece of art. Apple is never going to release a computer like this again, and you’re not going to find a touchbar MacBook being used like this in thirty years time.

Weather Forecasting Clock Makes An Almighty Racket

The old-fashioned alarm clock was a staple of cartoons in years past, with loud clanging bells and slap-to-shutoff functionality. Despite being an excellent dramatic device, these classic timepieces began to lose favor to the digital clock radio, and, in more recent times, the smartphone alarm. However, [LenkaDesign] has come up with this excellent build that combines the best of the old and the new.

The build starts with an old alarm clock. The clockwork internals are removed, but the bells remain, powered instead by a brushed DC motor. An Arduino Nano is the brains of the operation, interfacing with the now-ubiquitous temperature, humidity and barometric pressure sensors. Time is displayed on a Nokia 5110 LCD screen of the type popular a decade ago when options for small hobby project displays were significantly more limited then they are today.

As a nice touch, an old circuit board lends a new face to this clock, with a trio of big chunky buttons to act as controls. The LCD uses attractive icons to help convey information, making the most of the graphical capabilities available. There’s even a rudimentary weather forecasting algorithm that uses barometric pressure changes to predict the likelihood of rain.

Overall, it’s a tidy build that promises to serve as a great alarm clock, given the high volume of the original bells. Alarm clocks have always been a hacker staple, but if you’re still struggling to get out of bed this fire bell build should rattle your fillings loose on a daily basis. Video after the break.

[Thanks to Baldpower for the tip!]

Continue reading “Weather Forecasting Clock Makes An Almighty Racket”

We’re Dreaming Of A Circuit Sculpture Christmas

Whether or not you chose to believe our claim that we planned it this way, the holidays happen to fall right smack in the middle of our ongoing Circuit Sculpture Contest, which challenges hackers to build circuits that double as bona fide works of art. It’s become almost too easy to spin up your own PCB, so why not try your hand at building in three dimensions and without a net? The holidays are a perfect time for it as it’s not only a reprieve from the work, school, or forced labor camp that usually ties up our waking hours, but can also be a source of inspiration.

Case in point, this festive LED Christmas tree entry that comes our way courtesy of [Vincent Mkes]. This one really has it all: a recognizable theme, fantastic wire work, copious amounts of LEDs, and in a touch that is sure to delight even the electronics Scrooges amongst our readership, he does it all with the venerable 555 timer. It’s really what the Circuit Sculpture Contest is all about: taking a circuit that might otherwise be pretty ordinary and turning it into something truly unique.

The astute Hackaday reader (as if there was any other type) will likely notice there are actually two NE555 timers under the tree, each blinking their respective bank of LEDs at a different frequency. This makes the final result a bit more vibrant, and through some last-minute revisions, [Vincent] was able to hook them both up to a single power supply to really capture the minimalist spirit of the Contest.

As an early Christmas gift to us all, [Vincent] has done an excellent job documenting this build so anyone who wishes to infuse their end of year party with a little diode-driven holiday cheer can follow along. He’s included build instructions as well as diagrams of the circuit, though we encourage anyone looking to make one of their own to experiment a bit and put their own spin on it. After all, this is supposed to be art.

There’s still plenty of time to get your own entry into the Circuit Sculpture Contest, Yule-related or otherwise. Just document your build on Hackaday.io and submit it before the January 8th, 2019 deadline. Remember that entries can’t just look cool, they still need to be functional. Words to live by in general, but doubly important when they’re the rules of a contest.

Radio Gets Ridiculous

There were plenty of great talks at this year’s Supercon, but we really liked the title of Dominic Spill’s talk: Ridiculous Radios. Let’s face it, it is one thing to make a radio or a computer or a drone the way you are supposed to. It is another thing altogether to make one out of things you shouldn’t be using. That’s [Dominic’s] approach. In a quick 30 minutes, he shows you two receivers and two transmitters. What makes them ridiculous? Consider one of the receivers. It is a software defined radio (SDR). How many bits should an SDR have? How about one bit? Ridiculous? Then you are getting the idea.

Dominic is pretty adept at taking a normal microcontroller and bending it to do strange RF things and the results are really entertaining. The breadboard SDR, for example, is a microcontroller with three components: an antenna, a diode, and a resistor. That’s it. If you missed the talk at Supercon, you can see the newly published video below, along with more highlights from Dominic’s talk.

Continue reading “Radio Gets Ridiculous”

Manual 3D Digitizer Works A Bit Like 3-Dimensional Measuring Tape

Digitizing an object usually means firing up a CAD program and keeping the calipers handy, or using a 3D scanner to create a point cloud representing an object’s surfaces. [Dzl] took an entirely different approach with his DIY manual 3D digitizer, a laser-cut and 3D printed assembly that uses rotary encoders to create a turntable with an articulated “probe arm” attached.

Each joint of the arm is also an encoder, and by reading the encoder values and applying a bit of trigonometry, the relative position of the arm’s tip can be known at all times. Manually moving the tip of the arm from point to point on an object therefore creates measurements of that object. [Dzl] successfully created a prototype to test the idea, and the project files are available on GitHub.

We remember the earlier version of this project and it’s great to see how it’s been updated with improvements like the addition of a turntable with an encoder. DIY 3D digitizing takes all kinds of approaches, and one example was this unit that used four Raspberry Pi Zeros and four cameras to generate high quality 3D scans.