Automatic Microfiche Scanner Digitizes Docs

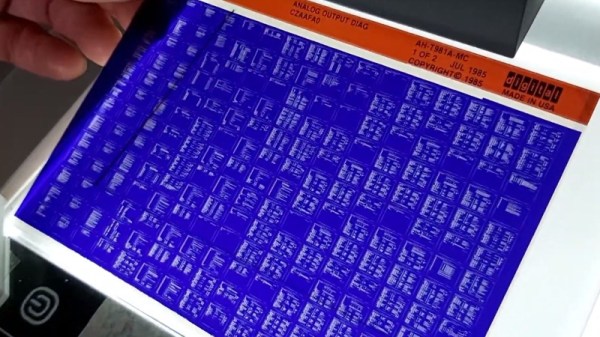
While the concept might seem quaint to us today, microfiche was once a very compelling way to store and distribute documents. By optically shrinking them down to just a few percent of their original size, hundreds of pages could be stored on a piece of high-resolution film. A box of said films could store the equivalent of several gigabytes of text and images, and reading them back only required a relatively simple projection machine.

As [Joerg Hoppe] explains in the write-up for his automatic microfiche scanner, companies such as Digital Equipment Corporation (DEC) made extensive use of this technology to distribute manuals, schematics, and even source code to their service departments in the 70s and 80s. Luckily, that means hard copies of all this valuable information still exist in excellent condition decades after DEC published it. The downside, of course, is that microfiche viewers aren’t exactly something you can pick up at the local Big Box electronics store these days. To make this information accessible to current and future generations, it needs to be digitized.

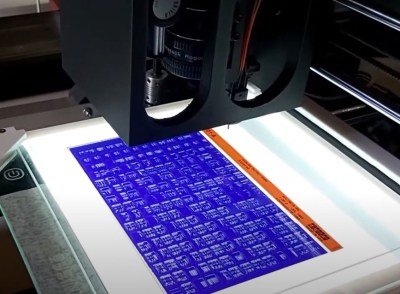
The camera panning over a full DEC microfiche sheet.

[Joerg] notes there are commercial services that would do this for you, but the prices are just too high to be practical for the hobbyist. The same for turn-key microfiche scanners. Which is why he’s developed this hardware and software system specifically to digitize DEC documents. The user enters in the information written on the top of the microfiche into the software, and then places it onto the machine itself which is based on a cheap 3D printer.

The device moves a Canon DSLR camera and appropriate magnifying optics in two dimensions over the film, using the Z axis to fine-tune the focus, and then commands the camera to take an image of each page. These are then passed through various filters to clean up the image, and compiled into PDFs that can be easily viewed on modern hardware. The digital documents can be further run though optical character recognition (OCR) so the text can be easily searched and manipulated. In the video after the break you can see that the whole process is rather involved, but once the settled into the workflow, [Joerg] says his scanner can digitize 100 pages in around 10 minutes.

A machine like this is invaluable if you’ve got a trove of microfiche documents to get through, but if you’ve just got a sheet or two you’d like to take a peek at, [CuriousMarc] put together a simple rig using a digital microscope and a salvaged light box that should work in a pinch.

Continue reading “Automatic Microfiche Scanner Digitizes Docs”

OCR Reads Old Newspapers So We Don’t Have To

Plenty of people don’t bother to read the current newspaper, let alone editions that were published over 100 years ago. But there’s a wealth of important historical information buried in these dusty old publications, assuming you can find a way to reliably digitize and index it all. You might think the solution is as simple as running images of the paper through optical character recognition (OCR) software, but as [John Scancella] explains, the problem is a bit more complicated than that.

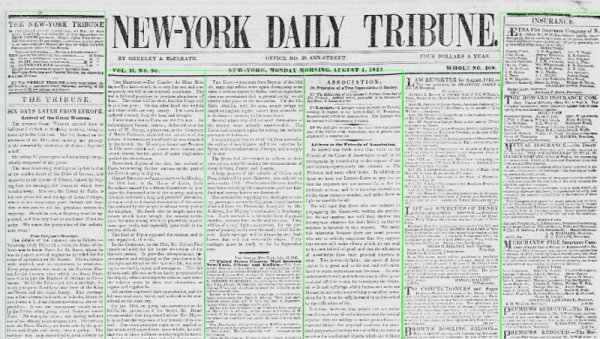
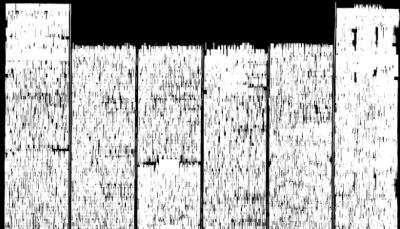
Stretching the text vertically highlights the columns.

Ultimately, the issue largely comes down to formatting. The OCR software reasonably assumes all the text is in orderly horizontal lines, because in the vast majority of cases, it would be. That’s how you’re reading these words now. But as anyone who’s seen an old time newspaper knows, that’s not how things were necessarily written back then. Pages consisted of multiple narrow columns of stories separated by vertical lines; if the OCR tries to read the page from left to right, the resulting text is a mishmash of several unrelated topics.

The answer is to break all those articles into their own images, but doing that manually at any sort of scale simply isn’t an option. So [John] has been working on a system that uses OpenCV to identify the columns of text and isolate them. He details the multi-step process down in his write-up, and even provides the Python code should you want to give it a spin. But the short version is that the image is converted to grayscale and the OpenCV dilate function is used to stretch the text in the Y dimension. This produces big blobs of white that can easily be picked out with findContours() and snipped into individual images.

It’s not a perfect solution, and there are still a few pitfalls. For one, the name of the paper needs to be removed from the front page before the stretching operation happens. But it’s clearly a step in the right direction, and the results certainly look very promising. Anything that makes OCR more accurate or easier to implement is a win in our book, so we’re excited to see where [John] takes this concept.

Manual 3D Digitizer Works A Bit Like 3-Dimensional Measuring Tape

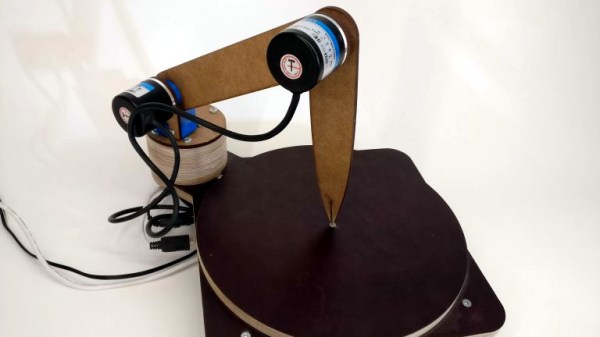
Digitizing an object usually means firing up a CAD program and keeping the calipers handy, or using a 3D scanner to create a point cloud representing an object’s surfaces. [Dzl] took an entirely different approach with his DIY manual 3D digitizer, a laser-cut and 3D printed assembly that uses rotary encoders to create a turntable with an articulated “probe arm” attached.

Each joint of the arm is also an encoder, and by reading the encoder values and applying a bit of trigonometry, the relative position of the arm’s tip can be known at all times. Manually moving the tip of the arm from point to point on an object therefore creates measurements of that object. [Dzl] successfully created a prototype to test the idea, and the project files are available on GitHub.

We remember the earlier version of this project and it’s great to see how it’s been updated with improvements like the addition of a turntable with an encoder. DIY 3D digitizing takes all kinds of approaches, and one example was this unit that used four Raspberry Pi Zeros and four cameras to generate high quality 3D scans.