I’ve always been fascinated by AI and machine learning. Google TensorFlow offers tutorials and has been on my ‘to-learn’ list since it was first released, although I always seem to neglect it in favor of the shiniest new embedded platform.
Last July, I took note when Intel released the Neural Compute Stick. It looked like an oversized USB stick, and acted as an accelerator for local AI applications, especially machine vision. I thought it was a pretty neat idea: it allowed me to test out AI applications on embedded systems at a power cost of about 1W. It requires pre-trained models, but there are enough of them available now to do some interesting things.
I wasn’t convinced I would get great performance out of it, and forgot about it until last November when they released an improved version. Unambiguously named the ‘Neural Compute Stick 2’ (NCS2), it was reasonably priced and promised a 6-8x performance increase over the last model, so I decided to give it a try to see how well it worked.
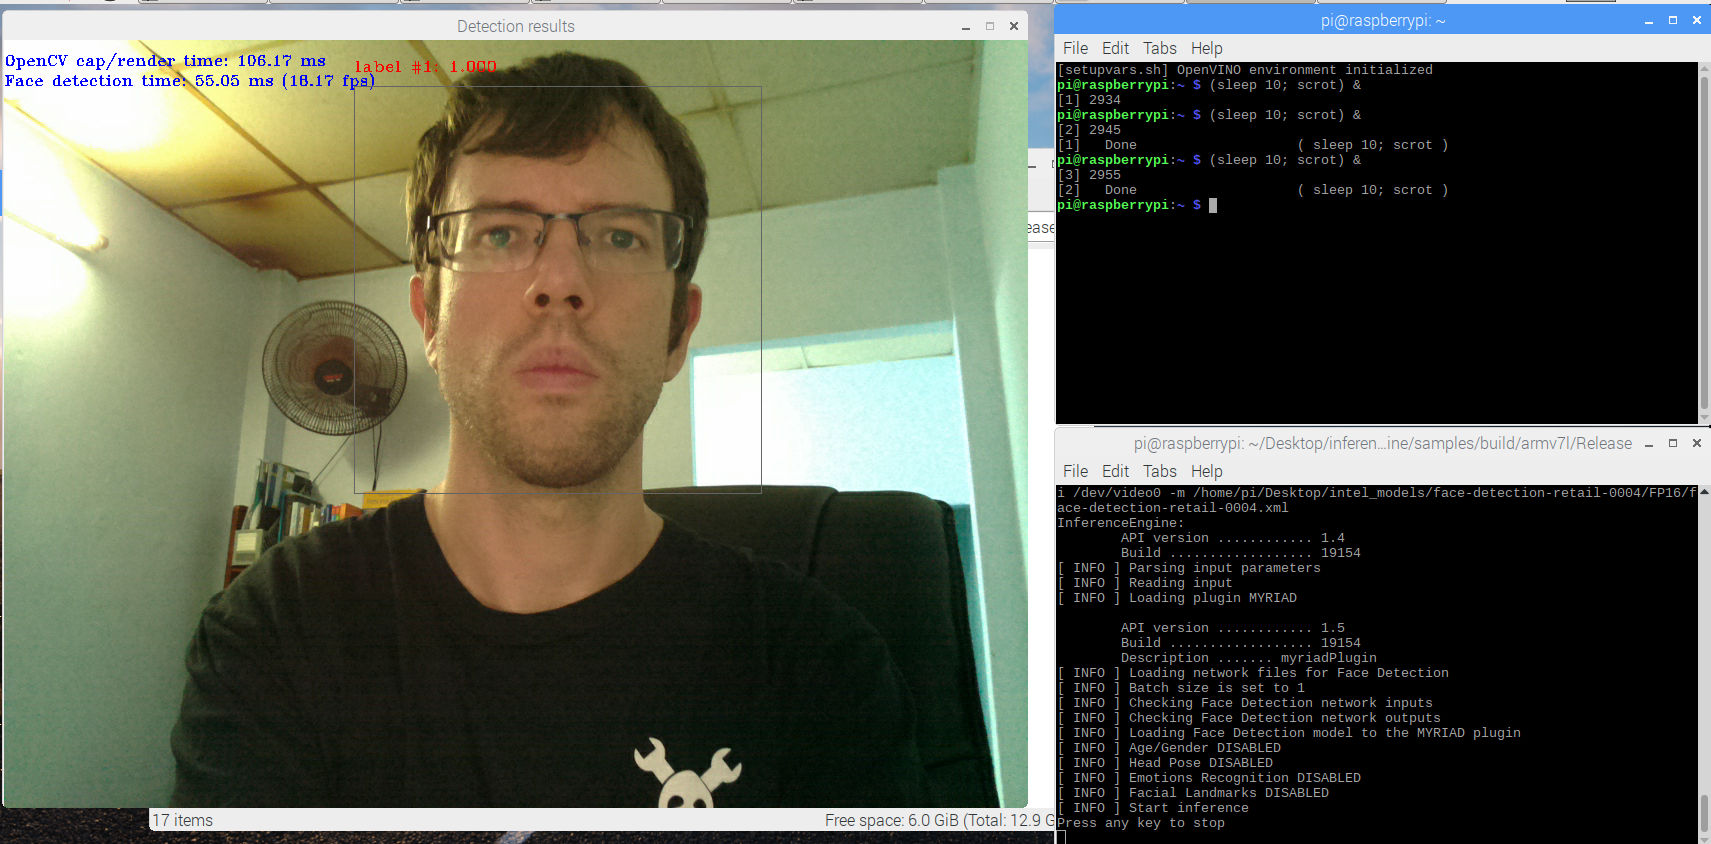
I took a few days off work around Christmas to set up Intel’s OpenVino Toolkit on my laptop. The installation script provided by Intel wasn’t particularly user-friendly, but it worked well enough and included several example applications I could use to test performance. I found that face detection was possible with my webcam in near real-time (something like 19 FPS), and pose detection at about 3 FPS. So in accordance with the holiday spirit, it knows when I am sleeping, and knows when I’m awake.
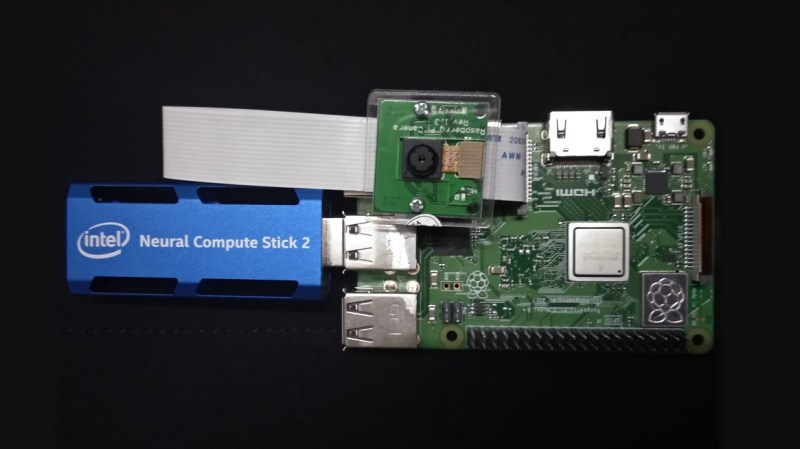
That was promising, but the NCS2 was marketed as allowing AI processing on edge computing devices. I set about installing it on the Raspberry Pi 3 Model B+ and compiling the application samples to see if it worked better than previous methods. This turned out to be more difficult than I expected, and the main goal of this article is to share the process I followed and save some of you a little frustration.
First off, Intel provides a separate install process for the Raspberry Pi. The normal installer won’t work (I tried). Very generally, there are 3 steps to getting the NCS2 running with some application samples: Initial configuration of the Raspberry Pi, installing OpenVino, and finally compiling some application samples. The last step will take 3+ hours and some will fail, pace yourself accordingly. If you’re not installing it right this moment, it’s still worth your time to read through the other examples section below to get a feel for what is possible.
Preparing the Raspberry Pi
First, download Noobs, unzip to a microSD card (I used 16GB), and boot the Raspberry Pi off it. Install the default graphical environment, connect to the Internet, and update all software on the device. When done, open a terminal and run sudo raspi-config. Select interfaces→enable camera. Shut down, remove power, plug in your camera, and boot up.
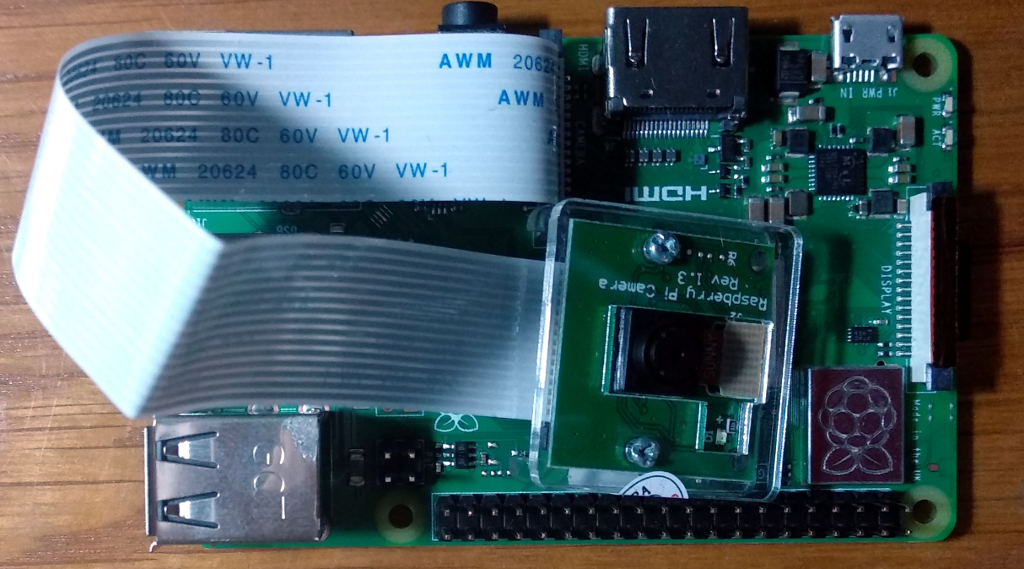
Open a terminal again, and run sudo modprobe bcm2835-v4l2 (note that’s a lowercase L, not a 1), then confirm /dev/video0 now exists by navigating to /dev and running ls. You’ll need to run this modprobe command each time you want the camera to be accessible this way, so consider adding this to startup.
Now, some of the applications we are going to compile will run out of memory, because the default swap partition size is 100 megabytes. Run sudo nano /etc/dphys-swapfile and increase it – I changed it from 100 to 1024 and this proved sufficient. Save, reboot and run free -h to confirm the swap size is increased. Finally, install cmake with sudo apt-get install cmake, as we’ll need that later on when compiling.
At this stage you’re ready to begin Intel’s OpenVino install process.
Installing OpenVino Toolkit
In this section, we’ll be roughly following the instructions from Intel. I’ll assume you’re installing to a folder on the desktop for simplicity. Download OpenVino for Raspberry Pi (.tgz file), then copy it to /home/pi/Desktop and untar it with tar xvf filename.tgz.
The install scripts need to explicitly know where they are located, so in the OpenVino folder, enter the /bin directory and open setupvars.sh in any text editor. Replace with the full path to your OpenVino folder, e.g. /home/pi/Desktop/inference_engine_vpu_arm/ and save.
The later scripts need this script loaded, so enter sudo nano /home/pi/.bashrc and add ‘source /home/pi/Desktop/inference_engine_vpu_arm/bin/setupvars.sh’ to the end of the file. This will load setupvars.sh every time you open a terminal. Close your terminal window and open it again to apply this change.
Next we’ll set up the USB rules that will allow the NCS2 to work. First add yourself to the user group that the hardware requires with sudo usermod -a -G users "$(whoami)". Log out, then back in.
Enter the install_dependencies folder of your OpenVino install. Run sh install_NCS_udev_rules.sh. Now if you plug in your NCS2 and run dmesg, you should see it correctly detected at the end of the output.
Intel’s documentation now shows us how to compile a single example application. We’ll compile more later. For now, enter /deployment_tools/inference_engine/samples and run:
$run mkdir build && cd build
$cmake .. -DCMAKE_BUILD_TYPE=Release -DCMAKE_CXX_FLAGS="-march=armv7-a"
$make -j2 object_detection_sample_ssd
Compiling Other Examples
Compiling the other examples is less straightforward, but due to our initial setup, we can expect some success. My goal was to get face recognition and pose estimation working, so I stopped there. Object detection, classification, and some type of speech recognition also appear to have compiled correctly.
Before we try to compile the samples, it’s important to note that the pretrained AI models for the samples aren’t included in the Raspberry Pi OpenVino installer. In the normal installer, there’s a script that will automatically download them all for you – however no such luck with the Raspberry Pi version. Luckily you can download the relevant models for the application samples. In case that link breaks one day, all I did was look for URLs in all the scripts located in the model_downloader folder in the laptop/desktop version of the OpenVino installer. Alternatively, if you have OpenVino installed on another computer, you can copy the models over. I installed them to a folder named intel_models on the desktop, and the commands below assume you’ve done the same.
With that out of the way, enter /home/pi/Desktop/inference_engine_vpu_arm/deployment_tools/inference_engine/samples and open build_samples.sh in any text editor. Replace everything after the last if block (after the last “fi”) with:
build_dir=/home/pi/Desktop/
mkdir -p $build_dir
cd $build_dir
cmake .. -DCMAKE_BUILD_TYPE=Release -DCMAKE_CXX_FLAGS="-march=armv7-a"
make -j8
printf "\nBuild completed.\n\n”
Now run ./build_samples.sh, for me this ran for about 3 hours before failing at 54% complete. However, several of the sample applications had compiled correctly by then. At this point, you should be able to enter the directory: deployment_tools/inference_engine/samples/build/armv7l/Release and run:
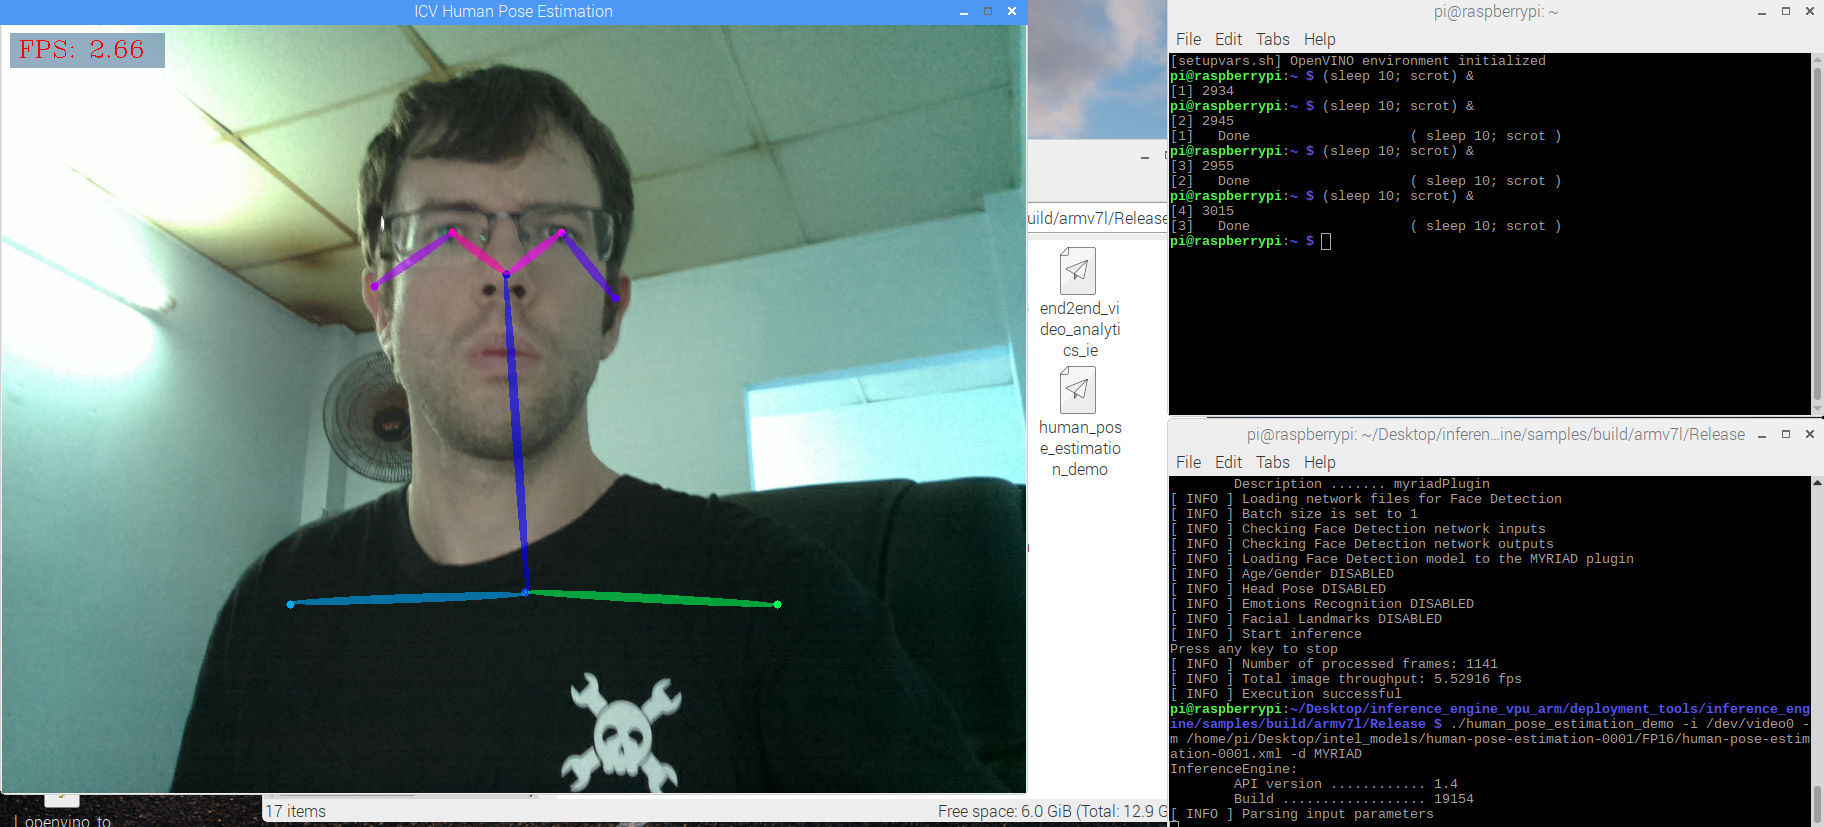
./interactive_face_detection_demo -d MYRIAD -i /dev/video0 -m /home/pi/Desktop/intel_models/face-detection-retail-0004/FP16/face-detection-retail-0004.xml
Or for pose estimation:
./human_pose_estimation_demo -d MYRIAD -i /dev/video0 -m /home/pi/Desktop/intel_models/human-pose-estimation-0001/FP16/human-pose-estimation-0001.xml
As for silly mistakes I seem to keep making, remember to use modprobe as described earlier to make the Raspberry Pi camera accessible as /dev/video0, and remember to actually plug in the NCS2.
Overall, performance is something like 18FPS for facial recognition and 2.5FPS for pose detection, very similar to performance on my laptop. That’s good enough to open up a few applications I had in mind.
Other than that, I’ve learned that while AI taking over the world mainly makes for very entertaining stories, with only a few afternoons of careful assistance, it is presently able to take over a sizable proportion of my desk.


“Now run ./build_samples.sh, for me this ran for about 3 hours before failing at 54% complete.”
Wondering if there’s a Raspberry Pi 3 Model B+ VM? Might speed things up, and lower the cost of failure.
qemu should be able to do this without too much trouble – https://azeria-labs.com/emulate-raspberry-pi-with-qemu/ shows an example. Now your Pi is running with 4GHz, 8 GB of RAM and 4 cores.
That looks very interesting. I hadn’t noticed that before. I was planning on using this actually:
http://kmdouglass.github.io/posts/how-i-built-a-cross-compilation-workflow-for-the-raspberry-pi/
But hadn’t quite gotten to it yet.
And ya, I ended up just doing most of my big compiling on the Pi overnight running off an SSD for now (so that the SWAP file would be faster).
Performance will probably be better, but since it’s not accelerated it’s not hugely faster. Being able to give it extra ram can make a huge difference in ability to compile things like chromium or firefox though.
you could probably set up cross compilation, or give the pi some swap so it won’t run out of memory during compilation
Yes, exactly. So PINTO0309 shows how to set up a larger swap for that reason. And I ended up running the Pi off of a decent SSD (Samsung 850 Evo) so that the swap was nice and fast.
Somehow, this hadn’t even occurred to me! I just planned my workflow so that the Raspi would compile while I attended a meeting. Probably a VM or cross compiler would have been more practical and I wouldn’t have to bend my workflow around the compile time.
https://xkcd.com/303/
Cross compiling is a thing, I swear I’ve even seen a article here on HaD about doing that with a rPi as target environment.
no volunteers? must have been a lonely Christmas :(
Great article. Thanks for the detailed log! This has been on my TODO list for a while as well. This article is just the push I needed.
So as of today Intel released a newer OpenVINO which is much easier to get running on the Pi:
>>>Compiled for Raspbian* 9 OS (ARM* CPU) including python2, python3 bindings, GStreamer* and GTK* support.
I’m going to try it soon, but just a heads up that it probably removes a lot of the headache from the last version (released in late December, which is what I’ve been using and the author here is probably also using – unless he did all of this just this morning!).
Best,
Brandon
I must be the only one who thought the late December release of OpenVino was easy to install !!!
Ha. So it wasn’t bad. It just took a while. The newer one will probably require a lot less compiling, but I haven’t tried it.
Mine was a little more work because I also loaded Intel Realsense 2 for Python as well on the Pi, compiling that from source as well.
Thanks for the tip, I’ll give it a try soon!
Neural Compute Stick is USB3 since a lot of bandwith is required, how does this behave on the slow RPi USB port ?
Yes, that’s an unfortunately bottleneck right now (the datapath on the Pi when used with NCS2 over USB). It reduces performance by a factor of about 5 from what the NCS2 can do.
Worse, the video has to go through the Pi CPU first, then over USB to the NCS2 (that’s the crux of the issue, actually). It’s actually why I’m making a carrier board (see other post) right now for the Raspberry Pi 3B+ Compute module, which will have the Myriad X directly.
It’s still good though, at ~12FPS at 640×480 video doing object detection (at close to max CPU). It can just be 60FPS with 0% CPU w/ the same hardware/cost w/ the carrier board, which is why I’m making it.
Thats pretty interesting. Over what bus do you let it communicate on your carrier board?
It would be interesting to do what the Google AIY Vision Bonnet does. It takes the Pi camera input on the vision bonnet, lets it run through the Myriad and then pipe it back to the Pi.
It’s unfortunate that they wont sell it outside the kit.
Do you have a repo for your carrier board?
Hah. You have a hilarious name.
So the carrier board would interface back to the Raspberry Pi compute module (CM3B+) over USB. The KEY difference is the dual-camera input would go STRAIGHT to the Myriad X, so that it does the camera de-warp, disparity-depth, and neural network work BEFORE it gets to the Pi.
So it can just export JSON blobs of information (say, bounding box, xyz object location, etc.) to the Pi over USB. So even 9,600 UART would be sufficient for that. And super-low-processing on the Pi side.
The nice part of doing it over USB is, though, that you can still pass through video too. So that if the Pi wants the video, or depth map, or whatever, it can have it streamed over USB. Which is fine itself – the Pi can handle a video input fine – it just struggles when it has to do all the other stuff, which is what the carrier board eliminates off of the Pi’s workload because it leverages the Myriad X’s dedicated hardware to do it all.
Anyways, we’re in the process of speeding up a website and forum so folks can comment/iterate/guide the boards we’ll make. In the meantime (and after), we have this initial project up here:
https://hackaday.io/project/163679-aipi
The goal of the website we’re making is to help all the folks trying to do this embedded computer/machine/ML vision help them find relevant parts/tools/etc. There are SO many now. So that will be one of the first things we post.
And then overall allow everyone to pool their resources/what they’ve found. And then we can help also by turning boards in response to what folks are wanting on there.
Best,
Brandon
luxonis.com
Ah awesome!
Btw. the vision bonnet doesn’t use USB at all. Seems they communicate over UART or so and the video comes through the usual DSI camera connector. If you use the CM its of course no big trouble to connect to USB but maybe saves the USB port for some other tasks.
Great write-up! So in case you haven’t seen it yet, PINTO0309 has a great article on getting a lot of NCS2 + Raspberry Pi stuff running at well. Including MobileNet-SSD object detection using the Raspberry Pi and the NCS2.
https://github.com/PINTO0309/MobileNet-SSD-RealSense
He also has it working with the Intel RealSense camera, which then gives you depth as well. I’ve played with it a lot (including with the RealSense), and it’s super useful
Here’s a GIF of it running the object detection on the Raspberry Pi + NCS2 with a webcam:
https://github.com/PINTO0309/MobileNet-SSD-RealSense/raw/master/media/24.gif
And if you missed the other Hackaday (written by Lewin Day about Lew Wright’s work), check this out:
https://hackaday.com/2019/01/25/robot-cant-take-its-eyes-off-the-bottle/
He references PINTOs github as well.
Also I’m actually working on a custom board for this that has the Myriad X onboard, two raspberry pi camera connectors (for stereo vision, more on that later), and a slot for the Raspberry Pi Compute Module 3B+.
Why?
When the video has to flow through the Rapberry Pi from a camera, over USB, and to the NCS2, the Pi has to do a lot of unnecessary video shuffling – which uses up the CPU while also limiting the framerate.
For example with 640×480 video with a Pi 3B+ and a NCS2 running MobileNet-SSD object detection, the max is around 12FPS, at a high Pi CPU use.
With the board above the cameras go directly to the Myriad X (instead of through the Pi host first), so MobileNet-SSD runs at about 60 FPS instead of 12FPS (or a 5x improvement), and also then has 0% impact on the RPi CPU, as the whole video path is on the Myriad X.
So a 5x improvement while also taking the RPi CPU use from ~70% to 0%.
And even better, the Myriad X can do real-time depth estimation from stereo cameras. So the dual-camera option allows you to do that too if you want, with 0% CPU impact on the RPi, as the Myriad X SHAVE cores do all the work.
And stereo vision + object detection is SUPER POWERFUL in robotics (and I’m sure a bunch of other applications I can’t think of), I’ve recently discovered. As you can know what objects are, and a real-time answer to where they are in 3D space. So interacting with the physical world is then super-easy and real-time. And if the Pi CPU is not loaded down doing video shuffling, it leaves a lot of room for end-use processing.
Anyways, getting a website up now for those who are interested in getting one of these PCBs. Going to open-source the hardware design and also do a Crowd Supply so folks can order it.
Best,
Brandon
Or one could wait till later February for the RealSense Tracking Camera T265.
@Ostracus – that camera (the T265) is the Myriad 2 actually. It’s confusing, but the Myriad 2 is what’s in the NCS1. So it’s the older one that’s 6x to 8x slower than the Myriad X.
This article is talking about the NCS2, which has the Myriad X in it. And my board is based on the Myriad X, not the Myriad 2, so it enables ~6x to 8x the speed of the Myriad 2 (and that camera).
Thoughts?
Also over USB the Myriad 2 (in the NCS1) gets ~5-6FPS on the Raspberry Pi 3B+ where the Myriad X (in the NCS2) gets about 11-12FPS. So this isn’t the 6x-8x you’d hope for. And the ‘why’ is the inefficient data path through the Raspberry Pi when the video has to go out through USB to the stick.
With the carrier-board approach, the video (camera) feed can go directly to the Myriad X. So that you do see the 6x-8x speedup (and actually higher than that when used with the Raspberry Pi, as the Pi CPU limits even the NCS1).
Thoughts?
Would love to see your crowd supply link and let me know when it’s available – couldn’t get to your website. appears to be down.
Just set up a brief/background project on Hackaday.io for tracking:
https://hackaday.io/project/163679-aipi
Will also get more info up on my website probably early next week. Right now we’re digging into the design itself.
Absolutely a sensible approach – if you can actually get the silicon and documentation.
Putting a kind of “man in the middle attack” in the CSI-2 pipeline between the camera and the Pi is much more efficient – it’s designed to be a high bandwidth pipe, without the constraints of USB2 and without double handling the video frames out over USB and back in again.
I want that board. Noticed the Google Edge TPU is going to deploy with the same format as you describe. Any idea of performance comparison between Myriad X and the Edge TPU?
Thanks! I too want it so bad, and I figured if I did so would a bunch of others here on Hackaday, so I’m kind of going all-in on it right now. Also feel free to either reach out on my website or brandon at luxonis.com and I’ll add you to our list.
Re: Edge TPU vs. Myriad X
Great question!
So the Edge TPU looks absolutely AWESOME! I’ve been anxiously awaiting it since the day it was announced.
So on performance, here’s how I think it’ll shake out:
Neural Inference (e.g. MobileNet, MobileNet-SSD, tinyYOLO, etc.):
Equal, or pretty close to it.
The Myriad X is about 1 TOPS for neural inference, and the 3 other TOPS are dedicated to vision-specific stuff, like depth estimation from stereo pairs.
So what sets them apart?
The Myriad X has a HUGE advantage if you want to do depth processing, which itself is SUPER useful when combined with object detection (PINTO0309’s github gives good examples). It can actually compute 3 stereo pairs of depth in hardware (using it’s 16 SHAVE cores). That’s right, 6 cameras!
So in short:
Use Edge TPU (when it’s out) for single-camera neural network stuff.
Use Myriad X for stereo-vison + neural network stuff.
And in the form of a neural compute stick, you kind of lose a TON of the sweet functionality of the Myriad X (hence the board I’m making).
On that, here’s an example of stereo-vision + object detection on the Pi:
https://photos.app.goo.gl/r5QF4bmapz61HTVeA
In this case I used the realsense D4 stereo-depth processor built into the realsense D435 (using PINTO0309’s github, which is great!) because using the NCS you can’t directly connect cameras of course (so you can’t use it to do the stereo depth processing).
That’s with the NCS1 and with the NCS2 it’s about 12FPS, both on the Pi.
Oh so the Google AIY Vision kit (below) uses the Myriad 2, and then you can use a Pi Zero:
https://aiyprojects.withgoogle.com/vision/
Since Google is now developing their own kind-of-competitor to the Myriad X (the Edge TPU), they’ll probably not make the equivalent for the Myriad X for the Pi (which is where I come in!).
Your board sounds interesting …. Put my name down on your potential customer list!
I just messaged you via your website.
Thanks! Just reached out there too and added you to the list. I’m going to write up a hackaday.io project now mainly so we can have a better place to discuss. I’ll link it back here.
And we’ll probably have a basic bit up on our website soon-ish too.
That’s great. I’ll be in on that discussion. Look forwards to it.
Here’s the initial project:
https://hackaday.io/project/163679-aipi
Brandon, how are you able to get access to the Movidius X chip? Both me and Kwabena from OpenMV have been trying but Intel wants tight NDA’s and $500K for their MDK.
Did they finally relent on their demands? Or are you an official channel that those of us who want to build on it can go through?
Reach out to me at brandon at luxonis dot com. Would be better to do a call.
Seems machines can figure it out with garden variety stuff.
https://www.eurekalert.org/pub_releases/2019-01/cuso-asc012819.php
Hey, that’s a cool idea. I know some local universities that would love to try that out for their computer vision projects. I’ll keep an eye out for it.
The results with one NCS2 seems to be very low (5FPS) ? I did some test with Google AIY with Intel Bonnet on Pi Zero and it was fast (face detection at 15fps)
Great point/question. I’m glad you brought this up.
One note is the data path with the Google AIY is more efficient. That’s probably the reason for the performance boosts you see with Myriad 2 on even the Pi Zero vs. Myriad X on a more powerful Pi.
So AFAICT the NCS1 loses about 40% of its performance when run on the Pi3B+ because of the data path issues. And the NCS2 loses about 80% of its performance because of the same issues.
The data path issue when using the Myriad * in NCS form factor is that all the video frames have to traverse the CPU first and be shuffled out over USB.
The AIY Vision Kit is a good example of getting rid of this data path issue, for the Myriad 2. And so if I’m understanding your data points correctly, that solution ends up faster than newer hardware, simply because of the more efficient data path.
Hi Jean-Philippe Encausse and everyone!
Just wanted to update that we do have the Myriad X working connected directly to image sensors (getting the Pi out of the middle) and it does increase the framerate considerably (at least 2x) while also reducing load on the Raspberry Pi a lot (from 220% to 35% CPU use). More details here:
https://hackaday.io/project/163679-luxonis-depthai/log/169343-outperforming-the-ncs2-by-3x
And if you’re interested please do subscribe to our CrowdSupply!
https://www.crowdsupply.com/luxonis/depthai
I was thinking of getting one but then ran across the page for googles edge TPU and decided to wait since I have plenty of other projects going already, haven’t heard anything new in awhile but hopefully it isn’t a dead project. https://aiyprojects.withgoogle.com/edge-tpu/
I actually have an Edge TPU on order. Will be standing up a central place to share results on this stuff. I also have a BM1880 on my desk, but haven’t been able to play with it yet. :-(
I’ve just submitted my project:
https://hackaday.io/project/161581-ai-equiped-wasp-and-asian-hornet-sentry-gun/
to the Hackaday Tip Line. It uses two deployment systems – Raspberry Pi and Jetson TX2 and two networks: MobileNet SSD and blvc Googlenet. Apart from deploying the networks, I’m also training them on my own image sets, which is quite fun!
I had seen that. And actually one of the first guys who’ll be using our board actually reached out to us specifically because of your post. Heh. He wanted to make sure that he could do what you did, but for a paintball gun.
And I meant to say, I love that application. Thanks for the write-up. I’ve been doing some semantic segmentation on the Tx2 as well. It’s not super-great yet, and I think there are many ways to make it both faster and more accurate with networks tuned for it.
Paintball is a bit of an overkill to get wasps.
Heh, meant to mention the targets may change, but turret/etc. w/ AI is the goal. :-)
That was my self deprecating British sense of humor.
Hah, love it.
Would these compute sticks be useful for encoding video to HEVC?
No, but a Nvidia GPU can be.
Yes, the Myriad X is helpfull when it comes to 4K encoding. The enhanced ISP AND the 16 SHAVEs (VLIW cores), the LLVM-based compiler and a clever fast internal bus are esential. The neural network stuff .. mentined in this articel … isn’t (besides the array of MAC blocks) of any use here.
One of the problems with this stuff is that it’s basically impossible to get any access to Movidius silicon – except in the NCS form factor. Completely closed, locked down ecosystem with no open documentation and datasheets, no access to the chips, NDA and half a million bucks to get a foot in the door.
So we are trying to make that a bit easier (similar to what UP AI X already did for PCIE access) by making a carrier board for the Movidius X, which the Raspberry Pi Compute Module can dock to:
https://hackaday.io/project/163679-aipi
We’re just starting on it now, but hope to really move on it and get samples out soon. We’ll be putting up a CrowdSupply for ordering when the time is right as well.
So I’m hoping for the maker market (and probably also others) this will be a really nice form factor. A board that’s similar in ports to the Raspberry Pi itself, which has the Movidius X on it and 2 camera connectors, and a slot for the Raspberry Pi Compute Module.
Thoughts?
I was able to run demos on my tinerboard. I installed armbian and changed some files.
i cant find .tgz file (;
I made a git repo to install opencv, openVino and run Face detection of images and video based off the ideas here. It should help those looking to get this running a hand.
https://github.com/s3540645/Raspbian_NCS2_Facial_Detection
It doesn’t have pose detection but I might add it if people take an interest
Just got 7 of them from a thrift store need to setup my old hp server for remote access , I have 32gb and 2x quad core cpus and a tb of sas ssd’s on the old proliant 2u just needs the USB 3.0 add in pcie card .any thoughts?