A picture of the JagerMachine consisting of rectangular, desktop sized drink serving machine with a wooden varnish, a 3.5 inch touchscreen on the front face on top and a cavity with a shot glass in it, lit up by blue leds, with liquid pouring into it.

Shoot An Email To Get A Shot

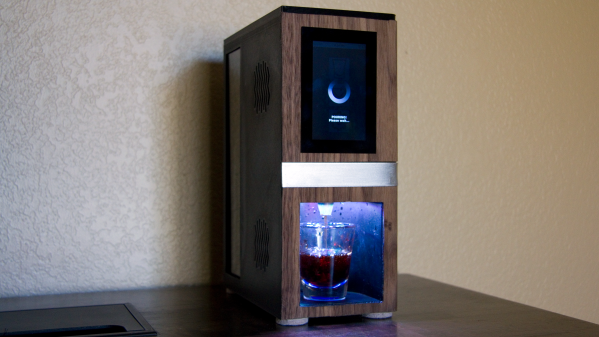
[_Pegor] wanted to create a shot pouring machine for their friends birthday. Unfortunately, the build wasn’t done in time, but at least the JagerMachine is finished now so that others can use it.

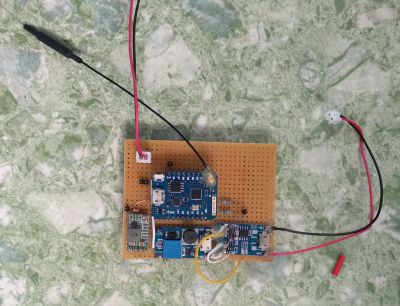
The JagerMachine has a peristaltic pump that moves liquid from a reservoir hidden in the back of the machine to the glass in front. The machine has a 3.5 inch DSI touch screen display for user input and a WS2812B LED ring for creating a small light show when the drinks are served. A 3.3 V to 5 V level shifter is used to power the LED ring and a motor driver module is used to drive the peristaltic pump motor. It looks like there’s a “shot glass detection” feature that uses a 3D printed mini platform with a notch for a magnet so that when a glass is placed on top of it, the hall sensor can detect the presence of the nearby magnet.

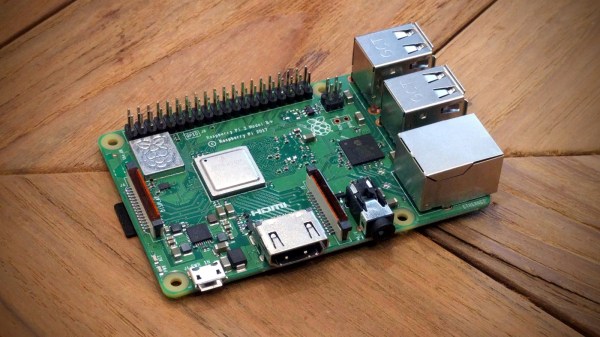
Part of the charm of this project is the software stack on the Raspberry Pi that allows for novel interaction, including being able to serve drinks from the receipt of emails. Using the Raspberry Pi as the controlling device allows for this rich set of interfacing options, including easily allowing the ability to drive the LEDs, detect the presence of the shot glass, along with establishing network connectivity. The setup procedures are all documented in the repository for anyone wanting to see how this type of functionality might transfer to their own project.

Drink mixing robots are, of course, a thing. ranging from small and cute to full shelf.

Sunrise, Sunset, Repeat

Sunrises and sunsets hardly ever disappoint. Still, it’s difficult to justify waking up early enough to catch one, or to stop what you’re doing in the evening just to watch the dying light. If there’s one good thing about CCTV cameras, it’s that some of them are positioned to catch a lovely view of one of the two, and a great many of them aren’t locked down at all.

[Dries Depoorter] found a way to use some of the many unsecured CCTV cameras around the world for a beautiful reason: to constantly show the sun rising and setting. Here’s how it works: a pair of Raspberry Pi 3B + boards pull the video feeds and display the sunrise/sunset location and the local time on VFD displays using an Arduino Nano Every. There isn’t a whole lot of detail here, but you can probably get the gist from the high-quality pictures.

If you wanted to recreate this for yourself, we might know where you can find some nice CCTV camera candidates. Just look through this dystopian peephole.

Thanks for the tip, [Luke]!

AI On Raspberry Pi With The Intel Neural Compute Stick

I’ve always been fascinated by AI and machine learning. Google TensorFlow offers tutorials and has been on my ‘to-learn’ list since it was first released, although I always seem to neglect it in favor of the shiniest new embedded platform.

Last July, I took note when Intel released the Neural Compute Stick. It looked like an oversized USB stick, and acted as an accelerator for local AI applications, especially machine vision. I thought it was a pretty neat idea: it allowed me to test out AI applications on embedded systems at a power cost of about 1W. It requires pre-trained models, but there are enough of them available now to do some interesting things.

You can add a few of them in a hub for parallel tasks. Image credit Intel Corporation.

I wasn’t convinced I would get great performance out of it, and forgot about it until last November when they released an improved version. Unambiguously named the ‘Neural Compute Stick 2’ (NCS2), it was reasonably priced and promised a 6-8x performance increase over the last model, so I decided to give it a try to see how well it worked.


I took a few days off work around Christmas to set up Intel’s OpenVino Toolkit on my laptop. The installation script provided by Intel wasn’t particularly user-friendly, but it worked well enough and included several example applications I could use to test performance. I found that face detection was possible with my webcam in near real-time (something like 19 FPS), and pose detection at about 3 FPS. So in accordance with the holiday spirit, it knows when I am sleeping, and knows when I’m awake.

That was promising, but the NCS2 was marketed as allowing AI processing on edge computing devices. I set about installing it on the Raspberry Pi 3 Model B+ and compiling the application samples to see if it worked better than previous methods. This turned out to be more difficult than I expected, and the main goal of this article is to share the process I followed and save some of you a little frustration.

Continue reading “AI On Raspberry Pi With The Intel Neural Compute Stick”

The Linux Throwie: A Non-Spacefaring Satellite

Throwies occupy a special place in hardware culture — a coin cell battery, LED, and a magnet that can be thrown into an inaccessible place and stick there as a little beacon of colored light. Many of us will fondly remember this as a first project. Alas, time marches inevitably on, and launching cheerful lights no longer teaches me new skills. With a nod to those simpler times, I’ve been working on the unusual idea of building a fully functional server that can be left in remote places and remain functional, like a throwie (please don’t actually throw it). It’s a little kooky, yet should still deliver a few years of occasional remote access if you leave it somewhere with sunlight.

A short while ago, I described the power stages for this solar-powered, cloud accessible Linux server. It only activates on demand, so a small solar cell and modest battery are sufficient to keep the whole show running.

Where we left off, I had a solar cell that could charge a battery, and provide regulated 12 V and 5 V output. For it to be a functional device, there are three high level problems to solve:

  1. It must be possible to set up the device without direct physical access
  2. You must be able to remotely turn it on and off as needed.
  3. It needs to be accessible from the Internet.

The funny thing is, this hardware reminds me of a satellite. Of course it’s not meant to go into space, but I do plan to put it somewhere not easy to get to again, it runs off of solar power, and there’s a special subsystem (ESP8266) to tend the power, check for remote activation, and turn the main computer (Raspberry Pi 3) on and off as necessary. This sounds a lot like space race tech, right?

As I have a bit more code than usual to share with you today, I’ll discuss the most interesting parts, and provide links to the full firmware files at the end of the article.

Continue reading “The Linux Throwie: A Non-Spacefaring Satellite”

The Linux Throwie: Powering A Linux Server With A 0.3W Solar Panel

Have you ever had one of those moments, when you’re rummaging through your spare parts heap, and have a rather bizarre project idea that you can’t quite get out of your head? You know, the ones that have no clear use, but simply demand to be born, of glass and steel and silicon?

This time, the stubborn idea in question was sort of like a solar-rechargeable LED throwie, but instead of a blinking light, it has a fully cloud-accessible embedded Linux server in the form of a Raspberry Pi 3 Model B+. Your choice of embedded Linux board should work — I just happen to have a lot of these due to a shipping error.

There were two main challenges here: First, it would have to combine the smallest practical combination of solar panel, power supply, and Li-ion cell that could run the Raspberry Pi. Second, we’ll need to remotely activate and access the Pi regardless of where it is, as well as be able to connect it to WiFi without direct physical access. In this article we’ll be dealing with the first set of problems — stay tuned for the rest.

Continue reading “The Linux Throwie: Powering A Linux Server With A 0.3W Solar Panel”

Raspberry Pi’s Power Over Ethernet Hardware Sparks False Spying Hubbub

Have you ever torn open an Ethernet jack? We’d bet the vast majority of readers — even the ones elbow-deep into the hardware world — will answer no. So we applaud the effort in this one, but the conclusion landed way off the mark.

In the last few days, a Tweet showing a Raspberry Pi with its Ethernet socket broken open suggested the little PCB inside it is a hidden bug. With more going on inside than one might expect, the conclusion of the person doing the teardown was that the Raspberry Pi foundation are spying upon us through our Ethernet traffic. That’s just not the case. But we’re still excited about what was found.

Continue reading “Raspberry Pi’s Power Over Ethernet Hardware Sparks False Spying Hubbub”

The Raspberry Pi 3B+ As An SDR – Without The SDR!

We’ve become used to software-defined radio as the future of radio experimentation, and many of us will have some form of SDR hardware. From the $10 RTL USB sticks through to all-singing, all-dancing models at eye-watering prices, there is an SDR for everyone.

What about the idea of an SDR without any external hardware? Instead of plugging something into your Raspberry Pi, how about using the Pi itself, unmodified? That’s just what the Nexmon SDR project has achieved, and this has been made possible through clever use of the on-board Broadcom 802.11ac WiFi chip. The result is a TX-capable SDR, albeit one only capable of operating within the 2.4 GHz and 5 GHz spectrum used by WiFi.

The team had previously worked extensively with the chipset in the Nexus 5 phone, and the SDR extension was first available on that platform. Then along came the Raspberry Pi 3 B+ with a similar-enough WiFi chipset that the same hack was portable to that platform, et voilá: WiFi SDR on a Pi 3 B+.

If you’ve not looked at the Pi 3 B+ we’d like to direct you to our review. If you don’t have a Nexus 5 kicking around, and you’d like to do some WiFi-band SDR work, it’s looking like an amazing deal.

Via rtl-sdr.com.