How To Time Drone Races Without Transponders

Drone racing is nifty as heck, and a need all races share is a way to track lap times. One way to do it is to use transponders attached to each racer, and use a receiver unit of some kind to clock them as they pass by. People have rolled their own transponder designs with some success, but the next step is ditching add-on transponders entirely, and that’s exactly what the Delta 5 Race Timer project does.
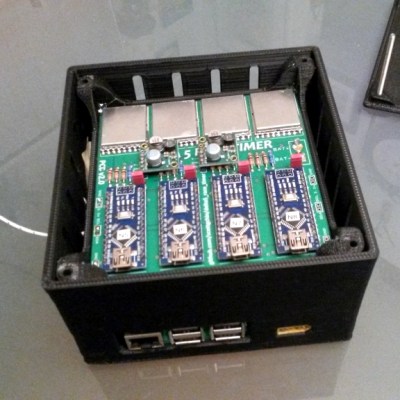
A sample Delta 5 Race Timer build (Source: ET Heli)

The open-sourced design has a clever approach. In drone racing, each aircraft is remotely piloted over a wireless video link. Since every drone in a race already requires a video transmitter and its own channel on which to broadcast, the idea is to use the video signal as the transponder. As a result, no external hardware needs to be added to the aircraft. The tradeoff is that using the video signal in this way is trickier than a purpose-made transponder, but the hardware to do it is economical, accessible, and the design is well documented on GitHub.

The hardware consists of RX508 RX5808 video receiver PCBs modified slightly to enable them to communicate over SPI. Each RX508 RX5808 is attached to its own Arduino, which takes care of low-level communications. The Arduinos are themselves connected to a Raspberry Pi over I2C, allowing the Pi high-level control over the receivers while it serves up a web-enabled user interface. As a bonus, the Pi can do much more than simply act as a fancy stopwatch. The races themselves can be entirely organized and run through the web interface. The system is useful enough that other projects using its framework have popped up, such as the RotorHazard project by [PropWashed] which uses the same hardware design.

While rolling one’s own transponders is a good solution for getting your race on, using the video transmission signal to avoid transponders entirely is super clever. The fact that it can be done with inexpensive, off the shelf hardware is just icing on the cake.

A Science Lab In Your Pocket?

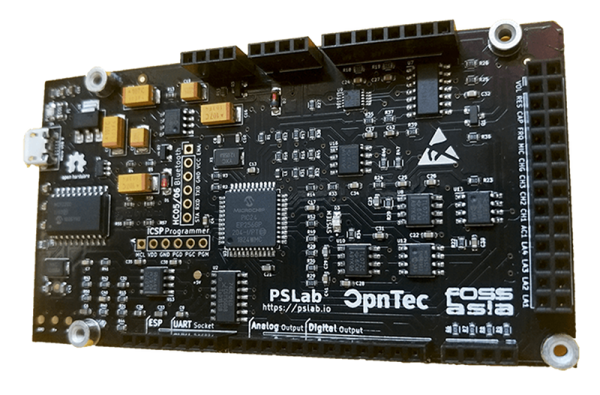
Since even the cheapest phone or computer now has plenty of horsepower, there’s been a move to create instruments that can do everything, using a reasonably simple front end and crunching data back on the host device. This is one of those tasks that seems easy, but doing it well turns out to be a lot of effort. One we recently noticed was Pocket Science Lab — a board that connects to your PC or Android phone and provides an oscilloscope, a logic analyzer, a wave generator, a power supply, a multimeter, and a few odd items such as an accelerometer, barometer, compass, and lux meter. The cost is about $65, so it isn’t a big investment. But what can it do? Read on, or you can watch the video below from Geekcamp Singapore.

The datasheet shows a reasonable device, although nothing amazing. The oscilloscope has 4 channels but only does 2 MSPS, so assuming the front end can handle it, you might visualize 1 MHz sine waves. There’s also a 12-bit voltmeter, three 12-bit power supplies with different ranges, a 4 MHz 4 channel logic analyzer, two sine or triangle wave generators, 4 PWM outputs, and the ability to measure capacitance. Finally, there’s a frequency counter that’s good to 16 MHz.

Continue reading “A Science Lab In Your Pocket?”

This Chromecast Volume Knob Has A Certain ’70s Chic

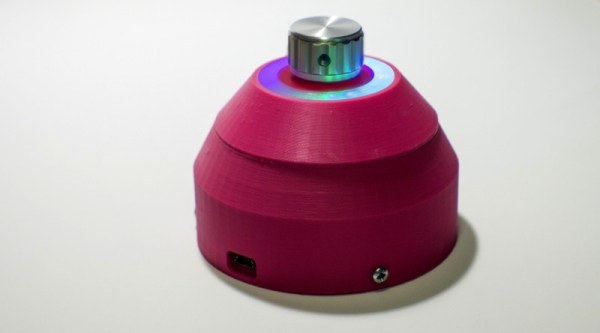
Chromecast devices have become popular in homes around the world in the last few years. They make it easy to cast audio or video from a smartphone or laptop, to a set of speakers or a display connected to the same network. [Akos] wanted to control the volume on these devices with a single, simple piece of equipment, rather than always reaching for a smartphone. Thus was built the CastVolumeKnob.

The project began by using Wireshark to capture data sent by the pychromecast library. Once [Akos] understood the messaging format, this was implemented in MicroPython on an ESP8266. A rotary encoder is used as a volume knob, and a Neopixel ring is used for visual feedback as to the device being controlled and the current volume level.

Further work was done to improve usability, with an ATtiny85 microcontroller being used to monitor the encoder for button presses before waking up the ESP8266, greatly reducing power consumption. The device is also rechargeable, thanks to an 18650 lithium polymer battery, and charger and boost converter boards. It’s all wrapped up in a sleek 3D printed case, with a translucent bezel for the LEDs and a swanky machined aluminium knob as the cherry on top.

It’s a homemade device that nonetheless would be stylish and unobtrusive in the living room environment. We imagine it proves very useful when important phone calls come in and it’s necessary to cut the stereo down to a more appropriate volume.

For another take, check out this USB volume knob with a nice weighty feel, courtesy of lead shot.

K40 Gets A Leg Up With Open Source Z Table

If you’ve done even the most cursory research into buying a laser cutter, you’ve certainly heard of the K40. Usually selling for around $400 USD online, the K40 is not so much a single machine as a class of very similar 40 watt CO2 lasers from various Chinese manufacturers. As you might expect, it takes considerable corner cutting to drive the cost down that low, but the K40 is still arguably the most cost-effective way to get a “real” laser cutter into your shop. If you’re willing to do some modifications on the thing, even better.

One of the shortcomings of the K40 is that it lacks a Z axis, and with thick material that needs multiple cuts at increasingly deeper depths, this can be a hassle. [Aaron Peterson] decided to take it upon himself to design and build an adjustable Z table for the K40 at his local makerspace (River City Labs), and being the swell guy that he is, has made it available under an open source license so the rest of the K40-owning world can benefit from his work.

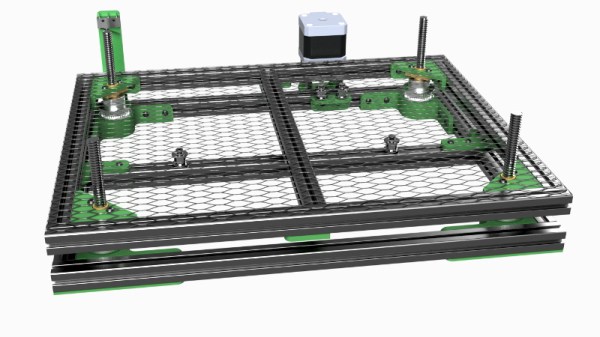
[Aaron] started the design with a number of goals which really helped elevate the project from a one-off hack to a sustainable community project. For one, he only wanted to use easily available commodity hardware to keep the cost down. The most complex components should all be 3D printable so the design would be easy to replicate by others, and finally, he wanted the user to have the ability to scale it in all dimensions. The end result is a electronically controlled lifting platform that anyone can build, for any laser cutter. It doesn’t even have to be limited to laser cutters; if you have a need for precisely raising or lowering something, this design might be exactly what you’re looking for.

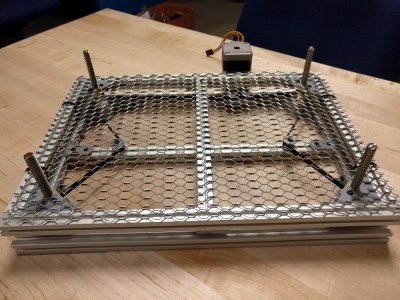
The table is primarily constructed out of 15×15 aluminum extrusion, and uses standard hardware store expanded wire mesh as a top surface. Height is adjusted by rotating the four 95 mm T8 leadscrews with a GT2 belt and pulleys, which prevents any corner from getting out of sync with the others. Connected to a standard NEMA 17 stepper motor, this arrangement should easily be capable of sub-millimeter accuracy. It looks as though [Aaron] has left controlling the stepper motor as an exercise for the reader, but an Arduino with a CNC shield would likely be the easiest route.

We’ve seen a lot of hacking around the K40 over the last couple of years, from spring loaded beds to complete rebuilds which are hardly recognizable. If you’re looking for a cheap laser with a huge catalog of possible hacks and modifications, you could do a lot worse than starting with this inexpensive Chinese machine.

Down The Rabbit Hole Of Electronics Manufacturing

If you want to build hundreds of a thing (and let’s face it, you do) now is a magical time to do it. Scale manufacturing has never been more accessible to the hardware hacker, but that doesn’t mean it’s turn-key with no question marks along the way. The path is there, but it’s not well marked and is only now becoming well-traveled. The great news is that yes, you can get hundreds of a thing manufactured, and Kerry Scharfglass proves that it’s a viable process for the lone-wolf electronics designer. He’s shared tips and tricks of the manufacturing process in a prefect level of detail during his talk at the 2018 Hackaday Superconference.

Kerry is the person behind the Dragonfly badge that was sold at DEF CON over the last two years. Yes, this is #badgelife, but it’s also a mechanism for him to test the waters for launching his own medium-run electronics business. And let’s face it, badge making can be a business. Kerry treats it as such in his talk.

Continue reading “Down The Rabbit Hole Of Electronics Manufacturing”

Linux Fu: Easier File Watching

In an earlier installment of Linux Fu, I mentioned how you can use inotifywait to efficiently watch for file system changes. The comments had a lot of alternative ways to do the same job, which is great. But there was one very easy-to-use tool that didn’t show up, so I wanted to talk about it. That tool is entr. It isn’t as versatile, but it is easy to use and covers a lot of common use cases where you want some action to occur when a file changes.

Continue reading “Linux Fu: Easier File Watching”

3D Print That Charging Dock For Your 3DS

The Switch is the new hotness and everyone wants Nintendo’s new portable gaming rig nestled in a dock next to their TV, but what about Nintendo’s other portable gaming system? Yes, the New Nintendo 3DS can get a charging dock, and you can 3D print it with swappable plates that make it look like something straight out of the Nintendo store.

[Hobby Hoarder] created this charging dock for the New Nintendo 3DS as a 3D printing project, with the goal of having everything printable without supports, and able to be constructed without any special tools. Printing a box is easy enough, but the real trick is how to charge the 3DS without any special tools. For this, [Hobby Hoarder] turned to the small charging contacts on the side of the console. All you do is apply power and ground to these contacts, and the 3DS charges.

Normally, adding contacts requires pogo pins or hilariously expensive connectors, but [Hobby Hoarder] has an interesting solution: just add some metal contacts constructed from LED leads or paper clips, and mount it on a spring-loaded slider. A regular ‘ol USB cable is scavenged, the wires stripped, and the red and black lines are attached to the spring-loaded slider.

There is a slight issue with the charging voltage in this setup; the 3DS charges at 4.6 Volts, and USB provides 5 Volts. If you want to keep everything within exacting specs, you could add an LDO linear regulator, but there might be issues with heat dissipation. You could use a buck converter, but at 0.4 Volts, you’re probably better off going with the ‘aaay yolo’ theory of engineering.

[Hobby Hoarder] produced a few great videos detailing this build, and one awesome video detailing how to print multicolored faceplates for this charging dock. It’s an excellent project, and a great example of what can be done with 3D printing and simple tools.

Continue reading “3D Print That Charging Dock For Your 3DS”