
Your thermostat is some of the oldest and simplest automation in your home. For years these were one-temperature setting and nothing more. Programmable thermostats brought more control; they’re alarm clocks attached to your furnace. Then Nest came along and added beautiful design and “learning features” that felt like magic compared to the old systems. But we can have a lot more fun. I’m taking my favorite single-board computer, the Raspberry Pi, and naming it keeper of heat (and cool) by building my own touchscreen thermostat.
Mercury thermostats started it all, and were ingenious in their simplicity — a glass capsule containing mercury, attached to a wound bi-metal strip. As the temperature changes, the contraption tilts and the mercury bead moves, making or breaking contact with the wiring. More sophisticated thermostats have replaced the mercury bead with electronics, but the signaling method remains the same, just a simple contact switch.
This makes the thermostat the prime target for an aspiring home automation hacker. I’ve had this particular project in mind for quite some time, and was excited to dive into it with simple raw materials: my Raspberry Pi, a touchscreen, and a mechanical relay board.
Hot Wiring a Heater
If you replace your standard home thermostat you find the most common setup has either 4 or 5 wires running to your HVAC equipment. These include a 24 volt AC power wire, leads to switch the heater, air conditioner, and fan, and finally an optional “common” wire, which is often used to power a smart thermostat. In order to remain backwards compatible, virtually all residential HVAC units in my part of the world use a version of this layout. A common troubleshooting technique is to “hot wire” an HVAC system — directly connecting the 24 volt wire to either the heater line or the AC line.
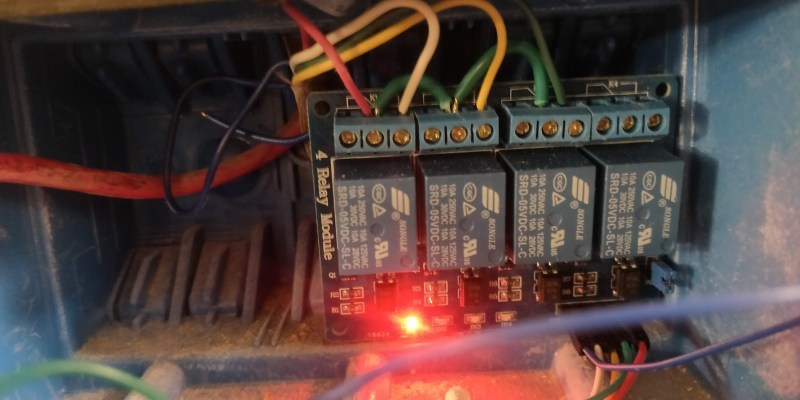
For the hacker, the takeaway is that a simple relay is perfect to drive the system. For my setup shown above, I bridge the red 24 volt line to the yellow heater line, and the system roars to life. I’m using the 4 channel relay module from SainSmart. Anything that has GPIO and can talk to a temperature sensor is enough to build a thermostat. As you all know, however, I have committed to a building a Raspberry Pi into every room in my house, and I’m using all that extra power to run the official 7 inch touchscreen as a display and interface for the HVAC. I’m also using some Adafruit MCP9808 temperature sensors, which talk to our Pis using the I2C bus.
I2C Gotcha: Never Cross the Streams
Partway through the build, I did run into a very strange problem. After a few minutes of working perfectly, the temperature sensor began returning 0C, the touchscreen stopped responding to touches, and i2cdetect thought there was an i2c device at every address. I knew the touchscreen and temperature sensor were sharing the I2C bus, so I began troubleshooting what was causing that bus to hang.
The display has 4 pins and a ribbon cable. Those pins are power, ground, and the two I2C pins. When connecting an original Raspberry Pi A or B, those I2C pins need to be wired to the Pi’s single I2C bus. Starting with the Pi A+ and B+, there is a second I2C bus dedicated to the display, physically connected through the ribbon cable. I was unknowingly connecting the display to both I2C buses, not to mention bridging the two buses together. When they happened to both talk at once, both went down. TLDR: Only connect the two dedicated power pins and the ribbon cable, not the I2C pins on the display.
Temperature Monitoring with Python and Flask
Last time, we used Python and Flask to send requests to the Raspberry Pi wired to the garage door. We’re expanding on that idea to build an HTTP interface for the Thermostat Pi as well. An HTTP request to the correct path will return the detected temperature value. Readers have pointed out the possibility of overheating the Raspberry Pis, so I’ve also added the Pis’ CPU temperatures to the list of monitored temperatures.
from flask import Flask
import smbus
import os
import time
import RPi.GPIO as GPIO
app = Flask(__name__)
GPIO.setmode(GPIO.BCM)
GPIO.setup(17, GPIO.OUT, initial=GPIO.HIGH)
GPIO.setup(18, GPIO.OUT, initial=GPIO.HIGH)
GPIO.setup(27, GPIO.OUT, initial=GPIO.HIGH)
bus = smbus.SMBus(1)
config = [0x00, 0x00]
bus.write_i2c_block_data(0x18, 0x01, config)

@app.route("/enable/<pin>")
def enable(pin):
        GPIO.output(int(pin), GPIO.LOW)
@app.route("/disable/<pin>")
def disable(pin):
        GPIO.output(int(pin), GPIO.HIGH)
@app.route("/temp/<sensor>")
def temp(sensor):
        if sensor == "internal" :
                temp = os.popen("vcgencmd measure_temp").readline()
                ctemp = float(temp.replace("temp=","").replace("'C",""))
                return str(ctemp * 1.8 + 32)
        if sensor == "external" :
                bus.write_byte_data(0x18, 0x08, 0x03)
                time.sleep(0.5)
                data = bus.read_i2c_block_data(0x18, 0x05, 2)
                ctemp = ((data[0] & 0x1F) * 256) + data[1]
                if ctemp > 4095 :
                        ctemp -= 8192
                ctemp *= 0.0625
                ftemp = ctemp * 1.8 + 32
                return str(ftemp)
if __name__ == "__main__":
        app.run(host='0.0.0.0', port=80, debug=False)
As you can see above, we’ve exposed the two temperatures as part of our RESTful interface. Now that we have access to that data, what do we do with it? Enter RRDTool.
Round-Robin Databases and Pretty Graphs
You may not be familiar with the name, but you’ve probably seen graphs produced by RRDTool, most notably in the Cacti monitoring suite. RRDTool is a simple round-robin database built on creating pretty graphs, and the idea that older data needs less resolution than fresh data. It might be useful to track temperature minute-by-minute, but usually only the last couple hours of that data. Last week’s data doesn’t need to be as granular: an average temperature for each hour might be enough. Last month, you might just care about the daily averages, etc. RRDTool lets you specify multiple round robin archives for each data source, with different time spans and granularity.
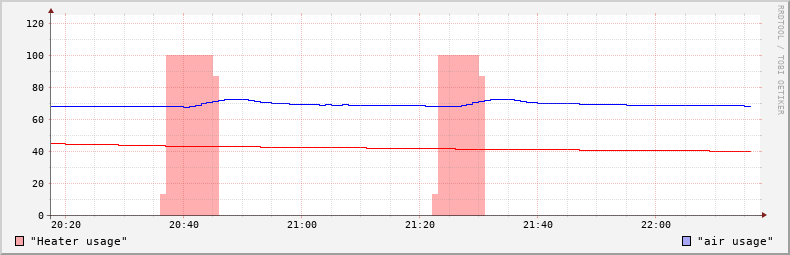
One more trick I’ve made use of is specifying a data source to track when the heater or air conditioner is running. This allows comparing temperatures to the HVAC duty cycle, which is useful for tracking down insulation and efficiency issues. Also, this data will be important for tuning the thermostat to avoid “short cycles”, when the system doesn’t run long enough to reach full efficiency, but turns on and off several times in short succession.
Stitching Together All The Parts That Make an Automatic Thermostat
Now that we’ve sorted the connection to the heater, temperature monitoring, and database, it’s time to put them all together. I’ve opted for a one-minute cycle: polling all our data sources, recording that data, and running the heater control logic every 60 seconds. To avoid short cycling, there is a temperature width setting — you could call it the system hysteresis. I’ve settled on a four degree swing: The thermostat turns on once the observed temperature drops two degrees below the target, and runs until it’s raised two degrees above it. This is the great thing about rolling your own system: you get to decide exactly how it will work.
import time
from rrdtool import update as rrd_update
import pycurl
import json
from StringIO import StringIO
starttime=time.time()
tempSensors = ("thermostat-temp-external", "thermostat-temp-internal", "office-temp-external", "office-temp-internal",
               "office-temp-outside", "garage-temp-internal", "garage-temp-external", "livingroom-hum-external",
               "livingroom-temp-external", "livingroom-temp-internal", "office-hum-outside")
#settings = {"temp": 70, "mode": "heat", "heater-width": 2, "ac-width": 2}
c = pycurl.Curl()
c.setopt(c.URL, 'http://thermostat/disable/17')
c.perform()
c.setopt(c.URL, 'http://thermostat/disable/27')
c.perform()
c.close()
state = {"activity": "idle"}
while True:
	with open('/var/www/data/settings', 'r') as f:
        	settings = json.load(f)
	f.closed
	temperatures = {}
	c = pycurl.Curl()
	for sensor in tempSensors:
		try:
			buffer = StringIO()
			c.setopt(c.URL, 'http://' + sensor.replace("-", "/")) #change dashes to /
			c.setopt(pycurl.WRITEFUNCTION, buffer.write)
			c.perform()
			temperatures[sensor] = float(buffer.getvalue())
			rrd_update('/var/www/data/' + sensor + '.rrd', 'N:%f' %(temperatures[sensor]))
		except Exception as e:
			print(e)
	with open('/var/www/data/temps', 'w') as f:
        	json.dump(temperatures, f)
	f.closed
	if settings["mode"] == "heat": #if mode heat (auto should compare to the outside temp, to figure out heat or AC
		if state["activity"] == "idle" and temperatures["thermostat-temp-external"] < (settings["temp"] - (settings["heater-width"] / 2.0)) : c.setopt(c.URL, 'http://thermostat/enable/17') c.perform() c.close() state["activity"] = "heating" elif state["activity"] == "heating" and temperatures["thermostat-temp-external"] > (settings["temp"] + (settings["heater-width"] / 2.0)) :
			c.setopt(c.URL, 'http://thermostat/disable/17')
			c.perform()
			c.close()
			state["activity"] = "idle"
	with open('/var/www/data/state', 'w') as f:
        	json.dump(state, f)
	f.closed
	if state["activity"] == "heating" :
		rrd_update('/var/www/data/heater-state.rrd', 'N:100')
	else :
		rrd_update('/var/www/data/heater-state.rrd', 'N:0')
	if state["activity"] == "cooling" :
		rrd_update('/var/www/data/ac-state.rrd', 'N:100')
	else :
		rrd_update('/var/www/data/ac-state.rrd', 'N:0')
	time.sleep(60.0 - ((time.time() - starttime) % 60.0))
Touchscreens: You’re Going to Want a GUI
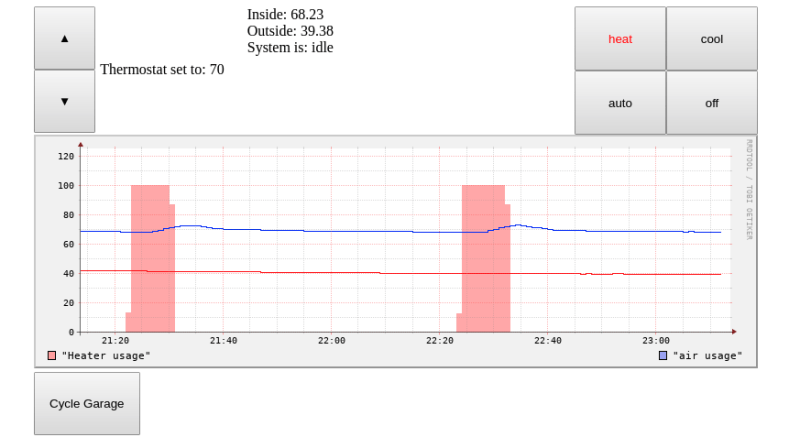
All that’s left is the user interface. The actual hardware is a Raspberry Pi 3 B+, booted over PXE, with the official 7 inch touchscreen, mounted on a 3-gang wall box. For software, we’re using Chromium in fullscreen mode, and building a webpage optimized for the Pi display’s small size. You may remember when wiring in the garage door opener, we put a single button on a web page. Today we’re expanding that page to make a central control panel.
<?php $settings = json_decode(file_get_contents('/var/www/data/settings')); $temps = json_decode(file_get_contents('/var/www/data/temps')); $state = json_decode(file_get_contents('/var/www/data/state')); if ($_SERVER['REQUEST_METHOD'] === 'POST') { if ($_POST["up"]) { $settings->{'temp'} += 1;
}
if ($_POST["down"]) {
$settings->{'temp'} -= 1;
}
if ($_POST["heat"]) {
$settings->{'mode'} = "heat";
}
if ($_POST["cool"]) {
$settings->{'mode'} = "cool";
}
if ($_POST["auto"]) {
$settings->{'mode'} = "auto";
}
if ($_POST["off"]) {
$settings->{'mode'} = "off";
}
if ($_POST["GDO"]) {
$curl_handle = curl_init();
curl_setopt( $curl_handle, CURLOPT_URL, 'http://garage/moment/20' );
curl_exec( $curl_handle ); // Execute the request
curl_close( $curl_handle );
}
$file = fopen('/var/www/data/settings', "w") or die("Unable to open file!");
fwrite($file, json_encode($settings, JSON_NUMERIC_CHECK));
}
?>
<!DOCTYPE html>
<html>
<head>
<meta http-equiv="refresh" content="60">
<img src="data:image/gif;base64,R0lGODlhAQABAIAAAAAAAP///yH5BAEAAAAALAAAAAABAAEAAAIBRAA7" data-wp-preserve="%3Cscript%20src%3D%22functions.js%22%3E%3C%2Fscript%3E" data-mce-resize="false" data-mce-placeholder="1" class="mce-object" width="20" height="20" alt="<script>" title="<script>" />
<img src="data:image/gif;base64,R0lGODlhAQABAIAAAAAAAP///yH5BAEAAAAALAAAAAABAAEAAAIBRAA7" data-wp-preserve="%3Cscript%3E%0A%20%20function%20startTime()%20%7B%0A%20%20%20var%20today%20%3D%20new%20Date()%3B%0A%20%20%20document.getElementById('txt').innerHTML%20%3D%20formatDate(today%2C%20%22dddd%20h%3Amm%3Ass%20TT%20d%20MMM%20yyyy%22)%3B%0A%20%20%20var%20t%20%3D%20setTimeout(startTime%2C%20500)%3B%0A%20%20%7D%0A%20%3C%2Fscript%3E" data-mce-resize="false" data-mce-placeholder="1" class="mce-object" width="20" height="20" alt="<script>" title="<script>" />
</head>
<body onload="startTime()">
<div style="width:790px; margin:auto;">
<div style="height:140px;">
<div style="float:left;">
<form method="post">
<input type="submit" name="up" value="▲" style="padding:25px 25px;">
</form>
<form method="post">
<input type="submit" name="down" value="▼" style="padding:25px 25px;">
</form>
</div>
<div style="float:left; margin-left:5px; margin-top:60px;">
Thermostat set to: <?php echo $settings->{'temp'}; ?>
</div>
<div style="float:left; margin-left:25px;">
<div id="txt"></div>
Inside: <?php echo round($temps->{'thermostat-temp-external'}, 2); ?>
Outside: <?php echo round($temps->{'office-temp-outside'}, 2); ?>
System is: <?php echo $state->{'activity'}; ?>
</div>
<div style="float:right;">
<form method="post">
<input type="submit" name="cool" value="cool" style="height:70px; width:100px;<?php if($settings->{'mode'} == "cool"){echo "color:red;";}?>">
</form>
<form method="post">
<input type="submit" name="off" value="off" style="height:70px; width:100px;<?php if($settings->{'mode'} == "off"){echo "color:red;";}?>">
</form>
</div>
<div style="float:right;">
<form method="post">
<input type="submit" name="heat" value="heat" style="height:70px; width:100px;<?php if($settings->{'mode'} == "heat"){echo "color:red;";}?>">
</form>
<form method="post">
<input type="submit" name="auto" value="auto" style="height:70px; width:100px;<?php if($settings->{'mode'} == "auto"){echo "color:red;";}?>">
</form>
</div>
</div>
<div style="margin:auto; text-align:center;">
<?php $opts = array ( "-w", "709", "-h", "200", "-Y", '-a', "PNG", "--start=-14400","--end=now", 'DEF:heater-state=/var/www/data/heater-state.rrd:state:AVERAGE', 'AREA:heater-state#FF000050:"Heater usage"', 'DEF:air-state=/var/www/data/ac-state.rrd:state:AVERAGE', 'AREA:air-state#0000FF50:"air usage"', 'DEF:livingroom-hum=/var/www/data/livingroom-hum-external.rrd:humidity:AVERAGE', 'LINE1:livingroom-hum#000000:humidity', 'DEF:therm-temp=/var/www/data/thermostat-temp-external.rrd:temperature:AVERAGE', 'LINE1:therm-temp#0000FF', 'DEF:outside-temp=/var/www/data/office-temp-outside.rrd:temperature:AVERAGE', 'LINE1:outside-temp#FF0000' ); $graphObj = new RRDGraph('-'); $graphObj->setOptions($opts);
try {
$ret = $graphObj->saveVerbose();
} catch (Exception $e) {
echo 'Caught exception: ', $e->getMessage(), "\n";
echo rrd_error()."\n";
}
if(!$ret){
echo rrd_error()."\n";
} else {
#var_dump($ret);
echo '<img alt="My Image" src="data:image/png;base64,' . base64_encode($ret['image']) . '" />';
}
?>
</div>
<div style="float:left;">
<form method="post">
<input type="submit" name="GDO" value="Cycle Garage" style="padding:25px 15px; margin-right:25px;">
</form>
</div>
</body>
</html>
Most of it is straightforward PHP and HTML. The most interesting element is the way the RRDTool graphs are dynamically generated at page load, and included in the html document. This allows future customization, like the ability to zoom out and see older data, or select other data sources to include.
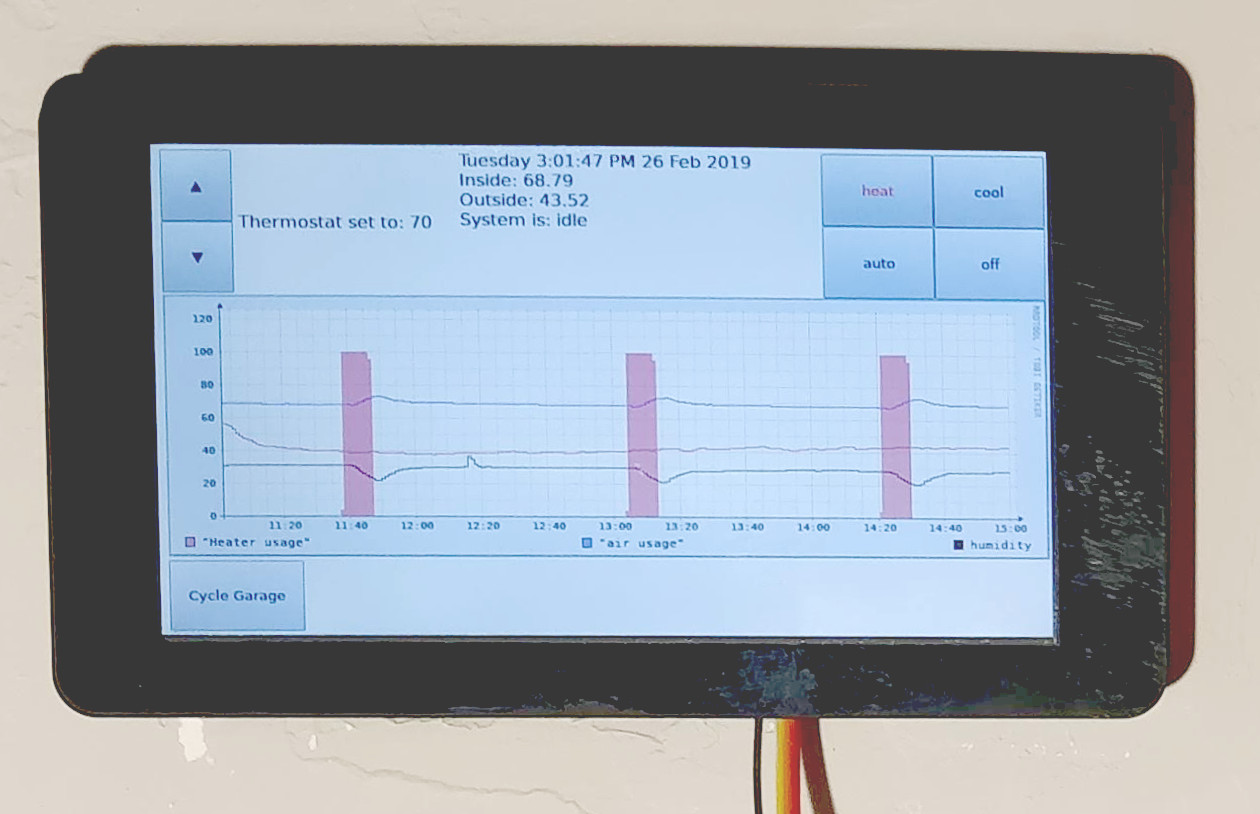
The 3D printed mount finishes the project nicely. It’s rather important to get that temperature sensor away from the heat of the Pi, in order to get an accurate reading.
We have more to come, so keep your eyes peeled, and feel free to follow me over on twitter for the occasional sneak peak or suggetions for the next step in my home automation adventure!


I was going to use a RPi3 as a thermostat controller but gave up as the power coming from my 24VAC was not enough to run it.
Unfortunately this is common problem because, at least for North America, the power to the control panel cannot exceed Class 2 (inherently limited). For those having problems sleeping, read NEC article 725, UL1310, and CSA No. 223 for the limits and material requirements. The power to the controller was never intended to provide margin for a full-up computer.
The RPi makes it easy because of the ridiculous level of processing power available in small form-factor, but is still ill-suited for embedded stuff where a full-blown OS most likely will reduce system reliability. This is where one of those ARM cortex boards shine. AF has some that run their version of Python, and PJRC makes the kick-ass Teensy boards.
I absolutely love the teensy. It’s an awesome amount of power in a tiny breadbordable form factor. Paul does a lot of work making Arduino compatible and doing work on Arduino itself.
“AF has some that run their version of Python,”
Y’know, that really pisses me off. Adafruit keeps taking open source stuff and then Adafruit-izing it, and the end result is software that is not nearly as well supported and will be unmaintained as soon as Adafruit moves on to yet another prototype board standard for yet another uC that they want to push.
You’ll need to use the R and C wire. I’d be surprised if you couldn’t runn it off that as most commercial stats need this to run. An esp running micropython would certainly work
“f you replace your standard home thermostat you find the most common setup has either 4 or 5 wires running to your HVAC equipment. These include a 24 volt AC power wire, leads to switch the heater, air conditioner, and fan, and finally an optional “common” wire, which is often used to power a smart thermostat.”
Just from a general safety point of view. If you are going to write an article that is US centric, then please state thus.
This might be how a typical US HVAC system is wired but for the rest of the world it may not be the case.
Many countries use mains level voltages.
Which because they are not in the US also happen to be closer to 220Vac or higher.
Blindly poking around in the HVAC system (a US term again) based on what you say as “the most common setup” is going to be a bad idea for many people.
There is plenty of talk on over the top safety on HaD but once in a while a post comes along which just doesn’t have enough warnings prefacing it.
This is one of those times.
What Dave said. Be safe, not sorry – use a multimeter to check!
An excellent point. I for one do not want to see our friends world wide electrocuted or burning their houses down.
But.. I would also point out that if you are going to take information off the internet to build items where electrical safety is a concern you should always consider the source. It is after all ultimately your own responsibility.
Here you go: https://www.whois.com/whois/hackaday.com
Just an aside to this, but 200+ volts really isn’t the issue is it? What I mean is that I have personally shocked the crap out of myself unintentionally fiddling with “power pairs” from a Telco. In my case one wire was about +200v the other around -200v for a difference of nearly 400 volts between them and only about 200 volts between any given wire and earth ground. Someone decided to cut the 100 pair trunk line coming into my office one day.
They did this on a weekend to disable the alarm and to steal drugs from a clinic. I was tasked with trying to get a line operational so we could call for repairs and maybe get the main line to our facility working. This is a place where cellphones don’t work for 80 miles in either direction. A field repair attempt was worth it. Telco truck roll repairs were going to take a lot longer. What I knew was we had a pool of analog lines tied to a pbx, I knew the numbers or each and I had a phone number that would read-back my caller ID if I called it. So up on a ladder with a pair of wire strippers in hand and a lineman’s handset. I figured I could just clip onto a pair and get some dial tone working then route that over some wire I had and see if I could get some temporary service until the repair folks could do their job. First problem, my first experience with “Icky Pick”. Those of you that know this stuff know what I mean, for the uninitiated its the stickiest crap I have ever seen that intended to block water in outdoor cables. Nasty stuff very hard to clean off if you don’t have a proper solvent. Soap and water doesn’t do anything.
After trying every wire multiple times all I got were some odd digital noises and nothing much. During this time my arm made inadvertent contact with at least 5 pairs of wires running at the above voltages, it caused my arm to lockup and I could not move etc. The only reason I didn’t die from the shock was because the lines were all current limited. This was the day I discovered “Pair Gain” (https://en.wikipedia.org/wiki/Pair_gain) technology. This telco used a form of DSL to consolidate 8 analog lines into 1 pair of copper wire. This was all powered from the telco side and had a box inside our telecom room that worked as an digital to analog adapter for the 8 lines. They send enough power to have each of the 8 lines power phones and supply voltage for the ringing and other analog needs as well as the analog to digital conversion stuff. Its kinda neat but at the end of the day I had to have been shocked by nearly 400 volts from multiple sources and it was annoying and painful but not likely life threatening.
You mentioned some country’s use a mains level voltage, is this more like just a pure hot lead off some breaker without anything else so really your thermostat wire could power any mains level device if you wanted?
P.S. This was a US based phone system.
“but at the end of the day I had to have been shocked by nearly 400 volts from multiple sources and it was annoying and painful but not likely life threatening.”
400v is beyond life-threatening if it’s crossing your body instead of just brushing against your arm.
Not really… Amps kill, not volts. Anyone who has worked on an automotive ignition system and been hit by coil voltage knows that … 30,000 – 50,000 volts coming your way. It will give you a start, but will not hurt you. When I was first learning to work on my VW Beetle I did it probably dozens of times!
V = IR. I = V/R. (Low) resistance kills, not amps or volts!
Get high enough resistance between you and the voltage differential, and everything’s OK. I walk under hundred kV power lines that carry enough current to power entire small cities, with impugnity. Because I know about resistance!
He did state his “part of the world” which I took to mean USA since I am also there, and his comments jibed with my thermostat wiring experiences. Still, that did require inference from experience on my part.
Just put a Honeywell wifi thermostat in my daughter’s house. For $70, it’s a bargain and it works really well. One thing it does, is “learn” the time constant of the house and heating system, so it doesn’t come on unless it’s needed. Sort of the step beyond setting a fixed hysteresis value. That’s one reason I bought it instead of building my own (Honeywell has decades of HVAC experience, so I’m sure their algorithm is better than one I could design).
Honeywell have different thermostats in different markets designed by different teams that dont talk to each other.
You could put two systems side by side at a similar price point from different markets and get wildly different results.
That’s way a company like Nest can come along, think/act differently, and beat a company like Honeywell with decades of experience at their own game.
“Honeywell have different thermostats in different markets designed by different teams that dont talk to each other.”
I see you have had the misfortune to have worked with Honeywell as well.
Isn’t it a PID controller at its core (https://en.wikipedia.org/wiki/PID_controller)? The implementation isn’t a secret and it’s used in most (every?) system where you don’t have a tight feedback loop around the effect you have on the variables you’re measuring IIRC. So thermostats, elevators, etc.
A honeywell programmable thermostat I bought in 2006 had this learning feature. It’s not anything remotely new or unique.
I wish someone would decode rheem/ruud “communicating furnace” protocol, our choices for thermostats are very limited.
At a commercial location, we had one of those non-standard protocols too. A local HVAC shop was able to fit the unit with a conversion kit that let us use a standard thermostat. It might be possible.
Yeah, I know, nobody wants to hear about how some troll would have done it with a 555. Still, I’d be a bit less nonchalant about using a raspberry pi for “IoT” devices, especially ones with the safety implications of a thermostat. A Raspberry Pi isn’t really an embedded device. It’s a full, general-purpose single board computer with a multi-tasking operating system. That means there is a whole lot more that can go wrong!
I’m just going to limit my hacking scare-mongering to this one question, what if someone hacks it? But, neverminding that, what if it simply locks up? What if it does so in the winter with the relays turned off and your pipes freeze? What if it does so with the heat on but the fans off? Might your furnace catch fire? Imagine the electric bill if you go away and the A/C gets stuck on the whole time.
A simpler microcontroler with it’s repeating loop is a lot easier to validate. It can still have a pretty touch screen, wireless or wired networking, etc… Or, if you MUST use a single board computer (like a Pi) you can put a cheap 8-bit microcontroler in between the relays and the Pi. The microcontroler could be programmed to know when the Pi is asking it to do something unreasonable (like leaving the furnace burning full blast for hours with no fans). It can intervene and save your butt..
The fans are controlled in 3 ways. Manually. When a/c is called for. And when the heat exchanger is hot. It shouldn’t be possible to leave the fan off with the burners on.
In a forced hot air system, as long as you leave the system controller alone, yes, you’re fine; the controller won’t do something dangerous, and the furnace controller is still yet another separate controller, and it also won’t do dangerous things.
If you start replacing the system controller, you’re potentially in for a world of pain and damage if things don’t go right. Then again, the controllers fail all on their own…
If you have steam or forced hot water, then there are mechanical safeties, but they often involve dumping lots of boiling water or steam, and that can cause damage to your home.
HVAC engineer here,
I agree. You could, however, arrange it like a commercial BMS (Building Management System). Where the Pi acts like the main system interface. It could show you data trends and send “set point” and or “enable” commands based on logic while the unit is being directly controlled by a basic controller that handles the specific control Loop functions, but sends the status on temp and equipment state back to the Pi for display and logging. This way if the Pi ever went down due to power or software issues, then the unit would still be under control of the basic controller. This is more or less how most commercial and industrial HVAC systems are set up.
Sometimes the Temperature sensor output is sent directly to a PLC and then that value is passed on to the equipment, or the PLC can directly operate a control loop and have the equipment slaved to it. The bottom line is that there are usually some alternative and backup operation options for these things as people get angry when their HVAC goes down.
I DIY all my home automation gear, but I was reluctant to build my own thermostat because of the consequences of failure (especially where the outside air temp is below 32F for most of the year!). The stakes are much lower when talking about turning a light on/off or unlocking a door (burglary is not really a concern in my small town).
I agreed that a microcontroller with some sane defaults in between the PI and the relays to act as a watchdog would be a solid improvement to this project
There’s a really simple solution here, which most people with vacation homes do anyway: you have a separate, mechanical thermostat for freeze protection, wired in parallel with your fancy-pants unit. Logical OR. In vacation homes, you just shut off the “normal” thermostat and temps drop to the point where the freeze protection t-stat comes on.
this. it is prudent to have a standby mechanical thermostat to fall back on. that way safety is increased with a pi controller as both the pi and standby would have to fail to create a disaster.
Stoobieboo: I like the points you bring up. I work as an embedded systems engineer in a web development company and it’s sometimes hard to communicate that you can’t just slap a fully-fledged GP computer on just any project without weighing its disadvantages (and not just price).
This is a great tutorial. But if I were to make something like this myself, I would use a combination of a raspberry pi zero w and an arduino or teensy. The arduino would be responsible for reading the signals, making decisions, and controlling the hvac unit entirely on its own. The raspberry pi would exist for advanced configuration over a GUI, plotting data, and communicating with a hub such as Home Assistant.
In this way, you have the reliability of an embedded system that can handle it all on its own, with the full-os interjecting with some more advanced features like weather anticipation.
Basically the difference between this and what you say is that instead of the embedded system intervening only in safety scenarios, it would run the show. The Pi would just sit back and watch.
Anybody know where I can find relays that can handle switching 220v electric baseboard heaters?
Plenty of relays out there can take the current demands, but these are a nice UL listed, packaged unit for a pretty reasonable price. Something that could be handed off to an electrician if you aren’t comfortable with line voltage stuff yourself.
https://www.functionaldevices.com/products/building-automation/relays/#power
Just get a quality zero cross (phase angle control would make a lot of electrical and acoustic noise for no significant benefit) SSR rated for at least twice the maximum current (better safe than sorry) and mount it on a good heatsink. Then use a standard mains transformer to power the logic and supply the zero cross reference at the same time. Hint: if minimizing standby power is important, you can use a 277V input transformer on 240V, just keep in mind the output voltage would be about 15% lower than rated.
Solid state relays would work great for this one line in one line out 0 to 10 volts to control the output. The output cold be based on a deviation from set point. The farther it is from set point the hotter it would be. This is how it’s done in commercial buildings
Flask, PHP, Raspi3: that guy is using a bulldozer to hammer a nail. To quote him: “This is the great thing about rolling your own system: you get to decide exactly how it will work.” I would add: while ignoring all the possible failure modes, and creating new ones.
Discovering failure modes and fixing them is all part of the experience. :P
I would rather not have “I one burned down my house” as one of my experiences…
Agreed, but PHP, Flask, and a Pi3 aren’t enough to burn a house down. That takes something really epicly ugly, like Java.
I’ve been tempted about doing something similar, but the desire for HVAC to “just work” has won every time. Plus the fear of explaining to a frozen wife to get the furnace working again how to navigate a command line. “Alright, type ‘sudo furnace.py -settemp 72 -fastheatup'”
The pain of running a LEAF router/firewall and then ClarkConnect, still run deep. Nothing like borking an upgrade on the thing you use to access the internet to read about how to fix things.
Now repurposing this for an HVAC *monitoring* system may be in my future…
The click, click, click of relays is my main issue. I could put them in the utility room with the furnace, but that would interfere with a quick swap to the old round thermo, should one of the “omg, hair on fire” scenarios listed above happen.
Safety is always the first thing to consider in any project!
I would like to see a material list that has “description, link to source, cost” eg:
Raspberry Pi 3+ [link to source] $35
power supply [link to source] $10
Pi Case [link to source] $15
Display [link to source] $15
4 relay board [link to source] $10
Temperature Sensor [link to source] $5
etc.
total $90
OK, that is more than I paid for a Z-Wave thermostat (Amazon $80) (I already have a Universal Devices home controller with Z-Wave) With a little software, I think I can do monitoring. For me, not cost effective, but I like the concept!
I don’t have power where my thermostat wires come out. How did you power it?
Here are some ideas for those that don’t have power or you need more wires. On the RPi side, add an nRF24 radio (Amazon $12 for 10 pcs) and on the Heater/Airconditioner side, an Arduino Nano ($2.50 Aliexpress), power supply (Amazon $10 for 5pcs), USB cable (for power supply Amazon $11 for 5 pcs) another radio, and the relay board (Amazon $10). Search for “nRF24 mesh network” to learn how to make the radios talk. If the distance is too far, relay the signal with an additional nano(s).
4 oz yogurt containers make good cases, but you’ll want something more robust for the relay board.
Then your RPi with its temperature sensor can be anywhere.
Yes, this will require soldering, making/and or modifying cases and mounting them.
So to put in wireless wires, the cost is about $35 + case, wires, solder, etc.
Aliexpress: way cheap prices. I have found quality from excellent to acceptable. There are knock-offs, forgeries and facsimiles (I’d be wary buying an RPi). While shipping is often times free, delivery can take 90 days!
My experience with non-US HVAC HaD is that the control lines, while line voltage, are turning relays on and off. Relays are low current and the relays for Arduino and RPi are usually 240V and 10A.
I have learned many times that electricity is dangerous. I am very careful and do my work as if my lines are live, even though I know that they are not. I have no desire to learn this lesson a final time!
I’m powering with PoE, pulled a bunch of Ethernet when I remodelled.
And a BOM? (Would be sooo appreciated! :)
Any github to have the full code of this project?
I was wondering if someone tied to the thread could help me. I plan on doing a very similar project, but i want to make some additions with multiple temp sensors, monitored weather to add to recorded data and present current and forcast on display. I predict my biggest problem will be recording weather forcasts and adding it to the data.
https://openweathermap.org/api will help you out there.
I was once a production developer but basically an idiot outside of my expertise. What I see here is typical amateur/expert stuff. Can you pretend that some of the people trying to build this don’t have a clue (me)? although, I’m not a complete idiot, my main computer is Ubuntu with multiple VM’s for different tasks and levels of security.
So,
I’d love to try this but need a ordered list of what to do. Starting from my just getting avraspberru PI B+ in the mail to a tested finished product. eg, install operating system ???. packages ???. what directories? what hardware … how.
You have multiple pieces of code… How do they actually fit/work together?
You’ve got something great started but I don’t understand how to put it together? Then again maybe you’re publishing for those with a lot more experience than I have?
Thanks
Steve
Steve, I think it would be an eye opener for some of the gurus if one of us guys that knows enough to be dangerous documented our efforts to accomplish one of these hacks. I too feel like they assume we all are at some level of expertise and they speak to that level.
This is a pretty old thread so I’m not sure if anyone is reading it anymore, but I’d like to help anyway that I can. Jonathan was right the best way to set this up would be with an arduino as the controller. I’ve taken apart an electric space heater and used an arduino to control the operation of it to heat a room and it works great. I’ve also turned an arduino into a stat for a garage heater (didnt hook up wifi but did make it bluetooth).
The one thing I’ve noticed from peoples code for programming a stat is that they worry about getting the temp too much. You really only need to get the temp every 1 to 2 minutes. 2 things to think about heat anticipater and a cool anticipater (if you dont know what they are look it up please). There is also no reason to get the temps in xx.x format unless you just want an extra digit.
Just in case you want to trend the data from the space and collect all the temp readings you can say every 15 seconds you can send the readings to a data base but like I said before I wouldnt have the reading on the display change until 1 to 2 minutes have passed. The last thing you want to do is short cycle your furnace or ac. Short cycling your furnace will never allow your house to heat to the setpoint at a minimum, and short cycling the ac will ruin your compressor. That’s why I felt like expanding on why reading at a longer time interval is not a bad thing.
As far as the wiring goes if you used a pi to power a arduino you could wire a battery backup in parallel
This way if your pi failed you would have time to get it back up and running.
The last thing that would be advisable for setting up a smart stat would be to get the outdoor temp. This way you could set up a block in the code to not allow the ac to run if the outdoor temp is under 50 (that’s a minimum temp 55 would be better). If you want extra savings from say a stupid mistake like your ac runs the temp of the house to 70 and the furnace turns on or the other way around dont forget to put logic in for that too :)
So are you using Arduino because that is your goto device? I am just entering this fray, and was looking at using a GPIO board with a PI. Is there something we newbies need to be aware of that requires 2 separate controllers like this? Also, does it make sense to go back to an older pi instead of say a 3 or 4?
I use an arduino for the simplicity. I’m not a fan of “learning” thermostats, but like I said I’ll help anyway possible. If you are making this stat to save money just lower or raise the set point of a cheap single stage stat off the shelf from a box store by 2 to 3 degrees it will save more time and headache. I’m sure I’ll get roasted for that last statement so I better explain. Most newer mid tier 2 stage furnaces have a little controller on the board so if you have a single stage stat it will still run both stages of the furnace all you have to do is set up the dip switches correctly. This is also the same for 2 stage cooling used to take humidity out of your house. For those reasons I would also say keep the stat as simple as possible. The other big reason is that I dont see a reason for setback in the thermostat especially for a home is because of time.
Time is very important in how much those stats save you. Are you setting the stat to “away” an hour before you leave and setting it to warm up or cool down 2 to 3 hrs before you get home? The other common time I see it set different is at night. I should make a disclaimer too, I live in Minnesota so we have very cold winters and hot humid summers that’s where I got the 2 to 3 hrs to warm the house up before you get home, I’ve seen it many times on nests that it will take that long before the space heats 5 degrees.
What you want to use for the project will work just fine for making a stat. I’ve just had better luck with the arduino for reliability. It would also be cheap and easy to replace it.
I have a smart thermostat. Doing this for fun and learn more about oi, Ohio. And possibly pithon or whatever code they use. Also interested in slowly automating house. Add temp, humidity, light, occupancy sensors in each room. Maybe add dampened to control which rooms get conditioning. Have some lutrin lighting. About to add caseta interface to control them. I’m in South central Texas.
awesome project! I’ve adapted your code a bit to fit my purposes. I’ve been scratching my head for a while to figure out how what to put into those rrd files. I only have the thermostat central unit, indoor, and an outdoors sensor, which is good enough for my small apartment. The one outside runs on a ESP32. Maybe I’ll add another ESP32 to handle most of what is currently being done by the RPi3 and use the latter just for collecting data and graphing, as suggested by many comments here. I’ll also integrate the openweathermap API. Anyway, it’s been fun and I would have never though of using python and flask before coming across this page, but they work like a charm and are so easy! Thank you