Hack My House: UL Certification And Turning The Lights On With An ESP8266

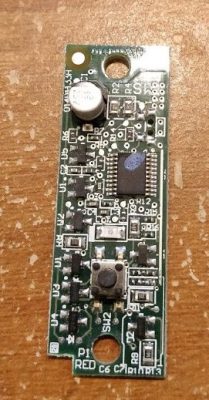
It’s hard to imagine a smart house without smart lighting. Maybe it’s laziness, but the ability to turn a light on or off without walking over to the switch is a must-have, particularly once the lap is occupied by a sleeping infant. It’s tempting to just stuff a relay in the electrical boxes and control them with a Raspberry Pi or micro-controller GPIO. While tempting, get it wrong and you have a real fire hazard. A better option is one of the integrated WiFi switches. Sonoff is probably the most well known brand, producing a whole line of devices based on the ESP8266. These devices are powered from mains power and connect to your network via WiFi. One disadvantage of Sonoff devices is they only work when connected to Sonoff’s cloud.

Light switches locked in to a cloud provider are simply not acceptable. Enter Tasmota, which we’ve covered before. Tasmota is an open source firmware, designed specifically for Sonoff switches, but supporting a wide range of ESP8266 based devices. Tasmota doesn’t connect to any cloud providers unless you tell it to, and can be completely controlled from within a local network.

Certifications, Liability, and More

We’re well acquainted with some of the pitfalls of imported electronics, but one of the lesser known problems is the lack of certification. In the United States, there are several nationally recognized testing laboratories: Underwriters Laboratories (UL) and Intertek (ETL) are the most prominent. Many  imported electronic devices, including Sonoff devices, do not have either of these certifications. The problem with this is liability, should the worst ever happen and an electrical fire break out. The Internet abounds with various opinions on the importance of the certification — a missing certification mark is somewhere between meaningless and a total hazard. The most common claim is that a house fire combined with non-certified equipment installed would result in an insurance company refusing to pay.

Rather than just repeat this surely sage advice from the Internet, I asked my insurance agent about uncertified equipment in the case of a fire. I discovered that insurance agencies avoid giving definite answers about claim payments. The response that came back was “it depends”: homeowner’s insurance covers events that are accidental and sudden. If a homeowner was aware that they were using uncertified equipment, then it could be categorized as “not an accident”. So far, the myth seems plausible. The final answer from the insurance agency: it’s possible that a non UL-certified device could result in denial of payment on a claim, but it depends on the policy and other details– why take the risk? Certification marks make insurance companies happier.

I also talked to my city’s electrical inspector about the issue. He commented that non-certified equipment is a violation of electrical code when it is hard-wired into a house. He echoed the warning that an insurance company could refuse to pay, but added that in the case of injury, there could be even further liability issues. I’ve opted to use certified equipment in my house. You’ll have to make your own decision about what equipment you’re willing to use.

There are some devices on Amazon that claim to have certification, but searching the certification database leads me to believe that not all of those claims are valid. If in doubt, there is a searchable UL database, as well as a searchable Intertek database.
Continue reading “Hack My House: UL Certification And Turning The Lights On With An ESP8266”

Hack My House: Raspberry Pi As A Touchscreen Thermostat

Your thermostat is some of the oldest and simplest automation in your home. For years these were one-temperature setting and nothing more. Programmable thermostats brought more control; they’re alarm clocks attached to your furnace. Then Nest came along and added beautiful design and “learning features” that felt like magic compared to the old systems. But we can have a lot more fun. I’m taking my favorite single-board computer, the Raspberry Pi, and naming it keeper of heat (and cool) by building my own touchscreen thermostat.

Mercury thermostats started it all, and were ingenious in their simplicity — a glass capsule containing mercury, attached to a wound bi-metal strip. As the temperature changes, the contraption tilts and the mercury bead moves, making or breaking contact with the wiring. More sophisticated thermostats have replaced the mercury bead with electronics, but the signaling method remains the same, just a simple contact switch.

This makes the thermostat the prime target for an aspiring home automation hacker. I’ve had this particular project in mind for quite some time, and was excited to dive into it with simple raw materials: my Raspberry Pi, a touchscreen, and a mechanical relay board.

Continue reading “Hack My House: Raspberry Pi As A Touchscreen Thermostat”

Hack My House: Garage Door Cryptography Meets Raspberry Pi

Today’s story is one of victory and defeat, of mystery and adventure… It’s time to automate the garage door. Connecting the garage door to the internet was a must on my list of smart home features. Our opener has internet connection capabilities built-in. As you might guess, I’m very skeptical of connecting a device to the internet when I have no control over the software running on it.

The garage door is controlled by a button hung on the garage wall. There is only a pair of wires, so a simple relay should be all that is needed to simulate the button press from a Raspberry Pi. I wired a relay module to a GPIO on the Pi mounted in the garage ceiling, and wrote a quick and dirty test program in Python. Sure enough, the little relay was clicking happily– but the garage door wasn’t budging. Time to troubleshoot. Does the push button still work? *raises the garage door* yep. How about the relay now? *click…click* nope.

You may have figured out by now, but this garage door opener isn’t just a simple momentary contact push button. Yes, that’s a microcontroller, in a garage door button. This sort of scenario calls for forensic equipment more capable than a simple multimeter, and so I turned to Amazon for a USB oscilloscope that could do some limited signal analysis. A device with Linux support was a must, and Pico Technology fit the bill nicely.

Searching for a Secret We Don’t Actually Need

My 2 channel Picotech oscilloscope, the 2204A, finally arrived, and it was time to see what sort of alien technology was in this garage door opener. There are two leads to the button, a ground and a five volt line. When the button is pressed, the microcontroller sends data back over that line by pulling the 5 V line to ground. If this isn’t an implementation of Dallas 1-wire, it’s a very similar concept.

Continue reading “Hack My House: Garage Door Cryptography Meets Raspberry Pi”

Hack My House: Opening Raspberry Pi To The Internet, But Not The Whole World

If you’ve followed along with our series so far, you know we’ve set up a network of Raspberry Pis that PXE boot off a central server, and then used Zoneminder to run a network of IP cameras. Now that some useful services are running in our smart house, how do we access those services when away from home, and how do we keep the rest of the world from spying on our cameras?

Before we get to VPNs and port forwarding, there is a more fundamental issue: Do you trust your devices? What exactly is the firmware on those cheap cameras really doing? You could use Wireshark and a smart switch with port mirroring to audit the camera’s traffic. How much traffic would you need to inspect to feel confident the camera never sends your data off somewhere else?

Thankfully, there’s a better way. One of the major features of surveillance software like Zoneminder is that it aggregates the feeds from the cameras. This process also has the effect of proxying the video feeds: We don’t connect directly to the cameras in order to view them, we connect to the surveillance software. If you don’t completely trust those cameras, then don’t give them internet access. You can make the cameras a physically separate network, only connected to the surveillance machine, or just set their IP addresses manually, and don’t fill in the default route or DNS. Whichever way you set it up, the goal is the same: let your surveillance software talk to the cameras, but don’t let the cameras talk to the outside world.

Edit: As has been pointed out in the comments, leaving off a default route is significantly less effective than separate networks. A truly malicious peice of hardware could easily probe for the gateway.

This idea applies to more than cameras. Any device that doesn’t need internet access to function, can be isolated in this way. While this could be considered paranoia, I consider it simple good practice. Join me after the break to discuss port forwarding vs. VPNs.

Continue reading “Hack My House: Opening Raspberry Pi To The Internet, But Not The Whole World”

Hack My House: ZoneMinder’s Keeping An Eye On The Place

Hacks are often born out of unfortunate circumstances. My unfortunate circumstance was a robbery– the back door of the remodel was kicked in, and a generator was carted off. Once the police report was filed and the door screwed shut, it was time to order cameras. Oh, and record the models and serial numbers of all my tools.

We’re going to use Power over Ethernet (POE) network cameras and a ZoneMinder install. ZoneMinder has a network trigger capability, and we’ll wire some magnetic switches to our network of PXE booting Pis, using those to inform the Zoneminder server of door opening events. Beyond that, many newer cameras support the Open Network Video Interface Forum (ONVIF) protocol and can do onboard motion detection. We’ll use the same script, running on the Pi, to forward those events as well.

Many of you have pointed out that Zoneminder isn’t the only option for open source camera management. MotionEyeOS, Pikrellcam, and Shinobi are all valid options.  I’m most familiar with Zoneminder, even interviewing them on FLOSS Weekly, so that’s what I’m using.  Perhaps at some point we can revisit this decision, and compare the existing video surveillance systems.

Continue reading “Hack My House: ZoneMinder’s Keeping An Eye On The Place”

Hack My House: Running Raspberry Pi Without An SD Card

Many of us have experienced the pain that is a Raspberry Pi with a corrupted SD card. I suspect the erase-on-write nature of flash memory is responsible for much of the problem. Regardless of the cause, one solution is to use PXE booting with the Raspberry Pi 3. That’s a fancy way to say we’ll be booting the Raspberry Pi over the network, instead of from an SD card.

What does this have to do with Hacking My House? As I discussed last time, I’m using Raspberry Pi as Infrastructure by building them into the walls of every room in my house. You don’t want to drag out a ladder and screwdriver to swap out a misbehaving SD card, so booting over the network is a really good solution. I know I promised we’d discuss cabling and cameras. Think of this as a parenthetical article — we’ll talk about Ethernet and ZoneMinder next time.

So let’s dive in and see what the Preboot Execution Environment (PXE) is all about and how to use PXE with Raspberry Pi.

Continue reading “Hack My House: Running Raspberry Pi Without An SD Card”

Hack My House: Raspberry Pi As Infrastructure

I finally had my own house. It was a repossession, and I bought it for a song. What was supposed to be a quick remodel quickly turned into the removal of most of the drywall in the house. There was a silver lining on this cloud of drywall dust and loose insulation. Rather than constantly retro-fitting cabling and gadgets in as needed, I could install everything ahead of time. A blank canvas, when the size of a house, can overwhelm a hacker. I’ve spent hours thinking through the infrastructure of my house, and many times I’ve wished for a guide written from a hacker’s perspective. This is that guide, or at least the start of it.

What do you want your smart house to do? And what do you want to be able to do in your smart house? For example, I wanted to be able to upgrade my cheap 120 V welder to a beefier 240 V model, so adding a 240 V plug in the garage was a must. As a bonus, that same 240 V circuit could be used for charging an electric car, if ever one is parked there.

“Ethernet everywhere” was my mantra. Try to imagine everywhere you might want to plug in a desktop, a laptop, an access point, or even a VoIP phone. I decided I wanted at least two Ethernet drops to each room, and tried to imagine the furniture layout in order to put them in convenient places.

Continue reading “Hack My House: Raspberry Pi As Infrastructure”