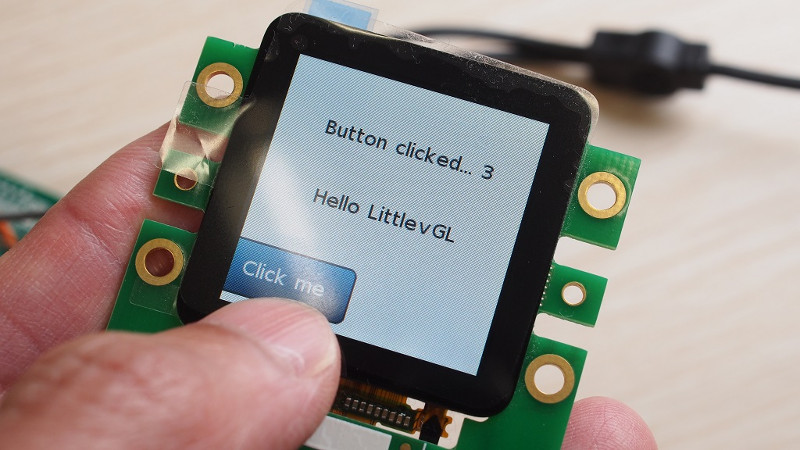
The 6th Generation iPod Nano was something of a revelation on launch. Packing a color screen, audio hardware, and a rechargable battery into a package no bigger than a large postage stamp remains impressive to this day. They’re now being used in various maker projects for their displays, but if you’re doing so, you might want to think about how you’re going to build a graphical interface. Not to worry – just grab an ESP32 and the right GUI library, and you’re on your way.
The Nano screen uses a MIPI DSI interface, which isn’t the easiest thing to use directly with the ESP32. Instead, a SSD2805 interface chip converts parallel input data to MIPI DSI signals to drive the display. Driving the display is only part of the game, however – you need something to display on it. Combining the LittlevGL GUI library with the screen’s touchpad makes creating a full graphical interface easy.
Hacked screens are something we don’t see as much these days, with the proliferation of display products aimed directly at the maker market. However, it’s always awesome to see a successful hack pulled off well. We’ve seen the display reverse engineered, too – and it certainly wasn’t easy.


Absolutely awesome piece of work. What are the chances of soldering a BGA like that successfully in a DIY reflow oven? Please, China, can you make up breakout boards based on this design???
That’s the right idea! Half the time I think the coolest part of open-source projects is fooling someone else into doing the mass production for you…
Although BGA on a hotplate works too. Sometimes, and with no real opportunity to inspect on a hobbyist level, but you never know until you try.
Soldering such BGA chip needs a stencil, good solder paste (like ALPHA® OM-338), a microscope, and steady hands (no coffee, no alcohol.) I am lucky enough to have a vision-based SMTA machine (mechatronic SMT P20 from Germany) so, assembly is reasonably fast. Nevertheless, manual placement under a mic is also OK. My experience is a yield like 80%-70% good.
Here you go: SSD2805 “breakout board”
https://www.ebay.com/itm/BY-MIPI-TEST-PCB-SSD2805D-DIY/402488597813
From [techtoys]’s link:
“I was forced to use jumper cables to wire up things with mess like this :( ”
That ain’t nothing, my fellow hacker! You want to see my rat’s nest of a circuit (for a laser engraver)?: https://understandingelectronics.blog/2019/03/06/lets-make-a-mess/
That’s nothing, you should see my worst rats nest, this is the beginning of several miles of wire: http://www.stephen.engineer/wp-content/uploads/2016/06/IMG_20140312_160335-1.jpg
Do we need an “Ask Hackaday: Show Us Your Worst Rats Nest?”
Where can you get a Nano LCD? Purchase a nonworking unit from ebay and strip out the display?
Ebay. There are plenty of them. I answered my own question. Here I stand beside myself.
Just search for “ST7789 240×240 display”. It has no touch, but a normal SPI interface. The cheap one is only 1.3 inch.
I tried a ST7789 with SPI too, even with DMA it is not as fast as a 8-bit 8080. Actually SSD2805 mipi bridge chip works with SPI for command mode but it is not performing as good as a 8-bit parallel. Unfortunately the code with I2S parallel output didn’t work with Arduino. It works only with ESP32 IDF. Otherwise I would have wrote another blog for Arduino as well.
Has anyone shown this to [Sprite_TM] yet? It would be nice to see a DSI driven directly by I2S with DMA ;-) Oh, and LVDS made from voltage dividers and some SOT23 inverters.
Is it just me that wishes someone would just root the device so hackers can just re-purpose them rather than having to strip them for parts?
The new version of LVGL (v7) is released and there a lot of news too (new website, establishing LVGL LLC, providing services and so on).
Check it out here: https://blog.lvgl.io/2020-06-01/announcement