It’s probably clear to a Hackaday reader that we live in a golden era for hobbyist tool accessibility. Cheap single board computers can be bought at any neighborhood RadioShack or Maplin. 3D printers sell fully assembled and ready to run for less than $200. Even the humble CNC mill has come down the price curve, though as you might expect at the low end things can get pretty rough. Like a cheap 3D printer, a cheap mill tends to be missing some basic features you’d expect any reasonable machine to have. If you get your hands on one of these little wonders, [Shahada Abubakar] has a pair of great blog posts on the basic set of upgrades you’ll probably want to perform right out of the box.
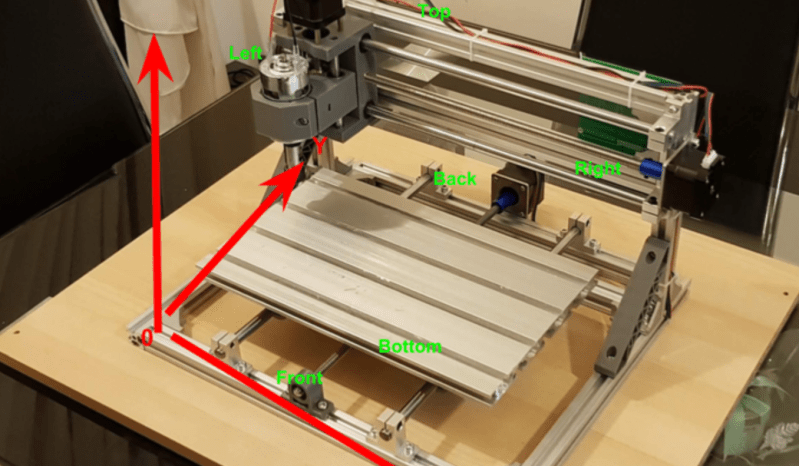
 Which cheap CNC mills are we talking about? They go by a few names. Last year our own [Kristina Panos] put together a review of a shockingly inexpensive “1610” type sold by Linksprite (go take a read if you’re already considering a purchase!). The “1610” class, so named for it’s 16 cm x 10 cm bed size, is pretty common under a wide variety of manufacturer names. You can find them in this size made of 8020 like [Kristina] did or as “upgraded” versions cut from 1/4″ mystery plastic (often referred to in the listings as Bakelite, but your guess is as good as ours as to the true material). 1610 is the smallest size but basically the same machine exists as an 1810, 2418, or 3018. Each has a 775 size spindle and a single PCBA that handles stepper drive and runs grbl.
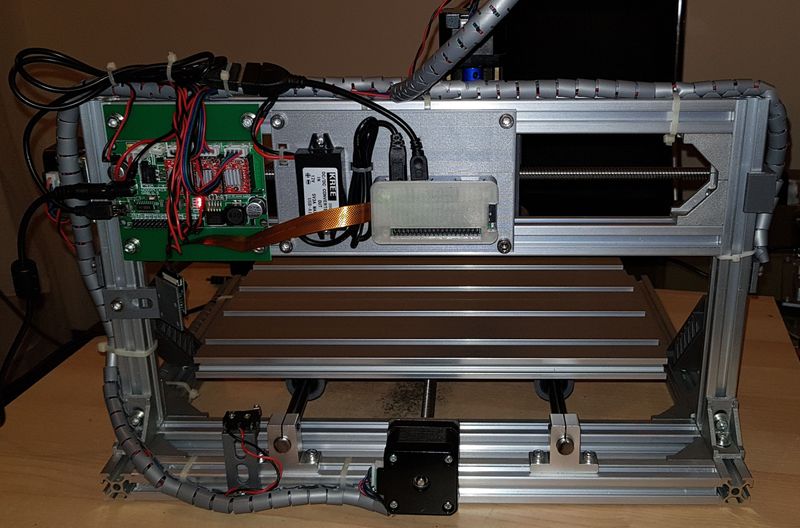
So what’s the problem? Well for one none of these machines have limit switches, though the controllers support them. [Shahada]’s guide has handy instructions for what kind to buy, how to wire them, and where they can be attached. Plus an overview of the G-code instructions to send the controller in order to home and configure everything properly. The controllers also like to be driven continuously over serial (though some sellers seem to offer a separate board to drive them). This is fine if you have a computer handy, but like a 3D printer it can be nice to bolt a Pi Zero or similar onto the unit and control it over the network. [Shahada]’s second post has a link to a mounting plate you can print for exactly that setup, as well as some suggestions for configuring CNC.js to drive everything.
Do you have one of these machines? Done any upgrades? Tell us in the comments! We’re always looking for ways to upgrade our home shop.


I had 3018 Woodpecker CNC for a month. I sold it because it\s not a very good machine. It had at least GRBL 1.1 controller, which is a good thing.`But there are things one can do to make it at least a bit more useful. Things I did:
1. My own holder for better spindle, which was a cheap Dremel clone.
2. I had to replace the Z-axis rods because they were scratched.
3. I set the microstepping to 1/4 from default 1/16. That quadrupled the torque. I also replaced the drivers, original ones had very bad and very limited current limit adjustment (only 1/4 of potentiometer range was used due to bad design).
4. I switched the whole thing to 24V (used before for that 775 “spindle”). I had to remove one diode that powered the relay. This also increased the torque, and with better current limits and decrease of microstepping it’s an essential mod for this machine.
5. I adjusted feedrates to 800mm/min for X and Y, and 400mm/min for Z. This one one has to adjust for each machine manually.
6. The most useful mod I didn’t finish was to add start/stop/pause buttons and touch probe that used a piezo membrane. I’ll do that for my current machine.
Limit switches are nice to have, but I’d rather have machine that can actually cut first. Stock 3018 Woodf***er can’t do that reliably…
>6
Probe with same principle as in AFM or simpler? That’s quite interesting, can you share more info?
I don’t know the acronym, but I’ve got the idea from this page:
https://blog.michael.franzl.name/2016/05/09/diy-piezo-electric-touch-probe-high-sensitivity/
The author made a mistake by not keeping the second op-amp of LM358 in stable condition. I used it as voltage follower/buffer for driving the LED. I didn’t finish the thing because I had problems with attaching the broken 0,6mm end mill to the membrane – I only had a cheap epoxy glue for that. I might try this again for my current machine…
I was thinking about Atomic Force Microscope piezo stage, in reverse. Thanks for the link. Time to fiddle with bCNC.
I was at work pretending to be looking at something very important and technical and definitely related to my job and I literally snorted coffee through my nose and out my ear when I read your final sentence. I am amused waaaay too easily by shameful language.
When it comes to CNC machines size is everything. In a perfect world you want one you can slide a 4.8 sheet of plywood into. I wouldn’t even consider one smaller than 24 x 24″
* 4×8 sheet of plywood
I have hooked a pi zero up to my 1610 cnc simply because the controller grounds through the USB if you unplug and plug in the main power cable and it can fry your USB port. I am running dietpi with Jon serial port sender and chillippr cnc. Chillippr grbl workspace works well and I had hooked a camera up but found it unnecessary. I tried using fusion 360 for basic cam stuff but it was a lot of fuss for simple stuff like engraving a name. So I turned to using easel online by inventables. It makes everything super easy and you can use the software for a few days a month free. Export the gcode and Bob’s your uncle.
A word on getting good cuts on wood. Engraving works pretty well with a small v bit but you will end up with a bad cuts if using a standard mill bit. I believe it’s to do with the tool path and bit combo so you might want to research what bits are good for cutting into wood this way.
The higher feedrate and the more RPMs on the spindle, the better quality of cuts. But with these machines you can’t have high feedrates while doing a deep cut – even with my mods that increase torque machine is not powerful nor rigid enough. With 3,175mm two-flute end mill I achieved good results at 400-500mm/min and 1mm depth of cut. But I had better spindle than 775 DC motor.
Thanks for the post. I’ve been working with a similar, cheap (quality and price) 24×17 CNC mill/laser cutter from China. The primary use case is making custom, one-off circuit boards. My next step is to add limit switches. I’ve started documenting the project here: https:///beltrani.com/
Your Laser is 2.5W which is clearly marked on the package. 2.5mW = 0.0025W which you used in your articles is the kind of power expected for a Laser pointer.
Thanks. Obvious error which I repeated a couple of time. I’ll correct it.
I have a 2417 thats a paperweight now due to a failure in the 3d printed plastic mount for the spindle. Cracked after some a couple months of light/occasional use. I had worked out a usable workflow for PCB milling, and had some impressive initial successes, when I started having issues with the Z-axis mysteriously “lifting” during a mill run. Eventually realized the spindle was no longer securely held. Pics and description of the workflow:
https://www.amazon.com/gp/customer-reviews/R19YAGWABEWWCY/
I designed sturdier spindle mount for my 3018, because I replaced the original one with 49mm mount diameter faux dremel multitool. I actually had to order two of them from two different 3d printing places – first one had all dimensions in one axis shrunk by 1mm…
I have a 3018. My first cnc and have managed to make some quite nice pcbs with it. I replaced the drivers on it and i also secured/tightened the “nuts” that goes on the lead screws by threading the little holes and screwing som m3 bolts in to them. ( sorry if I dint know the english terms so it might be hard to understand) Got it quite more rigid in that way.
The new drivers are supposed to be able to function as limit switches with some configuration but i haven’t gotten around to it.