Wood And Brass Drink Temperature Monitor Looks Good, Has Class

We’ve all been there. Your current project has hit a wall, or the next step will take days to complete, and you need something to do in the meantime. So you start a project that you envision will fit nicely in the gap, and then, inevitably, it doesn’t. Maybe it even takes so long that the original project gets finished first. So what? There’s nothing wrong with that, especially when the filler project turns out as well as this drink temperature monitor disguised as a circuit sculpture (video, embedded below). Just put your mug on the coaster, and the weight of it activates a hidden switch, which causes the sculpture to display its secret LEDs.

[MakeFunStuff] wanted to make something that looked less like a circuit and more like art, while building a tool that could determine the relative hotness of a beverage. Such a a useful circuit sculpture sounds like a tall order to us, but [MakeFunStuff] pulled it off with finesse and style.

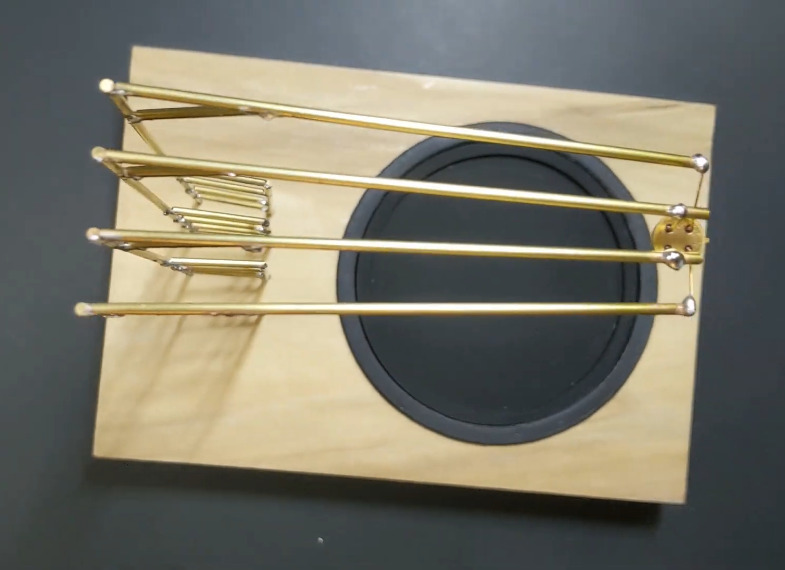
The circuit is based around this Sputnik-looking standalone IR temperature sensor which, as [MakeFunStuff] aptly describes, is “a single-pixel infrared camera that picks up everything in a 90° cone starting at the sensor.”

[MakeFunStuff] paired this easy-to-use sensor with an Arduino Nano and five LEDs that show how hot a beverage is on a scale from 1 to 5. The sensor is hidden in plain sight, suspended from the top of the brass rod sculpture and blending in perfectly. We love that the LEDs are hidden behind a thin layer of carefully-drilled wood and agree that a drill press would have been much easier.

The code is set up for just about every temperature scale from Celsius to Rømer, so that solves that argument. [MakeFunStuff] went with the Kelvin scale because science. Our favorite thing about this video is that [MakeFunStuff] shared their failures and fixes as they built their way toward answering the questions of how to suspend the sensor over the drink, and how best to display the heat level while hiding the electronics. Go grab a hot cup of something and check it out after the break while you let it cool off the normie way.

We admit that we would likely zone out while waiting for the LEDs to disappear. Here’s a smart coaster that uses an ESP8266 to send a message to Discord when your beverage has reached the perfect drinking temperature.

Continue reading “Wood And Brass Drink Temperature Monitor Looks Good, Has Class”

Riding Mower Repair Uncovers Miniature Culprit

Most people would be pretty upset it the lawn mower they spent $4,000 USD on had a major failure within the first year of owning it. But for [xxbiohazrdxx], it was an excuse to take a peek under the hood and figure out what brought down this state-of-the-art piece of landscaping gear.

It should be said that, at least technically, the Husqvarna TS 348XD in question was still working. It’s just that [xxbiohazrdxx] noticed the locking differential, which is key to maintaining traction on hilly terrain, didn’t seem to be doing anything when the switch was pressed. Since manually moving the engagement lever on the transmission locked up the differential as expected, the culprit was likely in the electronics.

Testing the dead actuator.

As [xxbiohazrdxx] explains, the switch on the dash is connected to a linear actuator that moves the lever on the transmission. The wiring and switch tested fine with a multimeter, but when the actuator was hooked up to a bench power supply, it didn’t move. Even more telling, it wasn’t drawing any power. Definitely not a good sign. Installing a new actuator would have solved the problem, but it was an expensive part that would take time to arrive.

Repairing the dead actuator seemed worth a shot at least, so [xxbiohazrdxx] cracked it open. The PCB looked good, and there were no obviously toasted components. But when one of the internal microswitches used to limit the travel of the actuator was found to be jammed in, everything started to make sense. With the switch locked in the closed position, the actuator believed it was already fully extended and wouldn’t move. After opening the switch itself and bending the contacts back into their appropriate position, everything worked as expected.

A tiny piece of bent metal kept this $4,000 machine from operating correctly.

As interesting as this step-by-step repair process was, what struck us the most is [xxbiohazrdxx]’s determination to fix rather than replace. At several points it would have been much easier to just swap out a broken part for a new one, but instead, the suspect part was carefully examined and coaxed back to life with the tools and materials on-hand.

While there’s plenty of folks who wouldn’t mind taking a few days off from lawn work while they wait for their replacement parts to arrive, not everyone can afford the luxury. Expedient repairs are critical when your livelihood depends on your equipment, which is why manufacturers making it harder and more expensive for farmers to fix their tractors has become such a major issue in right to repair battles all over the globe.

How Much Wood Can A Woodpecker Chuck?

It’s probably clear to a Hackaday reader that we live in a golden era for hobbyist tool accessibility. Cheap single board computers can be bought at any neighborhood RadioShack or Maplin. 3D printers sell fully assembled and ready to run for less than $200. Even the humble CNC mill has come down the price curve, though as you might expect at the low end things can get pretty rough. Like a cheap 3D printer, a cheap mill tends to be missing some basic features you’d expect any reasonable machine to have. If you get your hands on one of these little wonders, [Shahada Abubakar] has a pair of great blog posts on the basic set of upgrades you’ll probably want to perform right out of the box.

Which cheap CNC mills are we talking about? They go by a few names. Last year our own [Kristina Panos] put together a review of a shockingly inexpensive “1610” type sold by Linksprite (go take a read if you’re already considering a purchase!). The “1610” class, so named for it’s 16 cm x 10 cm bed size, is pretty common under a wide variety of manufacturer names. You can find them in this size made of 8020 like [Kristina] did or as “upgraded” versions cut from 1/4″ mystery plastic (often referred to in the listings as Bakelite, but your guess is as good as ours as to the true material). 1610 is the smallest size but basically the same machine exists as an 1810, 2418, or 3018. Each has a 775 size spindle and a single PCBA that handles stepper drive and runs grbl.

So what’s the problem? Well for one none of these machines have limit switches, though the controllers support them. [Shahada]’s guide has handy instructions for what kind to buy, how to wire them, and where they can be attached. Plus an overview of the G-code instructions to send the controller in order to home and configure everything properly. The controllers also like to be driven continuously over serial (though some sellers seem to offer a separate board to drive them). This is fine if you have a computer handy, but like a 3D printer it can be nice to bolt a Pi Zero or similar onto the unit and control it over the network. [Shahada]’s second post has a link to a mounting plate you can print for exactly that setup, as well as some suggestions for configuring CNC.js to drive everything.

Do you have one of these machines? Done any upgrades? Tell us in the comments! We’re always looking for ways to upgrade our home shop.

Dog-Or-Catapult Controls The Speed Of The Feed

[NathanKing] has a cute, rambunctious pupper who eats way too fast for her own good. He’s tried various distribution methods intended to get her to slow down, but she’s just too excited to eat. [Nathan]’s latest solution is to launch the food piece by piece using a catapult. The dog loves the gamified feeding method, which is sort of like one-way fetch. She gets a bit of exercise, and everyone is amused for the half hour it takes to fling 1.5 cups of food one piece at a time.

Electronics-wise, this food flinger doesn’t use much more than three servos and an Arduino Uno. Servo #1 pulls the arm back until it hits a limit switch. Servo #2 holds the arm down , and servo #3 rotates the food tube until it drops a unit of kibble into the spoon. Then servo #2 lets the arm go, and the tasty morsel flies about 30 feet (10 meters).

[Nathan] doesn’t offer step-by-step instructions, but there is more than enough detail to replicate this project. He used what he had on hand, such as scrap aluminium from another project for the frame. Future plans include swapping out the 6V lantern battery for rechargeable AAs, and downsizing to a Nano. We’ve fetched a couple of videos for you and thrown them in after the break. Go get ’em, reader!

Pets need plenty of water, especially during the summer. Here’s a no-sweat automatic watering solution we saw a few years ago.

Continue reading “Dog-Or-Catapult Controls The Speed Of The Feed”

Hackaday Prize Entry: 3D Printed Linear Actuator Does 2kg+

The rabbit hole of features and clever hacks in [chiprobot]’s NEMA17 3D Printed Linear Actuator is pretty deep. Not only can it lift 2kg+ of mass easily, it is mostly 3D printed, and uses commonplace hardware like a NEMA 17 stepper motor and a RAMPS board for motion control.

The main 3D printed leadscrew uses a plug-and-socket design so that the assembly can be extended easily to any length desired without needing to print the leadscrew as a single piece. The tip of the actuator even integrates a force sensor made from conductive foam, which changes resistance as it is compressed, allowing the actuator some degree of feedback. The force sensor is made from a 3M foam earplug which has been saturated with a conductive ink. [chiprobot] doesn’t go into many details about his specific method, but using conductive foam as a force sensor is a fairly well-known and effective hack. To top it all off, [chiprobot] added a web GUI served over WiFi with an ESP32. Watch the whole thing in action in the video embedded below.

Continue reading “Hackaday Prize Entry: 3D Printed Linear Actuator Does 2kg+”

Shapeoko 2 Mods: Dust Mitigation And Limit Switches

so2-main


Not long ago the Shapeoko 2 came out. In case you missed it, the Shapeoko 2 is the 2nd generation bench-top CNC Router of the namesake. All axes roll on Makerslide and v-wheels. The X and Y axes are belt driven, power is transmitted to the Z axis by lead screw.

As with most products, there will be people who must hack, mod or upgrade their as-received item.  If you are a regular Hackaday reader, you are probably one of those people. And as one of those people, you would expect there have been a few individuals that have not left this machine alone.

Continue reading “Shapeoko 2 Mods: Dust Mitigation And Limit Switches”

Chinese 3020 CNC Machine Gets Some Upgrades

If you frequent any CNC Forums out on the ‘web you’ll find that these Chinese 3020 CNC routers are generally well received. It is also common opinion that the control electronics leave something to be desired. [Peter]’s feelings were no different. He set out to make some improvements to his machine’s electronics such as fixing a failed power supply and adding PWM spindle control and limit switches.

[Peter] determined that the transformer used in the power supply was putting out more voltage from the secondary coil than the rest of the components could handle. Instead of replacing the transformer with another transformer, two switch mode power supplies were purchased. One powers the spindle and the other is for the stepper motors. So he wasn’t guessing at the required amperage output of the power supplies, [Peter] measured the in-operation current draw for both the steppers and spindle motor.

Continue reading “Chinese 3020 CNC Machine Gets Some Upgrades”