Last time Hackaday went hands on with a product from German company MNT, it was the Reform laptop; a full size computer with a full feature set and fully open source design. Now they’re back with the same value proposition and feature set crammed into a much more adorable (and colorful!) package with the MNT Pocket Reform. If you want the big Reform’s open source philosophy in a body fit for a coat pocket, this might be the computing device for you.
To refresh your memory, MNT is a company that specializes in open source hardware and the software to support it. They are probably best known for the Reform, their first laptop. Its marquis feature is a fully open design, from the mechanical components (designed with OSS tools) to the PCBAs (designed with KiCad) to the software (designed with, uh, software). When originally shipped that product packed a DIMM-style System On Module (SOM) with a default configuration containing a quad core NXP i.MX8M Quad and 4GB of RAM, as well as mini PCIe Card and M key m.2 2280 slots on the motherboard for storage and connectivity. That computer was designed to be easily serviceable and included a plethora of full sized ports along with easy to source cylindrical battery cells. The Pocket Reform takes the same intent and channels it into a much smaller package.
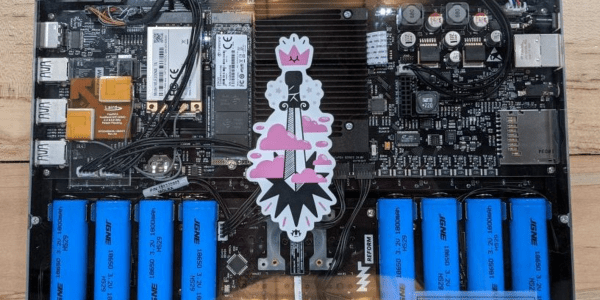
When we met our contact from MNT in the coffee shop, he was quietly working away on his laptop. Jet black and standing thick it was like an encyclopedia that didn’t quite blend in with the sea of silver MacBook lookalikes on the surrounding tables. After going through all the speeds and feeds we eagerly got our 64 piece driver kit out to open it up and see what made this marvel tick, but when the laptop was turned over it became clear that no tools were needed. The entire bottom of the machine was a single rectangle of transparent acrylic revealing everything from sharp white status LEDs on the bare mainboard to individual 18650 LiFePO4 battery cells in a tidy row. In a sense that’s the summary of the entire product: it’s a real laptop you can use to get work done, and every element of it from design to fabrication is completely transparent.
The MNT Reform
The device pictured here is called the Reform and is designed and manufactured by MNT, a company in Berlin, Germany (note MNT stands for MNT, it’s not an acronym). The Reform is a fully open source laptop which is shipping today and available via distribution through Crowd Supply. If the aesthetic doesn’t make it clear the Reform is an opinionated product designed from the ground up to optimize for free-as-in-freedom: from it’s solid metal chassis to the blob-free GNU/Linux distribution running inside.
We’re here to tell you that we’ve held one, it’s real, and it’s very well built.
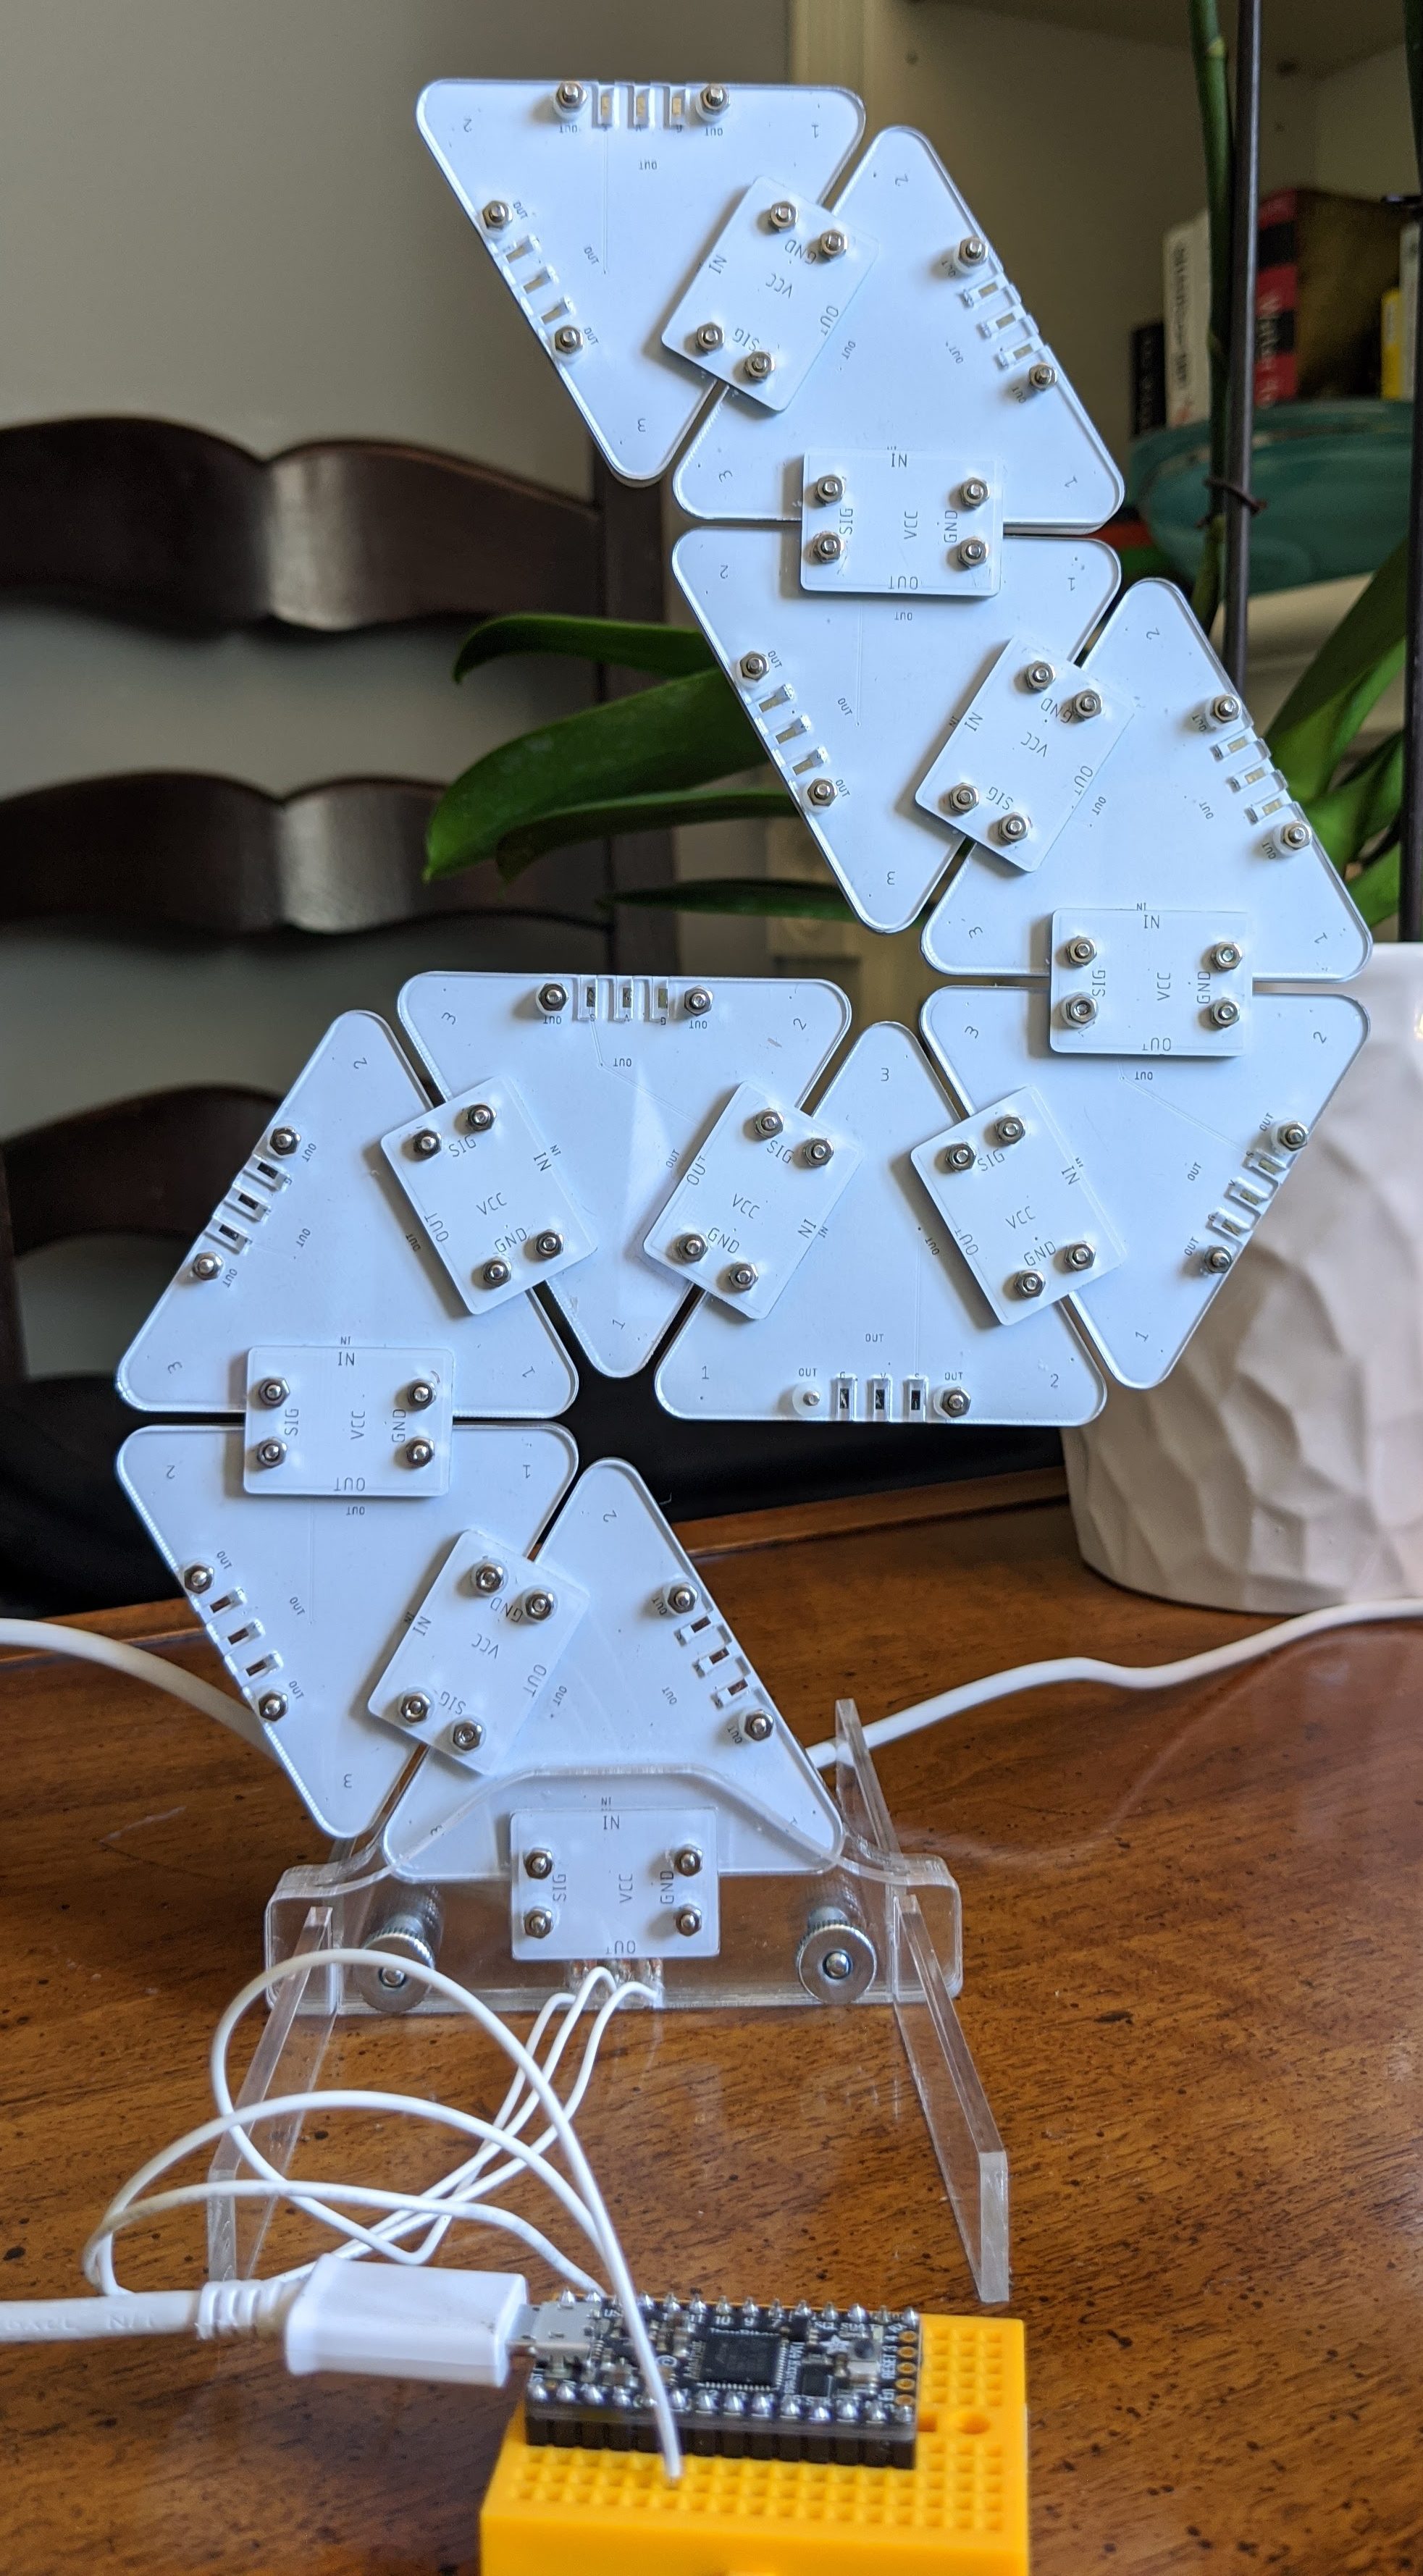
We love to see LEDs combined in all shapes and sizes, so we were especially ticked when we caught a glimpse of [Debra Ansell]’s (also known as [GeekMomProjects]) interlocking triangular TriangleLightPanel system glowing on our screen. This unusually shaped array seemed to be self supporting and brightly glowing, so we had to know more.
The TriangleLightPanel is a single, triangular, light panel (refreshing when everything is in the name, isn’t it?). Each panel consists of a single white PCBA holding three side-firing SK6812 LEDs aimed inward, covered by transparent acrylic. When the LEDs are doing their thing, the three-position arrangement and reflective PCB surface does diffuses the light sufficiently to illuminate each pane — if not perfectly evenly — very effectively. Given the simple construction it’s difficult to imagine how they could be significantly improved.
The real trick is the mechanical arrangement. Instead of being connected with classic Dupont jumper wires and 0.1″ headers or some sort of edge connector, [Debra] used spring contacts. But if you’re confused by the lack of edge-plated fingers think again; the connectors are simple plated strips on the back. There is a second PCBA which effectively acts as wires and a surface to mount the spring contacts on, which is bolted onto the back of the connected leaves to bridge between each node. The tiles need to be mechanically connected in any case, so it’s a brilliantly simple way to integrate the electrical connection with the necessary mechanical one.
All the requisite source files are available on the project’s GitHub page and the original Tweets announcing the project are here for reference. We can’t wait to see what this would look like with another 30 or 40 nodes! Enterprising hackers are already building their own setup; see [arturo182]’s 24 tile array glowing after the break.
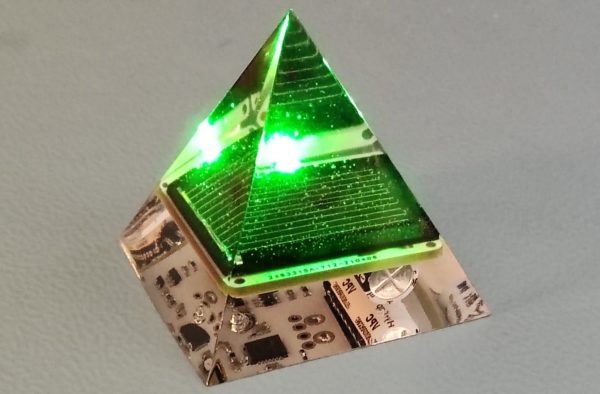
Without knowing it, we’ve spent years watching [Jasper Sikken] piece together an empire of energy harvesting equipment, and now he’s putting the pieces together into wonderful creations. His recently finished solar harvesting pyramids are mesmerizing objects of geometric perfection we’d love to see glinting in the sun.
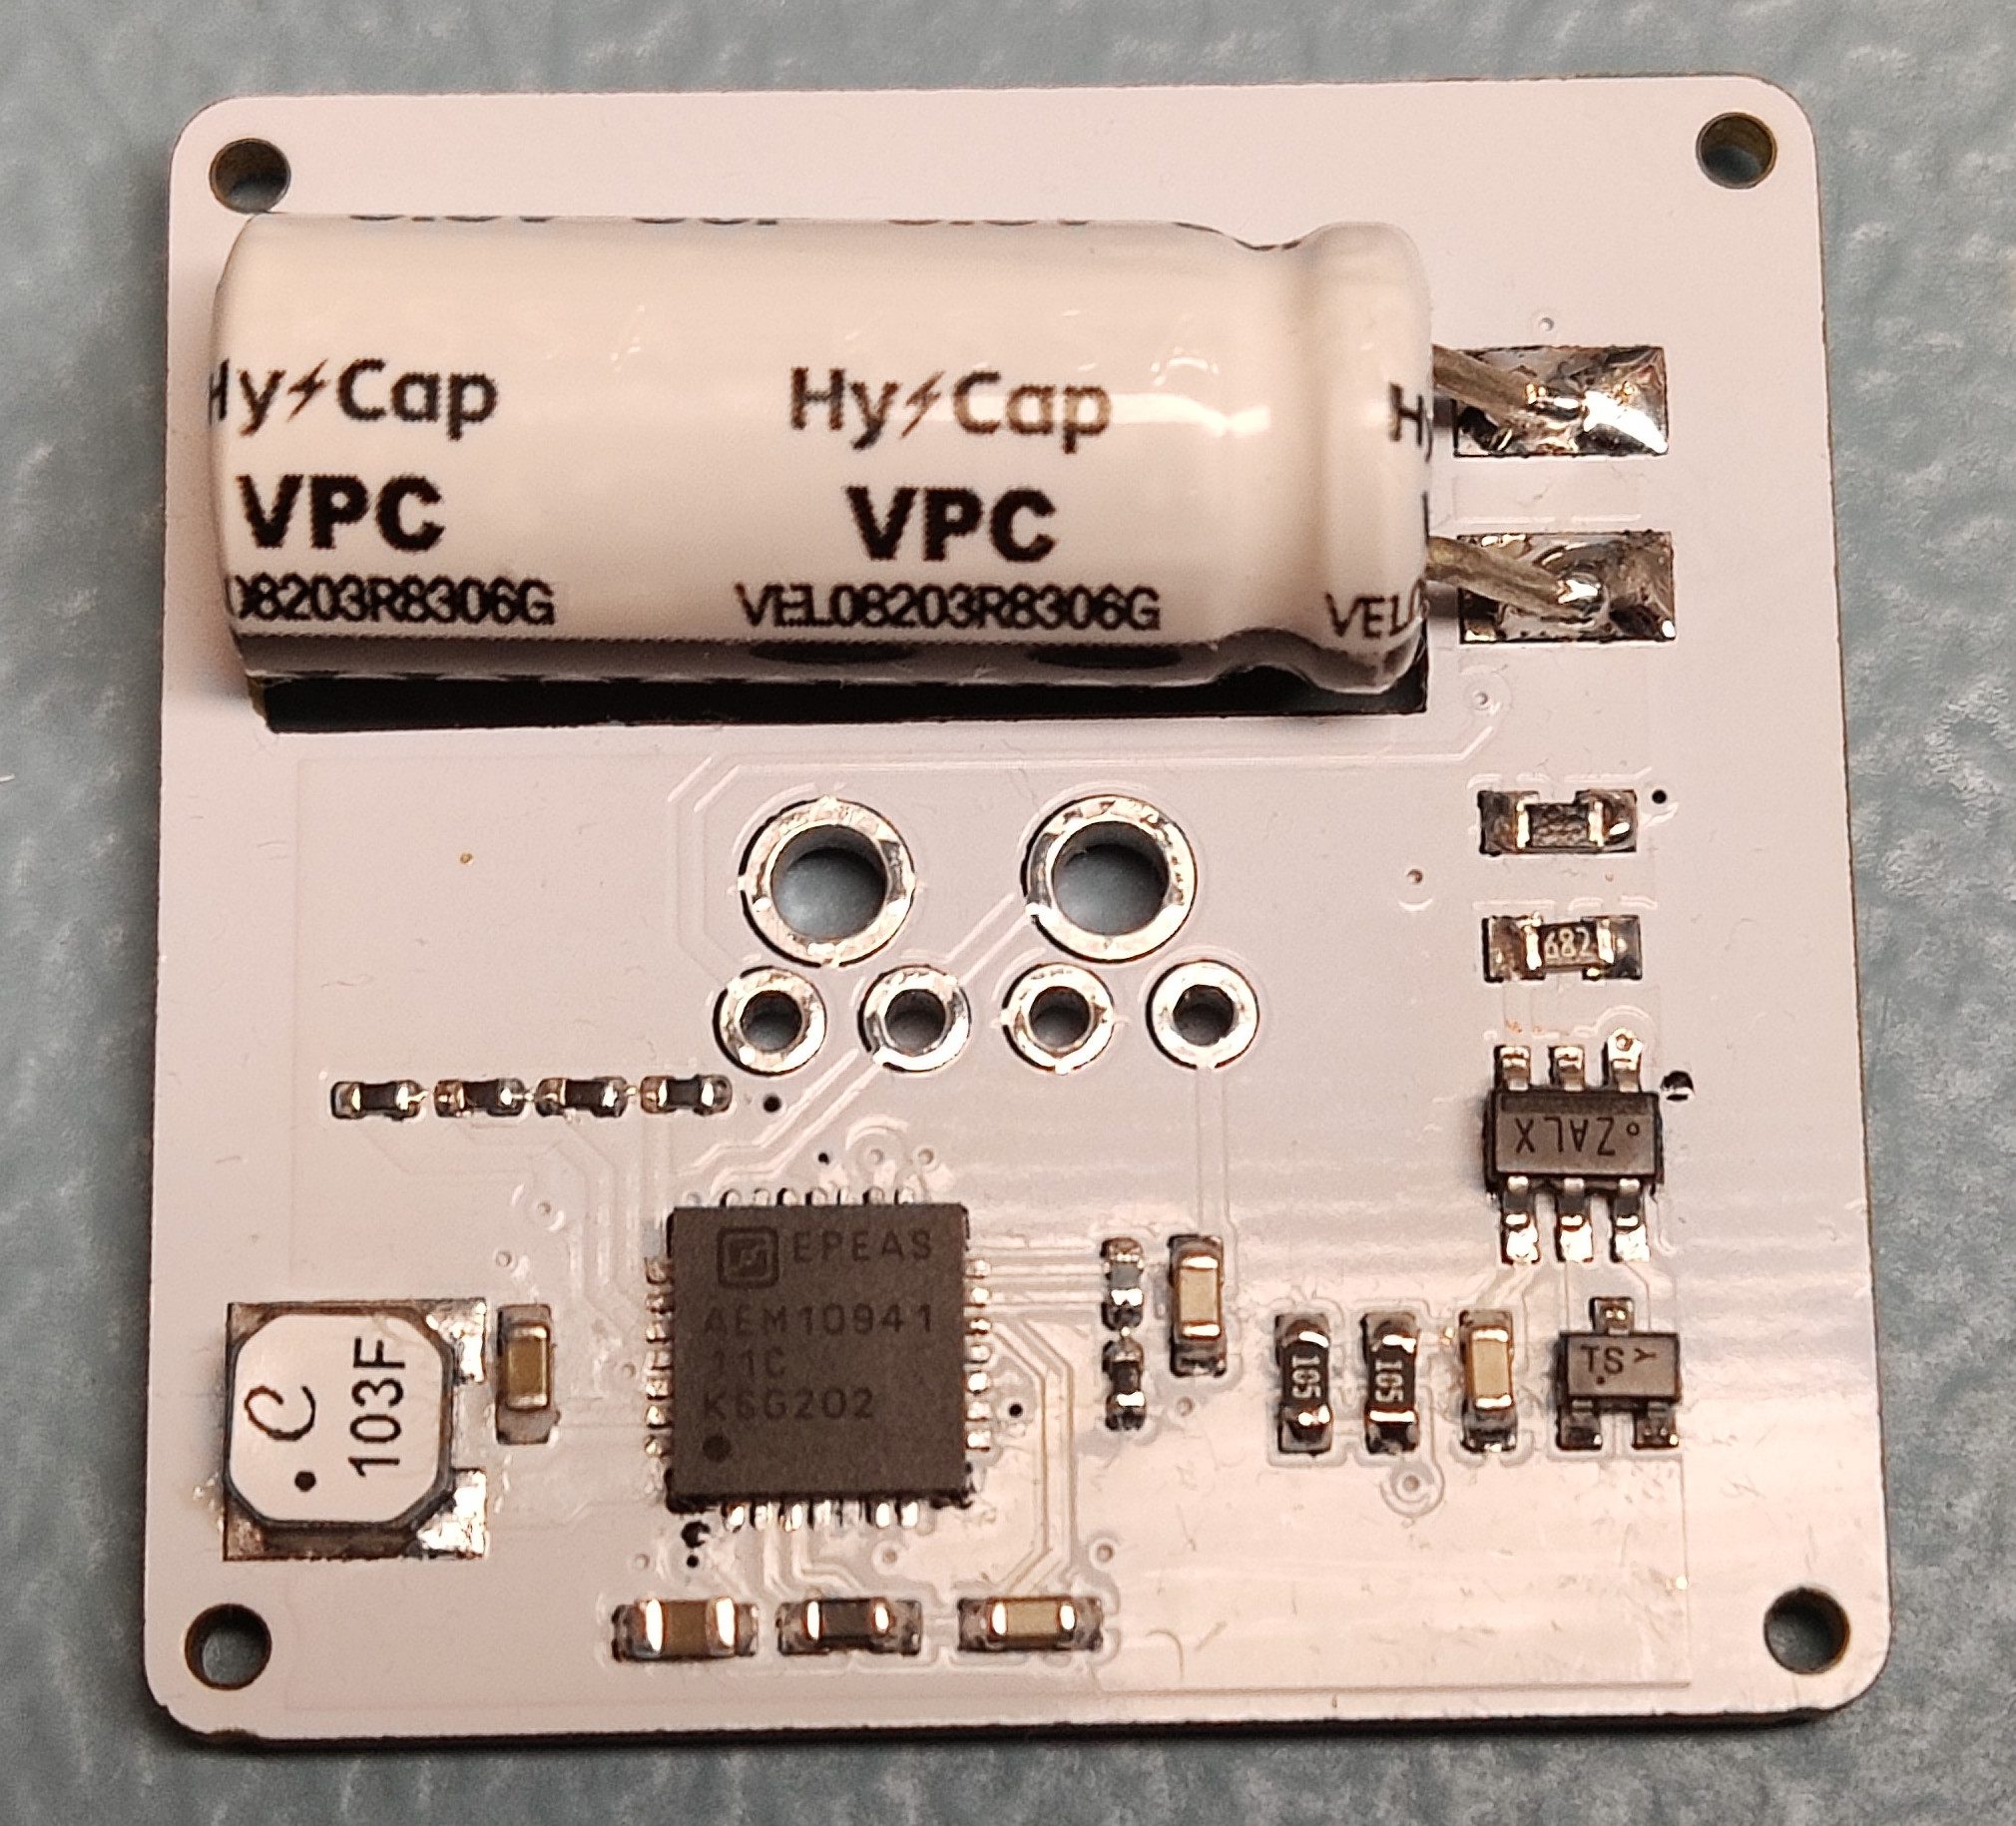
These solar harvesting pyramids are well described by their name. Each one contains a PCBA around 30mm on a side with a solar energy harvester built around the dedicated AEM10941 IC, a single solar cell, and a very bright green LED. [Jasper] calculates that the solar cell will charge the super capacitor at 20uA at with just 200 lux of light (a level typical for casual indoor spaces) letting it run indefinitely when placed indoors. Amazingly with the LED blinking for 15ms every 2 seconds it will run for 21 days in complete darkness. And that’s it! This is a software-free piece of hardware which requires no input besides dim light and blinks an LED indefinitely.
Small PCBA, large capacitor
What about that super capacitor? It’s called a Lithium Ion Capacitor (LIC) and is a hybrid between a typical rechargeable lithium battery and an electrolytic capacitor, offering extremely high capacity in a convenient two leg through hole form factor. This one is a whopping 30 Farad at 3.8 V, and we first saw it when [Jasper] won the Hackaday Earth Day contest last month. Check out that link if you want to know more about their uses and how to integrate them.
For more detail about all of the components of the solar pyramid we need only turn to the Hackaday archives. In December 2019 [Tom Nardi] wrote about building a cheap degassing system for making some very familiar looking resin pyramids. And before that [Donald Papp] brought us another familiar piece of the pyramid when he wrote up a different 1″ x 1″ solar harvesting system that [Jasper] designed.
Check out the video after the break to see what one of these gems looks like from all sides. And for many more experiments leading up the final pyramid check out the logs on the Hackaday.io page.
Our favorite raft of otters is back at it again with another display of open source audio prowess as they bring us the OtterCastAmp, the newest member of the OtterCast family of open source audio multitools. If you looked at the previous entry in the series – the OtterCastAudio – and thought it was nice but lacking in the pixel count or output power departments then this is the device for you.
The Amp is fundamentally a very similar device to the OtterCastAudio. It shares the same Allwinner S3 Cortex-A application processor and runs the same embedded Linux build assembled with Buildroot. In turn it offers the same substantial set of features and audio protocol support. It can be targeted by Snapcast, Spotify Connect or AirPlay if those are your tools of choice, or act as a generic PulseAudio sink for your Linux audio needs. And there’s still a separate line in so it source audio as well.
One look at the chassis and it’s clear that unlike the OtterCastAudio this is not a simple Chromecast Audio replacement. The face of the OtterCastAmp is graced by a luscious 340×800 LCD for all the cover art your listening ear can enjoy. And the raft of connectors in the back (and mountain of inductors on the PCBA) make it clear that this is a fully fledged class D amplifier, driving up to 120W of power across four channels. Though it may drive a theoretical 30W or 60W peak across its various outputs, with a maximum supply power of 100W (via USB-C power delivery, naturally) the true maximum output will be a little lower. Rounding out the feature set is an Ethernet jack and some wonderfully designed copper PCB otters to enjoy inside and out.
As before, it looks like this design is very close to ready for prime time but not quite there yet, so order at your own risk. Full fab files and some hints are linked in the repo mentioned above. If home fabrication is a little much it looks like there might be a small manufacturing run of these devices coming soon.
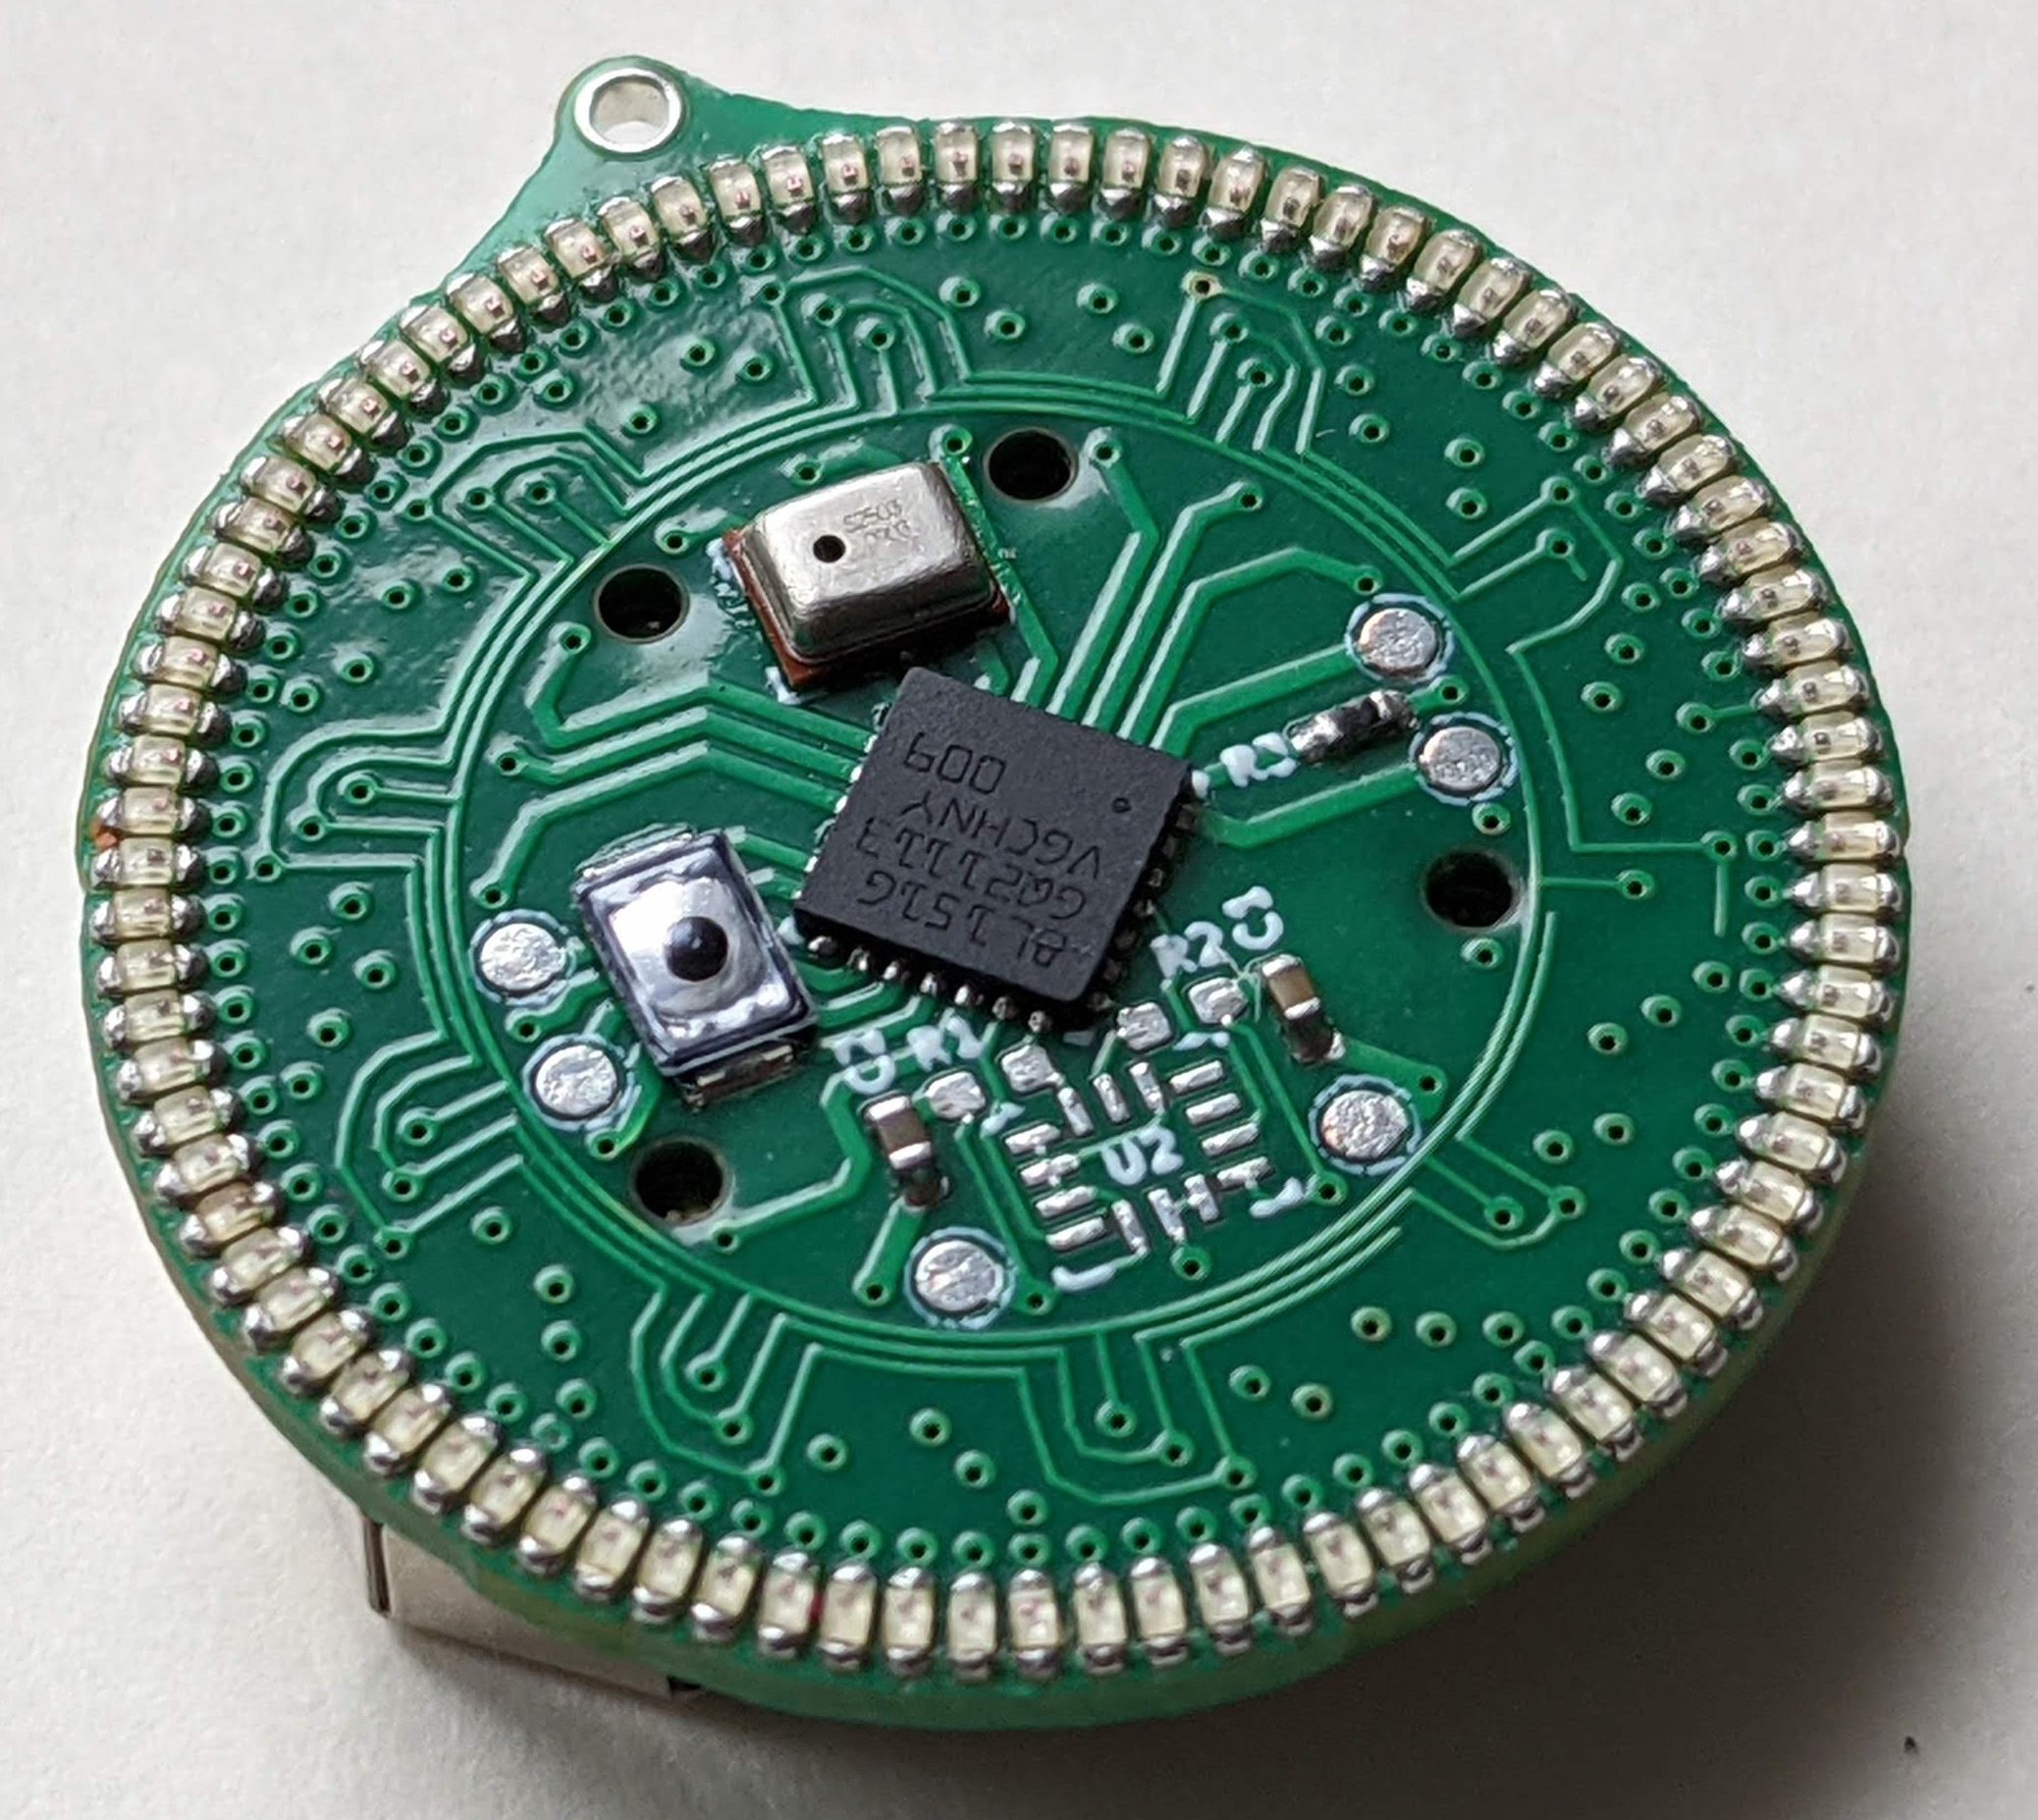
Few things get a Hackaday staffer excited like bunches of tiny LEDs. The smaller and denser the better, any form will do as long as we can get a macro shot or a video of a buttery smooth animation. This time we turn to [Sawaiz Syed] and [Open Kolibri] to deliver the brightly lit goods with the minuscule HALO 90 reactive LED earrings.
The HALO 90’s are designed to work as earrings, though we suspect they’d make equally great brooches, hair accessories, or desk objects. To fit this purpose each one is a minuscule 24 mm in diameter and weighs a featherweight 5.2 grams with the CR2032 battery (2.1 g for the PCBA alone). Functionally their current software includes three animation modes, each selectable via a button on device; audio reactive, halo (fully lit), and sparkle. Check out the documentation for details on expected battery life in each mode, but suffice to say that no matter what these earrings will make it through a few nights out.
In terms of hardware, the HALO 90’s are as straightforward as you’d expect. Each device is driven by an STM8 at its maximum 16MHz which is more than fast enough to keep the 90 charliplexed 0402 LEDs humming along at a 1kHz update rate, even with realtime audio processing. In fact the BOM here is refreshingly simple with just 8 components; the LEDs, microcontroller and microphone, battery holder and passives, and the button. [Sawaiz] even designed an exceptionally slick case to go with each pair of earrings, which holds two HALO 90’s with two CR2032’s and includes a magnetic closure for the most satisfying lid action possible.
As with some of his other work, [Sawaiz] has produced a wealth of exceptional documentation to go with the HALO 90’s. They’re available straight from him fully assembled, but with documentation this good the path to a home build should be well lit and accessible. He’s even chosen parts with an eye towards long availability, low cost, and ease of sourcing so no matter when you decide to get started it should be a snap.
It was difficult to choose just a few images from [Sawaiz]’s mesmerizing collection, so if you need more feast your eyes on the expanded set after the break.
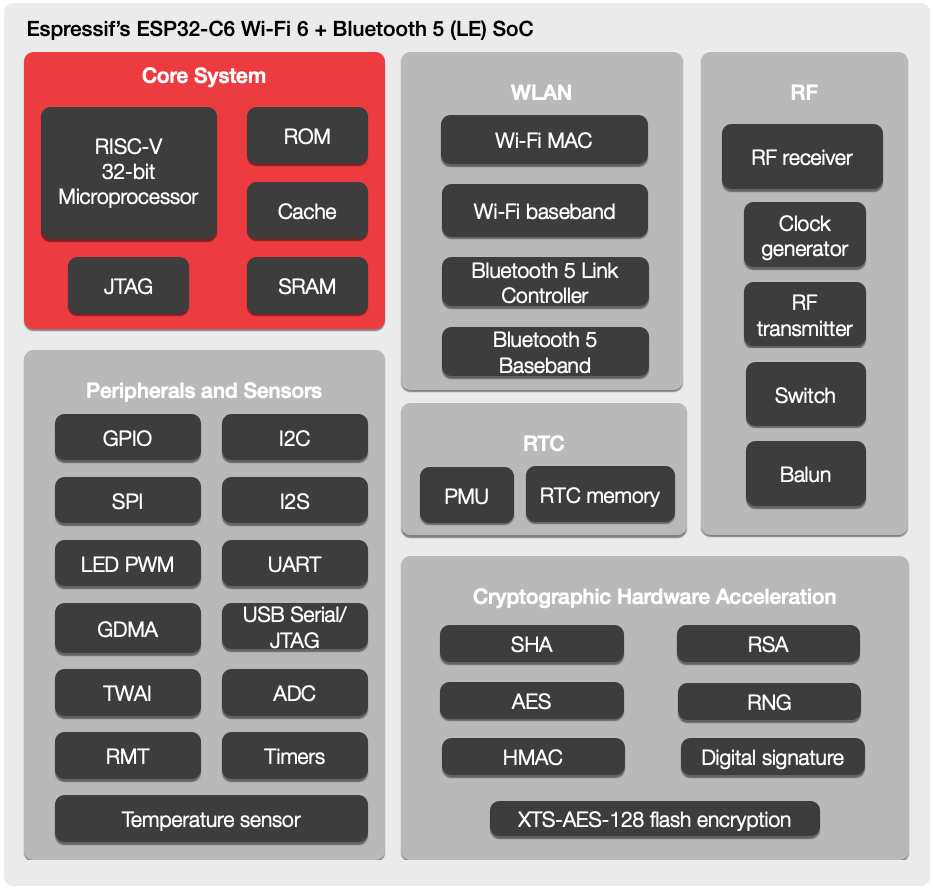
If you’re a reader of Hackaday, then you’ve almost certainly encountered an Espressif part. The twin microcontroller families ESP8266 and ESP32 burst onto the scene and immediately became the budget-friendly microcontroller option for projects of all types. We’ve seen the line expand recently with the ESP32-C3 (packing a hacker-friendly RISC-V core) and ESP32-S3 with oodles of IO and fresh new CPU peripherals. Now we have a first peek at the ESP32-C6; a brand new RISC-V based design with the hottest Wi-Fi standard on the block; Wi-Fi 6.
There’s not much to go on here besides the standard Espressif block diagram and a press release, so we’ll tease out what detail we can. From the diagram it looks like the standard set of interfaces will be on offer; they even go so far as to say “ESP32-C6 is similar to ESP32-C3” so we’ll refer you to [Jenny’s] excellent coverage of that part. In terms of other radios the ESP32-C6 continues Espressif’s trend of supporting Bluetooth 5.0. Of note is that this part includes both the coded and 2 Mbps Bluetooth PHYs, allowing for either dramatically longer range or a doubling of speed. Again, this isn’t the first ESP32 to support these features but we always appreciate when a manufacturer goes above and beyond the minimum spec.
Welcome to the ESP32-C6
The headline feature is, of course, Wi-Fi 6 (AKA 802.11ax). Unfortunately this is still exclusively a 2.4GHz part, so if you’re looking for 5GHz support (or 6GHz in Wi-Fi 6E) this isn’t the part for you. And while Wi-Fi 6 brings a bevy of features from significantly higher speed to better support for mesh networks, that isn’t the focus here either. Espressif have brought a set of IoT-centric features; two radio improvements with OFDMA and MU-MIMO, and the protocol feature Target Wake Time.
OFDMA and MU-MIMO are both different ways of allowing multiple connected device to communicate with an access point simultaneously. OFDMA allows devices to slice up and share channels more efficiency; allowing the AP more flexibility in allocating its constrained wireless resources. With OFDMA the access point can elect to give an entire channel to a single device, or slice it up to multiplex between more than once device simultaneously. MU-MIMO works similarly, but with entire antennas. Single User MIMO (SU-MIMO) allows an AP and connected device to communicate using a more than one antenna each. In contrast Multi User MIMO (MU-MIMO) allows APs and devices to share antenna arrays between multiple devices simultaneously, grouped directionally.
Finally there’s Target Wake Time, the simplest of the bunch. It works very similarly to the Bluetooth Low Energy (4.X and 5.X) concept of a connection interval, allowing devices to negotiate when they’re next going to communicate. This allows devices more focused on power than throughput to negotiate long intervals between which they can shut down their wireless radios (or more of the processor) to extended battery life.
These wireless features are useful on their own, but there is another potential benefit. Some fancy new wireless modes are only available on a network if every connected device supports them. A Wi-Fi 6 network with 10 Wi-Fi 6 devices and one W-Fi 5 (802.11ac) one may not be able to use all the bells and whistles, degrading the entire network to the lowest common denominator. The recent multiplication of low cost IoT devices has meant a corresponding proliferation of bargain-basement wireless radios (often Espressif parts!). Including new Wi-Fi 6 exclusive features in what’s sure to be an accessible part is a good start to alleviating problems with our already strained home networks.
When will we start seeing the ESP32-C6 in the wild? We’re still waiting to hear but we’ll let you know as soon as we can get our hands on some development hardware to try out.
Thanks to friend of the Hackaday [Fred Temperton] for spotting this while it was fresh!


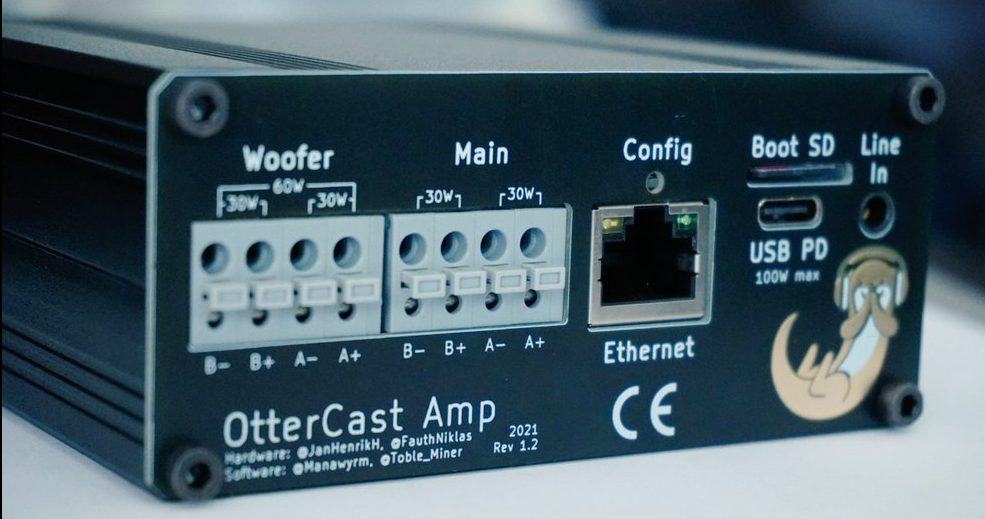
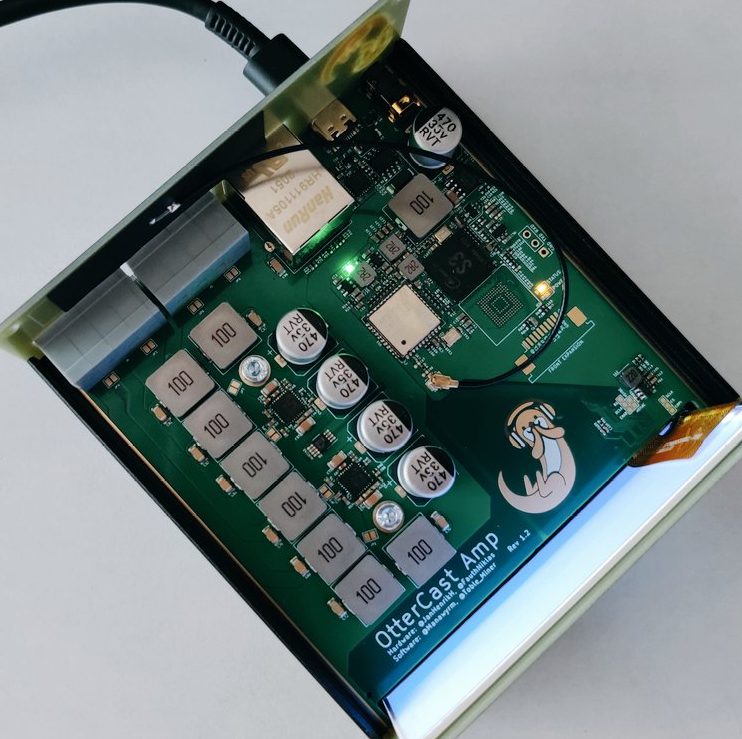 One look at the chassis and it’s clear that unlike the OtterCastAudio this is not a simple Chromecast Audio replacement. The face of the OtterCastAmp is graced by a luscious 340×800 LCD for all the cover art your listening ear can enjoy. And the raft of connectors in the back (and mountain of inductors on the PCBA) make it clear that this is a fully fledged class D amplifier, driving up to 120W of power across four channels. Though it may drive a theoretical 30W or 60W peak across its various outputs, with a maximum supply power of 100W (via USB-C power delivery, naturally) the true maximum output will be a little lower. Rounding out the feature set is an Ethernet jack and some wonderfully designed copper PCB otters to enjoy inside and out.