If you don’t have access to a 3D scanner, you can get a lot done with photogrammetry. Basically, you take a bunch of pictures of an object from different angles, and then stitch them together with software to create a 3D model. For best results, you need consistent, diffuse lighting, an unchanging background, and a steady camera.
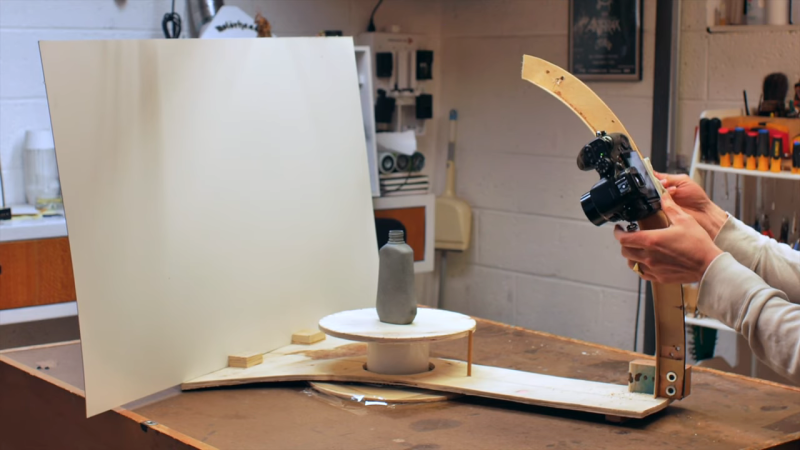
Industrial designer [Eric Strebel] recently made an Intro to Photogrammetry video wherein he circled an object taking photos with his bare hands. One commenter suggested a different method: build a donut-shaped turntable that circles the object, which sits on a stationary platform. Attach the camera to the donut, counterbalance the weight, and Bob’s your proverbial uncle. [Eric] thought it was a brilliant idea (because it is), and he built a proof of concept. This is that video.
[Eric] can move the camera up and down the arc of the boom to get all the Z-positions he wants. The platform has a mark every 10° and there’s a pointer in the platform to line them up against for consistent camera positioning. He was pleasantly surprised by the results, which we agree are outstanding.
We always learn a lot from [Eric]’s videos, and this one’s no exception. Case in point: he makes a cardboard mock-up by laying out the pieces, and uses that to make a pattern for the recycled plywood and melamine version. In the photogrammetry video, he covers spray paint techniques to make objects reflect as little light as possible so the details don’t get lost.
If you prefer to rotate your objects, get an Arduino out and automate the spin.


Sweet..
Any thoughts on how well Photogrammetry would work for scanning an engine compartment (engine removed)? I suspect not so well since every demo I’ve seen shows moving the camera pointing to the center of a sphere, not from the center pointed to the surface of a sphere. I wish I could rent a professional 3D scanner for a day; I’m not a cheapskate but $5K minimum rental is a bit more than I want to pay.
Might be worth looking at RGBD scanning (MS Kinect, etc) to get some extra definition, but photogrammetry can absolutely be done without completely encircling the object being scanned.
Depending on the software used you can inverse the Proceedure, agisoft can do it, Alice Vision can and so can reality capture, the processing proceedurenos different for all, but if you’re able do a test idea with your phone and Alice Vision.
For a final shot either remote shoot with an egg timer style tripod mounter with a DSLR on top or depending on your statistical needs stay with mobile.
I’d also light top and bottom, diffused and parallel to the compartment
Think of it as how Google maps do their indoor shots for companies, which is what I’m assume your idea is.
you’re looking for a structured light scanner for something like that.
1) Mount a pole up thru the middle of the engine compartment.
2) Make a “C” shaped guide, attached to the pole at the middle of the “C”.
3) Mount the camera on a slide as in the article, to the “C”.
4) take photos every 5-10 degrees of arc travel and for every few degrees of rotation.
5) Use software a s “Ty” suggests to process the photos.
Structure from motion should work in that scenario – which (contrary to what the above article suggests) is how most photogrammetry tools work. What you need is not to point at some specific point in space, but to capture what, in a nutshell, could be described as “paralaxe”. You want to capture the same area of your object from different angles and always slightly offset. From the overlap of “features” the software will then create a depth-field, from which your model can be derived.
So, yes, it could work, if you have enough space to work the camera sufficiently.
Don’t listen to the bad advice above me.
You will not get good results with photogrammetry if you place your camera on a tripod and simply rotate the camera position. The goal of photogrammetry is to triangulate. If two or more images have the same origin, there’s no way to have depth perception. It’s like using each of your eyes one at a time to look through the same hole in a wall. It just won’t work.
For proper photogrammetry in an engine compartment, you need to both ROTATE the camera and TRANSLATE the camera along the X, Y, and Z directions. You need to effectively “move your feet” between shots. You will have the best luck by positioning your camera on the opposite side of the vehicle that you want to capture and work the camera position around the perimeter of the engine compartment.
As someone else said, you may have better luck with a structured light scaner (SLS). If you have a projector and a Canon camera, you can do it relatively inexpensively. The nice thing about structured light scanning is that you CAN simply stand in the middle of the engine compartment and simply rotate the SLS. You simply digitally stitch each 3D view together into one big scan and you’re done. http://www.3dunderworld.org/software/
Seems like extra effort to make the camera and rig move rather than just having a rotating platform for the model.
That’s what I was thinking.
Is there any benefit to rotating the camera and backdrop around the object? The video mentioned consistency of the lighting. It seems to me that lighting would be more consistent if the rig was consistent in its orientation within the room during the scan.
I see a benefit if you want particular shadows and reflections baked into a texture map, but for anything that is not too bulky or heavy, I think rotating the object while moving the camera in the Y-axis is easiest.
the rotating backdrop in this case seems rather counterintuitive since you have the ability to track distant objects with a rotating camera frame, which can only help lead to better scans.
a fixed white background makes more since with a fixed camera arrangement with the subject being scanned mounted on gimbals.
in either case this guy is getting good results, so something he is doing is correct. i think my issues are lighting and the shitty 14.1 megapixel digital camera im using. its running dhck for remote triggering (so the arduino can command a shot) maybe there is a way to get rid of the compression artifacts and use lossless or raw formats. my scanner has the thing on a turntable and the camera on an adjustable height and tilt mount geared such that the focus stays at the center of the turntable, all built of lego. yet to get a good scan of anything, at least not better than manual scanning (which is actually quite good considering the camera im using).
It has to be your hardware/software setup, not your camera. This video shows the result of using 123D Catch on images taken with a 4MP SD450 that has a halogen chandelier sitting behind the camera for (somewhat) even lighting. Nothing about this image set was particularly well done, but it still worked out fantastically.
photgrammetry builds the 3d object by comparing all of the pictures and extrapolating the objects position in 3d space. if you rotate the object then the shadows that fall on the object being scanned move and make it harder for the software to match up points on the object, but if you move the camera around the object then the shadows don’t move and the software is better able to match up the points in separate photos.
you can make a system that rotates the object but you then need to build a lighting system that is evenly lit all the way around. he chose the simpler version of using his house lights and walking around rather than build a more expensive lighting rig.
I think the article is, probably because of the video, misdescribing how photogrammetry works. You do not need consistent lighting for the object capture (you want consistent lighting for the TEXTURE, the model doesn’t care).
Most photogrammetry tools use SFM to create a depth field. As long as the gradients from your input images are sufficient, you can have every image at different lighting. Again, texture is a different beast (there is software to take care of that, but most of the good stuff isn’t freely available).
Also the background does not have to be unchanging. If the background is “garbage”, all you have to do is strip out the points captured from the background, which even free software like meshlab can do with the snap of two fingers.
Leaving the object stationary removes any positioning inaccuracies from rotating it. Even worse would be having the object fall over, requiring starting the shoot over. The object can be glued or otherwise fixed to a rotating platform, but what about delicate objects or ones you’re not allowed to apply anything adhesive to or mechanically hold?
Time is money. Having to remove garbage data takes time, no matter how quickly it can be done, it’s still wasted time. Before the garbage is removed it takes up more storage space and increases the processing time.
As demonstrated in the video, this simple setup produces superior data to walking around it with a hand held camera. It just begs for some laser cut gears and curved racks so the picture taking can be fully automated. Plong an object on the table, click a button or flip a switch. Some time later you have a perfect set of images for photogrammetry – taken while spending time working on something else, like the pictures from the previous automatic session.
Yeah, I was thinking that the taking of the picture could be automated with something like chdk, or a remote trigger based on how far around the circle you have gone.
In my opinion, using a turntable for Photogrammetry makes most sense if you can automate the capture process as much as possible.
There is an affordable off-the-shelf smart turntable available that has a built-in infrared light that can trigger the shutter of almost every DSLR.
I made a tutorial about it if you’re interested: https://3dscanexpert.com/review-foldio360-3d-scanning-photogrammetry/
Cheers
FWIW, I would leave the base as a full circle, then mount some vertical strips of CRI 95+ LEDs (like the ones [DIY Perks] uses around the edges on the same type of curved mounts that the camera attaches to to provide completely uniform lighting no matter what lighting is available in the environment.