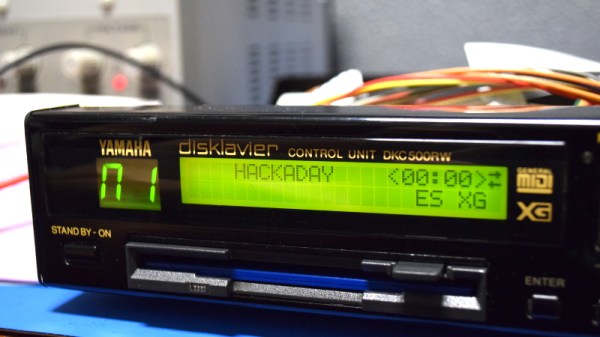
Repairdown: Disklavier DKC500RW Control Unit

If you’ve been kind enough to accompany me on these regular hardware explorations, you’ve likely recognized a trend with regards to the gadgets that go under the knife. Generally speaking, the devices I take apart for your viewing pleasure come to us from the clearance rack of a big box retailer, the thrift store, or the always generous “AS-IS” section on eBay. There’s something of a cost-benefit analysis performed each time I pick up a piece of gear for dissection, and it probably won’t surprise you to find that the least expensive doggy in the window is usually the one that secures its fifteen minutes of Internet fame.

DKC500RW installed on right side.

But this month I present to you, Good Reader, something a bit different. This time I’m not taking something apart just for the simple joy of seeing PCB laid bare. I’ve been given the task of repairing an expensive piece of antiquated oddball equipment because, quite frankly, nobody else wanted to do it. If we happen to find ourselves learning about its inner workings in the process, that’s just the cost of doing business with a Hackaday writer.

The situation as explained to me is that in the late 1990’s, my brother’s employer purchased a Yamaha Mark II XG “Baby Grand” piano for somewhere in the neighborhood of $20,000. This particular model was selected for its ability to play MIDI files from 3.5 inch floppy disks, complete with the rather ghostly effect of the keys moving by themselves. The idea was that you could set this piano up in your lobby with a floppy full of Barry Manilow’s greatest hits, and your establishment would instantly be dripping with automated class.

Unfortunately, about a month or so back, the piano’s Disklavier DKC500RW control unit stopped reading disks. The piano itself still worked, but now required a human to do the playing. Calls were made, but as you might expect, most repair centers politely declined around the time they heard the word “floppy” and anyone who stayed on the line quoted a price that simply wasn’t economical.

Before they resorted to hiring a pianist, perhaps a rare example of a human taking a robot’s job, my brother asked if he could remove the control unit and see if I could make any sense of it. So with that, let’s dig into this vintage piece of musical equipment and see what a five figure price tag got you at the turn of the millennium.

Continue reading “Repairdown: Disklavier DKC500RW Control Unit”

I Went To The Moon And All I Got Was This Lousy T-Shirt

It’s been a long time coming but [Fran] finally has a DSKY display, a replica of the user interface display found in the Apollo Guidance Computer. The best part? It’s a t-shirt.

This build is a long, long, time in the making first beginning in 2015 when Fran started investigating the DSKY of the Apollo Guidance Computer. At the time, there were reproductions, but honesty they were all terrible. The reproductions used off-the-shelf seven-segment LEDs or light pipes. The real DSKY was a work of art and at the time probably the most complex electroluminescent display ever created. This led [Fran] to a very special trip to the annex of the Air and Space Museum where she was allowed to inspect a real DSKY display. She got all the measurements, and with some non-destructive investigation, she was able to piece together how this very special display was put together.

With that information, [Fran] was able to figure out that this display was a fairly complex series of silk screens. If it’s silk screen, you can put it on a t-shirt, so that’s exactly what [Fran] did. This used a DIY silk screen jig with phosphorescent inks. It’s not an electroluminescent display, but it does glow in the dark.

While this DSKY t-shirt does glow in the dark, that means it’s not an electroluminescent display like the original DSKY. That said, screen printed electroluminescent displays on a t-shirt aren’t unheard of. Several years ago, a screen printing company did a few experiments with EL displays on wearables. Of course, if you want a real electroluminescent DSKY display, [Ben Krasnow] has a very modern reproduction of the screen printed display. The electronics of [Ben]’s project do not resemble what flew to the moon in any way whatsoever; the original DSKY had relays. That said, we’ve never been closer to a modern recreation of the display from an Apollo Guidance Computer, and we have [Fran] and [Ben]’s work to point us forward.

Continue reading “I Went To The Moon And All I Got Was This Lousy T-Shirt”

Tearing Apart Pulse Transformer Switches

If you like mechanical keyboards, you like switches. Historically, switches were weird, with strange capacitive rubber dome switches in Topre boards, buckling springs in the IBM Model M, and beamsprings in earlier IBM keyboards. This teardown of an HP signal generator has the weirdest keyboard switches ever. They’re being called pulse transformer switches, but they are the strangest, weirdest, and most complicated keyboard switch we’ve ever seen

Mechanically, these keys are mounted on a 1×5 plastic frame with a plunger that presses down on a (brass?) photoetched plate. Mechanically, this is effectively a metal dome keyboard that simply presses a springy bit of metal against a contact on a printed circuit board. That’s the mechanical explanation, the electrical theory of operation is much, much weirder.

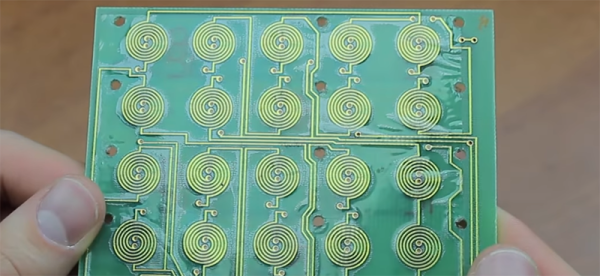
Electrically, this keyboard consists of a printed circuit board with two coils underneath each key. The circuit is wired up so two keys are ‘read’ at the same time with a pulse from a multiplexer. This pulse induces a current in the ‘sense’ coil of two individual keys which is sent to a comparator. If both keys are not pressed, the comparator sees a positive and a negative voltage which cancels out, meaning no keys are pressed. If one key is pressed, the metal dome shorts out the transformer underneath the keyboard, meaning only one voltage is seen by the comparator, and that key is registered as being pressed.

This is some crazy keyboard circuitry, and I do not say that lightly. There are ‘acoustic’ keyboards out there which consist of a row of keys striking a metal bar with an acoustic transducer on each end. By measuring the time it takes for the sound of a keypress to reach either end of the metal bar, a keypress can be registered. This is weird and expensive to build, and it’s still simpler than a pulse transformer switch. Check out the video below.

Continue reading “Tearing Apart Pulse Transformer Switches”