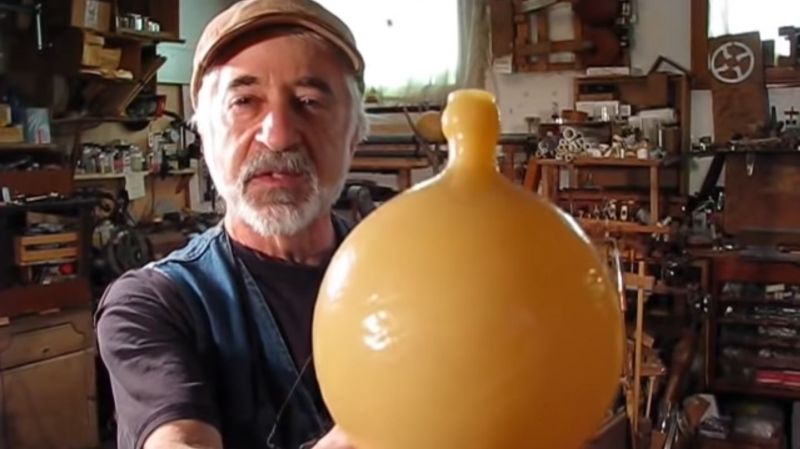
You would be forgiven for thinking that the semi-spherical bulb [Len], from the Bellowphone channel, is holding is a toilet bowl float. It is a bellows of his design that is similar to the squeezable part of a bike horn but is more substantial and less irritating at six in the morning. These rubber squeeze balls are old-school in the best way, and craftsmanship rolls out from every second of his videos. The backdrops to [Len’s] videos are alive with tools, materials, examples, and instruments the same way our offices and maker spaces erupt with soldering irons, LEDs, and passives.
His video walks through all the steps to make latex bellows starting with a rigid stemmed bulb and painting it with latex. This takes a bunch of coats with the associated drying time, so if you need a lot of bellows, you will want multiple bulbs. After coating of latex, we move to the contraption known as the Snout Master 5000. The SM5K looks like a wooden jig held in a table vise, but it is a purpose-built over-engineered chuck with four ball bearings held in a vise. When the latex is thick enough, the form is removed, and the bulb is repaired, then, more coats. Each ball has roughly twenty layers, and with three hours between coats, this is a weekend job at a minimum. Good things come to those who coat. The final steps are boiling the bulbs and adding a silicone preservative. They can last up to a decade with proper maintenance.
We see lots of electronic and automated instruments here, and spherical balls are definitely on the human interface spectrum, but the techniques we see from [Len] would allow anyone to design their own bellows more conducive to mechanization. [Len] says one of his inspiration is [Harry Partch] and his Blo-Boy, an organ powered by fireplace bellows. We think these squeeze balls are even better.


No school like old school. Old fashion printmaking techniques found their way into chip design (Lithography). Millennials discovered small scale printing presses a decade or so ago. Innovation is almost always iteration so learn what you can. Just be careful that it doesn’t become an in joke with your peers that your the guy that found out about Gingery machines, and next thing they know you’ll go out into the woods to mine ore (no I didn’t get THAT bad).
If you can get past the arcane application this is wildly useful for anyone interested in pneumatic handlers, bellows formation, water bladders and the like. Yes, silicone is wonderful too, but old-school paint-on latex over a mold is a simple entry point just because it’s easy and bonds to itself so well.
I would have loved to see him attempt homebrewed vulcanization with sulfur and heat though.
Wonderful to watch. He is delightfully funny in a suBtle way. Thanks Brian.
Tag: LaTeX. Hahahahahaha.
Got to see and play one of his instruments at the Montshire museum in Vermont, lots of fun!
I hope he does more “making-of” videos..
I’m glad you enjoyed my instrument at Montshire.
That’s not a boiler! It’s a Vulkanizer 5000!
It’s still in beta; that name was supposed to be Top-Secret!
Nice video. Patiently informative except for the BOILER. It was as if Len turned into a frog and leapt out of that pot before telling us how long to cook’em. Just saying’.
Sorry about that boiler; I plead insanity. You boil them about 15 minutes.
Would be easier to make a hollow two part mold and roll the latex around inside.
I actually did try that, and several related methods. They ended up being more work and poorer results. On my Youtube channel in the comments for this video, there are some more detailed discussions of this topic, if you’re interested.
Did you end up trying a negative plaster mold (slip cast)? that seems the most promising to me
I did try that, but I made a critical mistake, in sealing the inside of the mold with varnish. The point of slip casting with latex, which I didn’t know, is that the plaster will actually absorb a significant amount of moisture through its surface, helping the latex to cure. By sealing the inside surface, I prevented this and allowed the moisture only the half-inch hole in the mold for dissipating moisture. Each coat would take many days to dry, sagging in the process and ruining the cast. I plan to make a new mold and try it again, at some point.
Yeah, I read that comment, thought it was an old one and that you might have tried by now. I think it’s worth pursuing, as it is a very consistent technique (at least with ceramics). I actually remember using it with ceramics at some point, and using varnish *only* on the pour spout, so that I’d get no thickness there…
also, this time i will trust that my comment is posted, and not try again and again (even if it doesn’t show for 3 hours)
Did you end up trying slip casting into a negative plaster mold? that seemed the most promising.
Did you end up trying slip casting using a plaster mold?