For years we’ve seen a trickle of really interesting home automation projects that use the Node-RED package. Each time, the hackers behind these projects have raved about Node-RED and now I’ve joined those ranks as well.
This graphic-based coding platform lets you quickly put together useful operations and graphic user interfaces (GUIs), whether you’re the freshest greenhorn or a seasoned veteran. You can use it to switch your internet-connected lights on schedule, or at the touch of a button through a web-app available to any device on your home network. You can use it as an information dashboard for the weather forecast, latest Hackaday articles, bus schedules, or all of them at once. At a glance it abstracts away the complexity of writing Javascript, while also making it simple to dive under hood and use your 1337 haxor skills to add your own code.
You can get this up and running in less than an hour and I’m going to tackle that as well as examples for playing with MQTT, setting up a web GUI, and writing to log files. To make Node-RED persistent on your network you need a server, but it’s lean enough to run from a Raspberry Pi without issue, and it’s even installed by default in BeagleBone distributions. Code for all examples in this guide can be found in the tutorial repository. Let’s dive in!
What It Is
Node-RED is a graphical programming language built on Node.js. It implements a server and runs what are called “Flows”: programs based on Javascript. Why would you want to run a server-side IDE for your programs? Because Node-RED also makes it dead simple to spin up web apps and use them as your online information and control system.
Installation
To make your Node-RED programs persistent you do need a server, however, if you just want to play for now you can run locally. Your server can be as simple as installing the platform on a Raspberry Pi or an always-on computer on your LAN. Prerequisites include Node.js and npm (the Node.js package manager) which on a Linux system are an easy install.
sudo apt install nodejs
Now we can install Node-RED and, to follow the examples below, you should also install the dashboard package:
npm install node-red
npm install node-red-dashboard
To run locally you can just type node-red in the terminal. However, the more eloquent way to run this is as a systemd service. Copy the contents of the nodered.service file to /etc/systemd/system/nodered.service and update the User, Group, and WorkingDirectory variables in that file to match an actual user on your system. With that in place, just enable and start the service. It will now restart on a crash or system reboot from here on out.
systemctl enable nodered.service
systemctl start nodered.service
You can now load up the Node-RED IDE simply by visiting localhost:1880 in a web browser.
Hello World
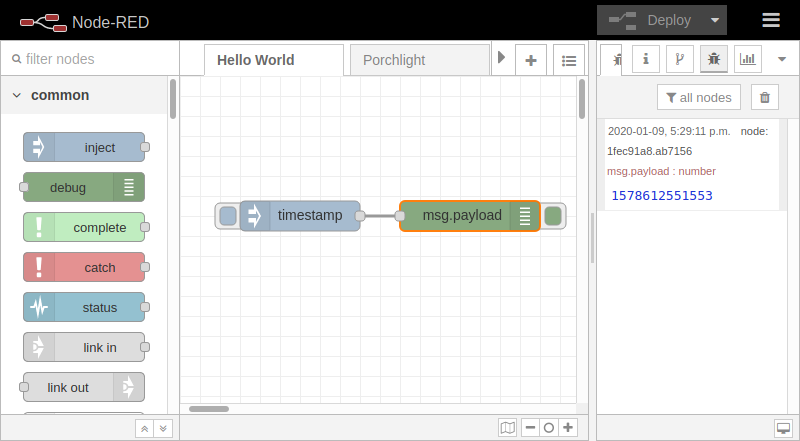
The simplest thing to do as your first “flow” in Node-RED is: click button, get timestamp. To make the image above I did nothing more than drag the “Inject” and “Debug” nodes from the left column into the center, then drag the line that connects the two nodes. You need to click the “Deploy” button on the upper right any time you make changes, and then clicking the button hanging off the left side of the inject node, which has the “timestamp” label by default, to spit out the time in the debug window. Click the bug icon in above the right window if you’re not seeing the debug output.
This example isn’t very useful, but that’s not the point of Hello World code. This drives home the power of the graphical code system. What’s also interesting is that flows can be exported as json files. Here’s what this Hello World looks like and it can be imported to your own Node-RED installation.
[
    {
        "disabled": false,
        "id": "ff177395.3cf468",
        "info": "",
        "label": "Hello World",
        "type": "tab"
    },
    {
        "crontab": "",
        "id": "1c6883be.759c24",
        "name": "",
        "once": false,
        "onceDelay": 0.1,
        "payload": "",
        "payloadType": "date",
        "repeat": "",
        "topic": "",
        "type": "inject",
        "wires": [
            [
                "1fec91a8.ab7156"
            ]
        ],
        "x": 200,
        "y": 140,
        "z": "ff177395.3cf468"
    },
    {
        "active": true,
        "complete": "false",
        "console": false,
        "id": "1fec91a8.ab7156",
        "name": "",
        "tosidebar": true,
        "tostatus": false,
        "type": "debug",
        "wires": [],
        "x": 370,
        "y": 140,
        "z": "ff177395.3cf468"
    }
]
MQTT Quickstart
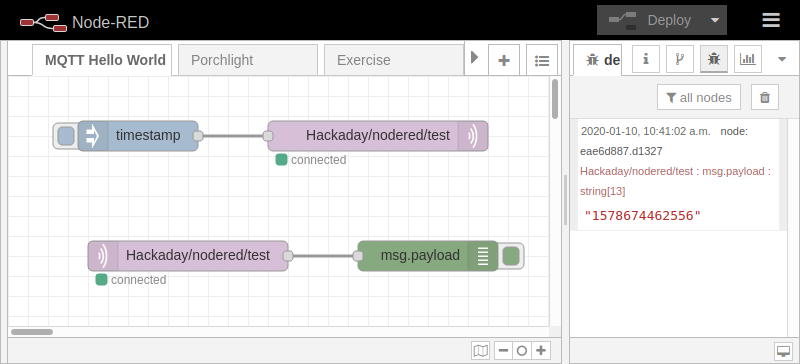
Node-RED feels like it’s made specifically to be used with MQTT, the popular Internet of Things protocol for which Elliot Williams has written a fantastic guide. It feels that way because an MQTT client is built in and most of the nodes have “topics” as well as message payloads which is all you really need to communicate with an MQTT broker.
As you can see above, I’m doing the exact same inject/debug trick but now I’ve dragged an “mqtt in” and “mqtt out” node from the “Network” column of possible nodes.
There’s slightly more setup here as we need to choose an MQTT server and select a topic to publish to and listen for. But the interface makes this very easy, just double-click one of the MQTT nodes. Here I’m using the mosquitto test server (test.mosquitto.org)and the topic Hackaday/nodered/test. Just realize that anyone looking at messages on that server can see this and if you use the exact same topic you may see other readers sending test messages. Node-RED can actually be used as an MQTT broker as well.
Try double-clicking the inject node and changing the payload from timestamp to a string and you can send your own custom messages. For the most part I find it easy to find my way around Node-RED and playing with settings is low-effort. Just make sure to hit the deploy button — your changes won’t actually be in place until you do.
Web Gui Hello World
 Let’s get to the really exciting part of Node-Red, the ability to spin up a web app with very little effort.
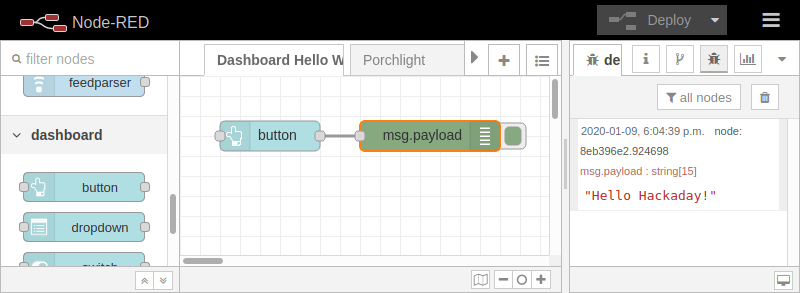
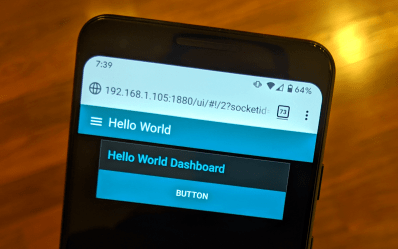
Here you can see a smartphone displaying our app. The only really useful part here is the button. Click it and you’ll get “Hello Hackaday!” in the debug window of Node-RED as seen above. All it took to create this page was to install the dashboard package for Node-RED and then drag a button onto the canvas. Once deployed, your web app will be located at localhost:1880/ui
Installation of the package is a simple one-liner:
npm install node-red-dashboard
Dragging the button onto the canvas and hooking it to a debug node is also simple, but you need to do just a bit of configuration. Double-clicking on the button node you can change the payload to affect what message is sent to the debug window, but you also need to set a Group, and within the group edit dialog you’ll need to set a Tab. This affects the web app, with Groups organizing blocks on each page of the web app, and Tabs selecting different pages from the hamburger menu at the upper left. You can name groups and tabs however you like.
Let’s Build a Web App!
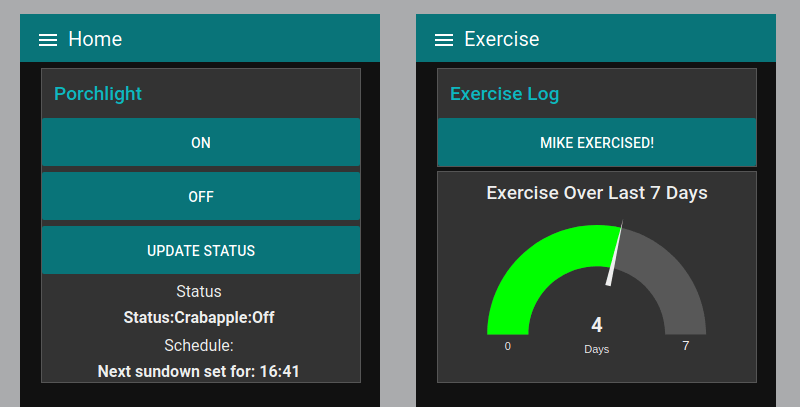
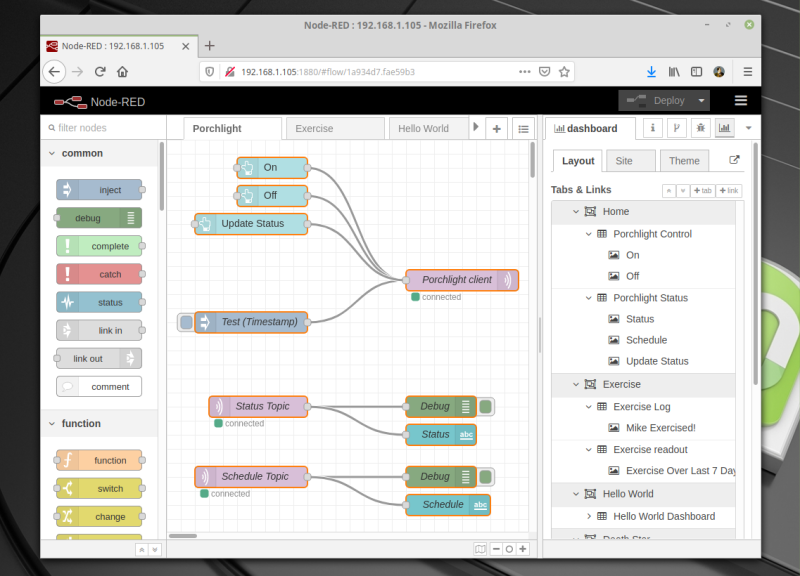
Enough with the Hello World code, let’s build something useful. I’ve been using Node-RED for a month or so and have built up a couple of useful apps, one interacts with my MQTT broker to control and monitor my front porchlight, the other I use as a simple button-press to keep track of the days I exercise. Let’s build up the exercise app bit by bit because there’s more to it than merely sending MQTT packets back and forth.
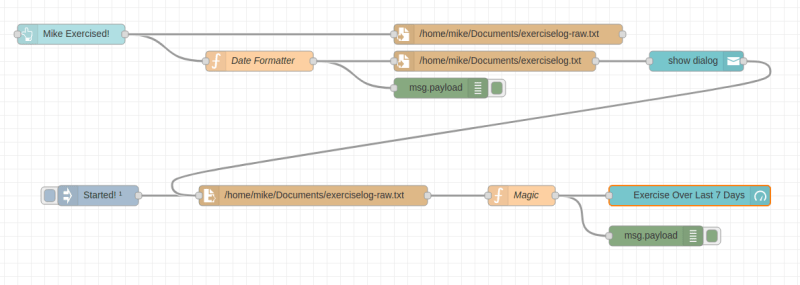
Here is the current state of the exercise app, which includes a button that records today’s date to a log file and a gauge that reads the log file to display how many of the last seven days have included exercise. Let’s build it up one block at a time.
GUI Button Writing to Files

This is where the flow begins. It consists of a button from the Dashboard package that sends a timestamp when clicked. This message will be logged to two “file” nodes, the first is exerciselog-raw.txt which simply records one UNIX timestamp for each line. That’s not human readable, so the second file node has a function node which translates the timestamp using the following JavaScript snippet. There’s a bit of magic in there to make sure the month and day are always two digits.
var date;
date = new Date();
var year = date.getFullYear();
var month = date.getMonth();
month = (month < 9 ? '0' : '') + (month+1)
var day = date.getDate();
day = (day < 10 ? '0' : '') + day
msg.payload = year + '-' + month + '-' + day;
return msg;
Adding a User Notification
The button works as expected, but it gives no feedback to the user. To improve upon this I added a notification node from the dashboard package. It is connected after the file node to confirm that the date had been written to the log file.
Reading a File, Displaying Data, Refreshing at Startup

This last part of the flow uses the tan “file in” node to read UNIX timestamps from the raw log file and displays it on the teal “gauge” node from the dashboard package. It is activated by two different triggers, one updates after a new date is written to the log files. The other is the lavender “inject” node which has an “index once after n seconds” option to populate the initial data when Node-RED starts.
The gauge is just looking for a number to populate and this is fed by a function node (I called it Magic). The following code reads in the logfile as an array, figures out the UNIX date code for seven days ago, and then iterates back through the last seven timestamps in the log file.
//Turn incoming timestamps log into an array:
var exercisearray = msg.payload.split("\n");
if (exercisearray.slice(-1)[0] === "") exercisearray.length = exercisearray.length-1

//Get timestamp for week ago to compare against
var thismorning = new Date()
thismorning.setHours(0)
thismorning.setMinutes(0)
thismorning.setSeconds(0)
thismorning.setMilliseconds(0)
var sixdays = 1000*60*60*24*6
var oneweekago = thismorning.getTime()-sixdays

//Iterate and count past week of exercise
var count = 0
var secondsinday = 60*24*7
for (var i=1; i<8; i++) {
  if (i>exercisearray.length) break;
  var testval = parseInt(exercisearray.slice(-i)[0]);
  if (testval >= oneweekago) ++count;
}

//Store our answer as the payload and pass along
msg.payload = count;
return msg;
Give Node-RED a Try!
 One of my first concerns with the platform was version control but that’s available too. There is git integration built-in called Node-RED projects but it’s not enabled by default. I’m not accustomed to using a GUI for git, but then again I’m not accustomed to graphical programming interfaces so it doesn’t hurt to try something new.
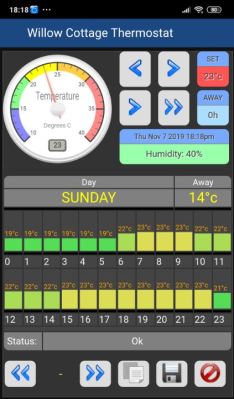
The examples I’ve shown here are really the tip of the iceberg. Look around and you’ll find a ton of enthusiasm for Node-RED which translates to incredible flows and awesome web apps. For instance, I’ve been reading Scargill’s Tech Blog for years and there you’ll find a ton examples of what can be accomplished. Here we see Scargill’s thermostat control panel that has all kinds of customization to give it a special look. Finding examples that you like isn’t hard, and copying their code is even easier.
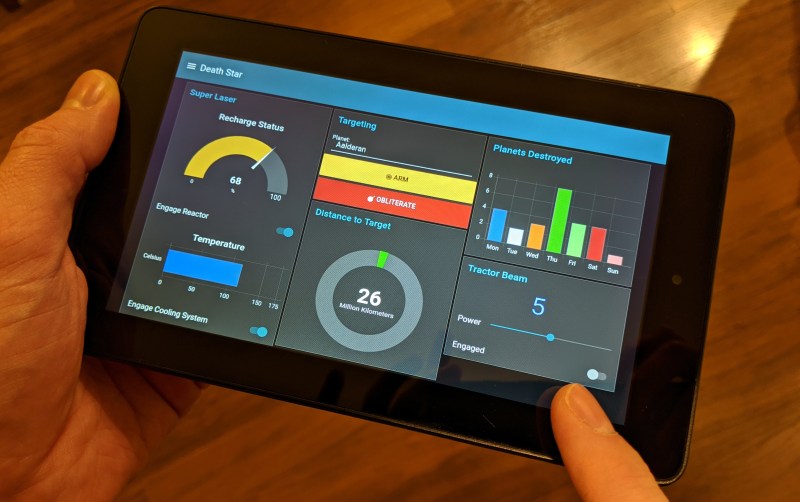
You can easily pick up Node-RED in an afternoon and end up with something useful. For those who want to spend more time, the sky’s the limit. If you have any kind of home automation, it’s something you must try as it unlocks the ability for anyone on your LAN to access information and control without installing an app. You can easily pull a disused smartphone out of the drawer and turn it into a dedicated control panel, something I did for the image at the top of this article with the help of an Android app called Fully Kiosk Browser Lockdown for a true fullscreen browser experience not provided by Chrome or Firefox for Android. Give it a try with your own surplus gear!



Yay! more java-script craplets!
I can pollute my system with NodeJS and Node-RED that installs tons of unverified crap, that wants extended access to my files.
Also, I can use MQQT, the “lightweight” broker platform, to send messages that could easily be encapsulated in UDP or any other protocol.
All you need to run it is a 4 core, 4GB machine, sucking 100W, wow! such lightweight, such usefulness, many wow!
If you are going to whinge, can you at least keep up with the times? A modern 4 core 4 GB machine only takes about 20W.
JavaScript is becoming a leading programming language for IoT due to the popularity of Node.js
source : https://wiki.yoctoproject.org/wiki/TipsAndTricks/NPM
Which doesn’t mean it’s a good thing
@Bill Gates Surely 640k is not enough for that :)
I’m running it on a raspi and it works like a charm.
It monitors an old UPS through serial port , displays data on UI webend with gauges and histogram graphs etc. also it reports grid failures with push messages (via pushover) and a message to a XMPP chat room. It monitors asterisk server (seperate machine) event stream for incoming-outgoing calls and queries callerIDs from a webservice and reports them to chatroom. It queries a webservice regularly for locations of the company vehicles and pushes them to worldmap webend also sends locations to tile38 server (on another machine) to check geofence in-out events. When a geofence event occurs tile38 calls back a webhook so node-red reports to chatoom and displays a notification on UI screen. It monitors chatroom for /commands for inventory queries from our legacy system on mssql. It grabs exchange rates from central bank website and reports back to chatroom. It regularly checks certain webpages for updates, checks mailboxes for certain subjects reports back to chatroom.
All that works on a raspi 1 b+ with 512mb ram.
That’s silly. I’ve used Node.js for production on VMs that only have 512mb ram and 1 slow cpu core.
It can be lightweight or it can be expensive. It’s up to the code, like any software.
Well, it runs perfect in a docker container in my Raspi 4, and it worked perfectly in my Raspi 3 also. So it’s not that way. And running in docker means that it’s (normally) a layer more of security for your system, and a layer more abstraction for you system. so your system doesn’t have to have all those javascript installed, I just run a vanilla Raspbian with docker.
(I had 9 containers running, plus raspbian, as a headless machine, and in a couple of days running it never passed the 1Gb Ram usage).
Also, MQTT it’s pretty lightweigt, I used years ago in 8bit Mcu and worked flawlessly (last will and QOS are nice feats), and I haven’t to reinvent the wheel, so again, unless you are proposing to make every step in your workflow bit by bit (that would be perfect for you if you want that, I’been there, done that). It’s really much easy and usefull (sending IOT data and other simple messages).
I highly recommend the video from Andreas Spies where he explains a simple process to use a script to install a full stack of frameworks/utilies for a IOTServer in a Raspberry Pi.
https://www.youtube.com/watch?v=a6mjt8tWUws
I really hope to make myself clear (and not had make any offense), as it’s easy to see that Im not an English speaker, I expect not to be bothered with that kind of critics, but technical ones.
Do you get access to the GPIO pins running it in a container?
Yes, you can access the GPIO from a docker container, I do it for my irrigation system no probs! Just need 32bit raspbian
I share your disdain for MQTT. It has some features for IoT sure, but nothing mindblowing and worth moving away from the HTTP stack, particularly on a non-metered connection. It’s proponents tend to just insist on it as the de facto IoT standard.
Correct me with a comparison of bytes per message between MQTT and WebSockets. I’ll happily change my mind.
You are assuming TCP/IP. MQTT have no such requirement.
Ok, what framework or protocol can you recommend that’s implemented in UDP and offers customisable QoS levels, pub/sub, notification on disconnect, authentication and has client libraries in these languages: https://github.com/mqtt/mqtt.github.io/wiki/libraries ?
Or are you suggesting the average user should code something like this from scratch?
QoS is particularly relevant to your comment – I could tell you a joke about UDP, but I don’t know if you’d get it…
My actual, real-world experience running a network of MQQT clients in python + Java / on Raspberry Pi 2s talking to a server on a Pi3 (which also runs node-red) in an industrial application for about two years, has been overwhelmingly positive.
But still, I’m interested to hear about the alternatives.
+1 for that joke
+1
The UDP joke! As good as the TCP joke: you just keep re-telling it until they get it. And if you tell parts out of order, it’s no problem.
But on MQTT: this. It provides a relatively lightweight set of guarantees, and the pub-sub / persistance stuff is great. You _could_ implement all this yourself. But why?
I haven’t really used QoS — I just abuse the retain flag to do the same thing. (Make sure responses are idempotent.)
I didn’t really realize the full utility of the pub/sub concept until I built it into my (simple) home system. Decoupling everything from everything is a huge win. Adding new features, and playing around with existing ones, is a joy because you only need to work on one side of the system at any given time.
All this, and it’s content agnostic, which some people see as a drawback (no framework!) but I personally see as a feature (no framework!). It’s lighter than HTTP, more reliable and less fiddly than UDP or anything without a broker in the middle. It’s Goldilocks, for me at least.
Plus PLCs from companies like Siemens are now coming with MQTT servers built in by default, it’s all about interoperability and COTS.
Pretty sure you could also do it with a 555 timer.
OpAmp FTW!
Node.js is like any scripting language. I highly doubt python’s packages is secure or verified either (it’s also very popular for IoT).
You don’t need a 4 core 4gb machine either. I write and run node.js applications all the time on virtual machines that only have 512mb ram and a really slow single core cpu.
I think you just have a vendetta against something you don’t understand. Drop the ego. There is no need for jimmies to be rustled.
Gee, I manage a massive IoT system with 7 million data sources streaming 70 billion data points a day from (at this time) over 650 utility scale power plants.
It runs over MQTT. We even use Node-Red in places.
Your opinion, especially the “easily be encapsulated in UDP” is laughably wrong. I have seen the miserable results and ever expanding maintenance (bug fixes) costs created by the “I can just build it from scratch” mentality.
The wide user base of MQTT creates very solid code in a variety of server implementations and diverse tools for nearly every scale of problem. Just the logistics of following your “do it with UDP” philosophy is absurd. Have fun dealing with that when you get past a few connections. I suppose you can do it, but it would require some form of broker system. Hmmm, that sounds like MQTT.
I work in a world with tight security regulations, the Feds don’t like it when power plants get hacked. Somehow we managed to get all our JavaScript libraries in validated and secure ways. Maybe it just seems hard if you don’t know what you are doing. That is definitely NOT the person I want building a from scratch, UDP based communications system.
As for Node-Red. It is a great tool for creating quick and easy workflows. One so simple, I can hand it off to hundreds of mechanical and electrical engineers. They figure it out fast, do their own work and help us avoid millions of dollars per year worth of programmer/IT hours focused on the little micro projects they need.
They are happy, my budget is happy, and the best part, with a bit of organization we have set it up to be nearly unbreakable. That is no small feat when you are dealing with Electrical and Mechanical Engineers pretending to be programmers. They are smart people, but don’t even realize how little they understand about IT or programming.
As for the power claims you make, I will give you the benefit of the doubt and suggest that you are just ignorant, not disingenuous. I have Node-Red and systems utilizing MQTT on some of the tiniest, low power SBC systems out there. Even a handful collecting Met data (weather) that run on a small solar panel & rechargeable battery.
Please take a bit of time to educate yourself before spouting off unqualified opinions like this.
Synchronicity! I was trying to string together some bits in node-red as this appeared on my feed reader!
Now that I have a hammer, I’m looking for nails at every turn. Been building up little web interfaces for stuff all week and having fun doing it!
I’m still a bit wonky at the layout and sizing for the web app elements but I think I’ll get the hang of it eventually.
I have used MQTT with Node-Red for home automation for a while now. In general it works really well and allows new capabilities to be easily and quickly added to a HA system. The main limitation for me was security. While MQTT can be set up with strong security, at the time I was setting up my system Node-Red security was limited, especially the web based dashboard. So, I use Node-Red for my HA server logic which communicates to an app based GUI via secure MQTT (with client side certificates). To speed up front end development as I add new functionality, I use App Inventor/Thunkable for the app but they need a workaround/paid extension to support secure MQTT. A HA web GUI has different security requirements than a regular web site as it is much less important to verify the web server and much more important to verify the client.
Has anyone with a deeper understanding of Node-RED run across a clever way to build a sequence of steps that can execute in order, something like how ladder logic in a PLC works?
The classic node-RED examples of simple button presses, or alert to the cloud or a log, or throw a voltage on a dashboard are interesting but limited.
I run about 25 Pi’s all running Node Red on a manufacturing line which operates 24/7 producing ~60k parts a day. Each Pi is running an instance of Node Red which loads a common flow file from a network location, sets machine specific parameters from an SQL database and logs data back to the database, as well as proving real time into to a number of dashboards via MQTT, which is running on our own broker on another Pi.
To some degree you need to think of programming in node red in a slightly different way to PLC’s, or native coding. You’re basically building a flow chart, mixed with a state machine where the messages themselves are the clock signals. Therefore, each ladder step can be made using a switch or change node, and combined with some function nodes you write yourself you can do most things just with those three blocks. Bear in mind you also get node, flow and global variables to play with which can be made persistent across reboots, so a change node can set a flag and send a message.
To implement something closer to ladder logic using core nodes look into the hold node. It holds a message until a trigger input arrives.
Using non-native nodes, this is what you want. It’s basically a gate which you can switch on and off.
https://flows.nodered.org/node/node-red-contrib-simple-gate
Thank you for the insight! It will be helpful for me in considering node-RED for some future projects.
I’d tried searching for state machines in the node-red repo. I’d seen two entries that didn’t make that much sense to me. Gates (and the q-gate) sound interesting.
Hi Droberts.
I am about to dwelve into something akin to your setup; running multiple (up to 100 i guess) RPi’s on the shop floor.
And thus I have some questions to your setup:
+ How have you overcome the problem of corrupted SD cards
+ how do you manage a large fleet of PI’s – can you recommend any tools?
+ making data persist between reboots will also wear on the SD card, have you done anything to handle this?
Hoping to hear your experiences :)
Network boot/storage
Corrupt SD cards is a hard one, we haven’t actually had many faliures as Node Red lives in RAM, and we don’t log anything locally. The few that have normally also involved a dead Pi. We don’t have LAN on the shop floor, if we did network booting would be the way forward. I’m aware of one place running redundant Pi’s actually running their line that way!!
Managing the Pi’s isn’t too bad as we have one central set of flows they all use (so we update code on one, test it, then copy to the network location and restart Node Red to reload the new flows). We have scripts to update Node-Red itself when needed (rarely). Starting from scratch we’d have used the GIT integration but we haven’t particularly needed it. There’s a tool called Nebula from Iotobox which is aimed at bigger installs. Haven’t used it personally.
In short, no. We buy decent SD cards with plenty of free space. If one does worst case is we miss a few hours data unless maintenance is slacking!
I’ve done time based stuff, it reads a clock and after 10 pm do something. There is no built in sequencing, but you can make nodes that are sequencers.
I’m very much a novice, but I’ve been using MQTT and Node-Red (both running on the same Raspberry Pi 3) for a while to manage environmental info at home (temperature, humidity, power consumption, furnace operation).
A few ESP8266’s around the house transmit their info via MQTT, which then gets picked up by a Node-Red flow, reformatted, and shipped off to the data storage / visualization service du jour (used to be Thingspeak, now InfluxDB and Chronograf running in the cloud).
It’s of course very possible to send data straight from the ESPs to Thingspeak or your cloud service of choice, but the advantage here is that adding a new “destination” only involves setting things up in one place (Node-Red) rather than going in and reprogramming all the ESPs.
My version with esp32 and 8266 node coding examples is at
http://enginemonitor.blogspot.com/2019/04/thermostat-and-node-red.html?m=1
I’ve never even heard of Node-Red until yesterday’s article about the duck shooting game. I’ve to check this out (i.e., Node-Red, though the duck shooting game is pretty cool, too).
I just started with it a couple weeks ago while researching how to use MQTT to send data from an ESP32 to other devices. Then I found out it had an EISCP node for controlling Onkyo/Integra network receivers, which is what I want to do with the ESP32 and was hooked. I have a prototype running with an ESP32 that has an OLED and a rotary encoder hooked up to it
whoops, wasn’t finished with that…
I have a prototype running with an ESP32 that has an OLED and a rotary encoder hooked up to it. This sends MQTT messages that Node-Red subscribes to and performs actions on. In turn, the flow I have configured in Node-Red can send a command to my Integra DTR 4.9 receiver (which has an Ethernet port connected to my LAN).
Right now, it’s just a proof of concept to see if I could get an ESP32 with a rotary encoder to send volume commands to the receiver. At the moment, it connects to WiFi, then to the Mosquitto server. Once connected, the OLED shows current volume, turning the knob causes messages to be sent via MQTT, which are picked up by Node-Red. The flow in Node-Red sends to an EISCP node, which sends a properly formatted message EISCP message to the receiver over the network, which then sets the volume to whatever number was last sent by the ESP32.
Eventually, the rotary encoder will be joined by an ILI9341 with a capacitive touchscreen to make a full blown, ESP32 based universal remote using Node-Red and Mosquitto as the back-end. Currently, I have it all running on a headless Raspberry Pi Zero W, including LIRC to send IR commands as well as Pi-hole. All running in 127MB of RAM on DietPi with RAMdisk logs and no swap.
Nice! How long is the lag going through all those hoops? Do you keep a public build log for this project?
Or just use Home-Assistant for all that, which easily integrates with NodeRed, AppDaemon, and a ton of other things.
I wrote tons of own automation code. I also used hass and test 5 other. But I must say that node-red has been life saver. It just save tons of time
The main advantage of MQTT is its ubiquity. The main downside is that it uses TCP/IP which, being connection based, is not well suited to battery powered IOT devices. One of my devices is a simple push button that is normally powered down, only firing up when the button is pressed. I can’t remember the exact timings but it takes a couple of seconds to set up the TCP connection on an ESP8266 so there is a lot of lag. UDP is much faster so I use CoAP for battery powered devices. The problem with CoAP is that it is not as well supported as MQTT so more work is required in implementation.
If you use static addresses for your push button, you can save a lot of time by avoiding the DHCP handshakes.
https://hackaday.com/2020/01/15/one-esp8266-one-battery-one-year-and-counting/ and the articles it links to will get your on-air time down to around 1.5 sec per update, assuming a small MQTT payload.
Basically: cache the channel # and MAC of the AP, use static IP. That saves you like 4 sec, and is a huge win with almost no effort. Getting lower is where it gets tricky…
For those that are interested in something similar but different check out Codesys 3.5. Free to download and use you can use it on Raspberry Pi’s and Beaglebones.
I find setting up complicated logic much easier with Codesys.
I use it at home and at work for custom automation of a wide variety of things. Nothing as intense as the factory floor Node Red setup up thread though…
It’s awesome product , esp for free.
Tutorial never get past
“npm install node-red”
npm WARN npm npm does not support Node.js v10.15.2
npm WARN npm You should probably upgrade to a newer version of node as we
npm WARN npm can’t make any promises that npm will work with this version.
npm WARN npm Supported releases of Node.js are the latest release of 4, 6, 7, 8, 9.
npm WARN npm You can find the latest version at https://nodejs.org/
On debian stable. Guess I will spare myself dependency hell…
Thank you for tuning in for today’s Olds at Ten. Our headline tonight “Debian stable not up to date”. Stay tuned for “Batteries need to be charged”, and our fascinating editorial “Can Greeks bearing gifts be trusted?”
nah it’s just the case of not just use debian apt source, got it running now (on WLS).
And debian is quite better than ubuntu where I have a bunch of issues on it.
FYI, for those looking to get started quickly on the PI there is the IOTStack script that installs a bunch of the home automation software in containers and with automatic backup: https://github.com/gcgarner/IOTstack
I got to the systemctl enable mqtt+porchlight.service step and that failed. I’m assuming i need some sort of MQTT broker installed? I’ll google it for myself but for the benefit of those of us who will find this article later on the timeline it’d be nice to have that updated to include whatever might be missing. Thanks for the article!
Ooops, that’s my fault. The service you’re starting should be the same as the filename you made in the systemd directory. So it should be:
systemctl enable nodered.servicewhoops i should have read more of the article first before saying I couldn’t find the MQTT stuff. Sorry! IT’s in there I just didn’t read the whole article before putting in my last comment. hopefully that comment and this one will not post so that the internet won’t make fun of me.
For me, node-red is my home keeper. It keeps track of people leaving/coming to house (using apr packets sent when phone connects to wifi network) and puts my home in ‘away’ mode (turns down heater, puts lights in scheduled mode, starts security cams) and does reverse when folks come back. Also monitors my emails for delivery confirmation when UPS leaves a package on porch without ringing bell (package theft is common around here) and makes my google home scream that I need to pickup the package before porch pirates have a chance. Also senses magnetic field changes in my old doorbell’s transformer , to see if someone rang the doorbell and takes snapshots from dumb security camera and sends it on my phone. Checks charge level in my electric car and if it is below a threshold in evening, it sends a notification to my phone to plug it in. I could go on on and on.
BTW I am a programmer, what I love about node-red is, you are putting things graphically (combining flowchart with code). So you can build pretty complicated flows without losing track of what you are doing. You can use pre-built nodes or can add your own complicated logic if needed.
And this code has been running on a 6 year old laptop. Now porting it over to a 4 year old broken screen android phone.
So no, nodejs does not require i3 or i9. it will do fine on a 4 year old android phone.
I am teaching this topic to my older daughter at the moment as she has a project where she wants to implement a sensor network and node-red is very convenient, but it leaves me feeling a little guilty that I am doing the equivalent of using a mainframe to monitor a doorbell because the tech involved is way more powerful than what it took to get men to the moon. Perhaps when it is all working we can revisit the task and see how much we can do with a minimalist system built up from as low a level as possible, because the sheer complexity of the entire system is a recipe for unreliability. So yeah great for learning, prototyping and proof of concept demonstrations but perhaps overkill for a final implementation.
Yeah, it does feel a little bit like some sort of impostor syndrome, doesn’t it using such high tech for a low level task?
The way i reason with this is: computers get better and better, but not all tasks do. When all factors are in, a commodity computer is the best tool for the job most times.
IoT really? So you like the ability for some hacked off Russian shut down a grid or two just so you can keep track of your Tropicana orange juice consumption? Genius. Gots to love all them EMFs too yay!